Kit Upload
This page contains:
Kits allow you to configure your instance with a single upload. Kits can do the following:
Create projects
Upload methodology templates
Add Note templates
Upload report templates (Excel, Word, HTML etc)
Configure report template properties
Configure the Mappings Manager
Create Rules in the Rules Engine
Creating a kit
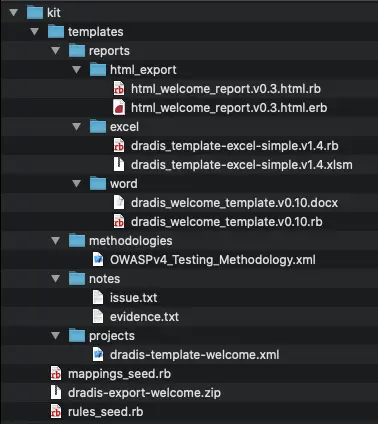
The kit is simply a .zip file that contains the specific files that you need to upload. The kit must follow a specific structure.

If you run into the following error when you upload a kit that you created, don't worry! There is help.
[13:54:00] An error ocurred: No such file or directory @ rb_file_s_stat - /tmp/d20200804-10496-11ca0p0/kit/templates/methodologies/.
You're going to need to zip your kit via the command line. To zip via the command line, first navigate to the folder where the kit folder lives, then run:
$ zip -ur kit.zip kit
If you're on a Mac and want to skip all the hidden files:
$ zip kit.zip -x \*.DS_Store -x \__MACOSX -r kit
When you unzip a kit.zip file, you will see the following:
- A project package file (e.g.
dradis-export.zip) - A
mappings_seed.rbfile that creates Mappings in the Mappings Manager. - A
rules_seed.rbfile that creates Rules in the Rules Engine. - A
/templatessubfolder
The Templates
-
The /templates/methodologies subfolder
This folder contains any methodology templates that you want to add to your instance. Example,
OWASPv4_Testing_Methodology.xml. -
The /templates/notes subfolder
This folder contains any note templates that you want to add to your instance. Example,
issue.txt. -
The /templates/projects subfolder
This folder contains any project templates that you want to add to your instance. Example,
dradis-template.xml. -
The /templates/reports subfolder
This folder contains 3 more subfolders:
/templates/reports/excel
/templates/reports/html_export
/templates/reports/word
Add any report templates that you want to add to your instance. Example, dradis_template-client.v0.1.docm (in the /word subfolder), dradis_template-excel-client.v0.1.xlsm (in the /excel subfolder), dradis_html_template.html.erb (in the /html_export folder).
Configure Report Template Properties
To automatically configure report template properties on upload, create an .rb file that has the same filename as your report template. For example, if your report template is "dradis_welcome_template.v0.5.docm", the configuration file name would be dradis_welcome_template.v0.5.rb.
Example .rb file:
ReportTemplateProperties.create_from_hash!(
  definition_file: File.basename(__FILE__, '.rb'),
  # plugin_name: 'excel',
  plugin_name: 'word',
  # plugin_name: 'html_export',
  content_block_fields: {
    'Conclusion' => [
      {name: 'Title', type: 'string', values: nil},
      {name: 'Type', type: 'string', values: 'Conclusion'}
    ],
    'Scope' => [
      {name: 'Title', type: 'string', values: nil},
      {name: 'Type', type: 'string', values: 'Scope'}
    ]
  },
  document_properties: [
    'dradis.project',
    'dradis.client'
  ],
  evidence_fields: [
    {name: 'Details', type: 'number', values: nil}
  ],
  issue_fields: [
    {name: 'Title', type: 'string', values: nil},
    {name: 'CVSSv3.BaseScore', type: 'number', values: nil}
  ],
  sort_field: 'CVSSv3.BaseScore'
)
Set
plugin_name:to excel, word, or html_export as required.Set
content_block_fieldsby creating Content Blocks. Set the Block Group name at the first level (e.g.'Conclusion'), then create a new row for each field that needs to be defined. UseNameas the field name, settypeto either string or number, and setvaluesas needed.Create a list of
document_properties(e.g. dradis.project).Create
evidence_fieldsandissue_fieldsas needed. UseNameas the field name, settypeto either string or number, and setvaluesas needed.
The sort_field is optional. If you want to sort issues by default in your template, you can sort by an Issue field that exists in the issue_fields section and is a number. Sorting is in descending order - highest to lowest.
Configure the Mappings Manager
The mappings_seed.rb file creates new mappings in the Mappings Manager associated with your report template.
rtp = ReportTemplateProperties.find_by(title: 'dradis_welcome_template.v0.10')
mapping1 = Mapping.create(
  component: 'qualys',
  source: 'asset_issue',
  destination: "rtp_#{rtp.id}"
)

MappingField.create(
  mapping_id: mapping1.id,
  source_field: 'asset-issue.title',
  destination_field: 'Title',
  content: '{{ qualys[asset-issue.title] }}'
)

MappingField.create(
  mapping_id: mapping1.id,
  source_field: 'asset-issue.impact',
  destination_field: 'Description',
  content: '{{ qualys[asset-issue.impact] }}'
)

mapping2 = Mapping.create(
  component: 'qualys',
  source: 'vuln_evidence',
  destination: "rtp_#{rtp.id}"
)

MappingField.create(
  mapping_id: mapping2.id,
  source_field: 'evidence.cat_protocol',
  destination_field: 'Location',
  content: '{{ qualys[evidence.cat_protocol] }}/{{ qualys[evidence.cat_port] }}'
)

MappingField.create(
  mapping_id: mapping2.id,
  source_field: 'evidence.result',
  destination_field: 'Result',
  content: '{{ qualys[evidence.result] }}'
)
First, the mapping is associated with a specific report template property, defined by the report template's name. In this example, dradis_welcome_template.v0.10.
rtp = ReportTemplateProperties.find_by(title: 'dradis_welcome_template.v0.10')
Then, Mappings and MappingFields are created.
You can think of the Mapping as setting up the link between the report template and the tool format you're defining. Then, you can think of each MappingField as a building block for the output format you're defining.
To create the desired Mapping, you'll want to define the component, source, and destination:
mapping1 = Mapping.create(
  component: 'qualys',
  source: 'asset_issue',
  destination: "rtp_#{rtp.id}"
)
You'll also note that we set a mapping1 variable to the new Mapping we just created. This is important for the MappingFields that we'll create later!
| Mapping Value | Description | Where to find the value |
|---|---|---|
| component | The name (in lowercase) of the tool you're configuring. | Use the name from the list of supported tools in the Mappings Manager. |
| source | The name (in lowercase) of the mapping source | Use the name of the data source you're configuring in the mappings manager. Use underscores instead of spaces when working with multiple words. |
| destination | The report template properties that you want to associate the mappings with | Assuming that you have already set the rtp variable to the specific report template properties you're configuring against, you will use the value "rtp_#{rtp.id}". |
Then, each Mapping needs at least one MappingField. For this example, we'll create one MappingField for the Title field and another for the Description field, each with a mapping_id, source_field, destination_field, and a content value.
MappingField.create(
  mapping_id: mapping1.id,
  source_field: 'asset-issue.title',
  destination_field: 'Title',
  content: '{{ qualys[asset-issue.title] }}'
)

MappingField.create(
  mapping_id: mapping1.id,
  source_field: 'asset-issue.impact',
  destination_field: 'Description',
  content: '{{ qualys[asset-issue.impact] }}'
)
| Mapping Value | Description | Where to find the value |
|---|---|---|
| mapping_id | This associates the MappingField with a specific Mapping that has already been created. Make sure that you're associating the MappingField with the correct Mapping if you're creating more than one Mapping. |
The variable name from the associated Mapping plus .id. |
| source_field | The name (in lowercase) of the mapping source plus the source field that you're mapping. | Use the name of the data source you're configuring in the mappings manager, then the source field that you're mapping, separated by a .. Use dashes instead of spaces when working with multiple words. |
| destination_field | This is the Dradis Field in the Mappings Manager UI. | Use the field name from the associated report template properties you're configuring against. |
| content | Use Liquid to configure how you want the tool data to appear in the specific Dradis field. | Use Liquid to map 1 or more source fields to your Dradis field, and add formatting like code blocks, tables, and more. |
Copy existing Mappings to a new template
If you are creating a Kit that is based on one of your existing report templates that already has associated Mappings in the Mappings Manager, then you could use the mappings_seed.rb file to copy existing mappings to your new template in this Kit. By doing it this way, you don't need to check for any changes that have been made to Mappings since the original Kit was created. You can of course also combine functionality, both copying existing mappings and adding or changing fields in the mappings_seed.rb script. Here is an example file you can use as a basis:
# Reference the new RTP
template = 'dradis_welcome_template'

new_rtp, old_rtp =
  ReportTemplateProperties.where('title LIKE ?', "#{template}%").
    order(created_at: :desc).
    first(2)
return if old_rtp.nil?

# Duplicate the mappings to the new RTP
Mapping.where(destination: "rtp_#{old_rtp.id}").each do |mapping|
  copy = mapping.dup
  copy.update(destination: "rtp_#{new_rtp.id}")
  mapping.mapping_fields.each do |mapping_field|

    # Skip CVSSv3.BaseScore when copying mapping_fields (optional)
    next if mapping_field.destination_field == 'CVSSv3.BaseScore'

    # Copy all mapping fields to new report template
    mapping_field.dup.update(mapping_id: copy.id)
  end

  # Add new mappings to new_rtp (optional)
  if mapping.component == 'qualys' && mapping.source == 'vuln_element'
    MappingField.create(
      mapping_id: copy.id,
      source_field: 'Custom Text',
      destination_field: 'An extra field',
      content: 'Added via v0.10 kit'
    )
  end

end
In the above, template = 'dradis_welcome_template' means you are copying mappings from the most recently created template where the filename starts with dradis_welcome_template.
The Mapping.where(destination: "rtp_#{old_rtp.id}").each do |mapping| block copies all mappings from that older template's mappings.
The (optional) next if mapping_field.destination_field == 'CVSSv3.BaseScore' line lets you delete or existing field mappings.
Finally, the (optional) if mapping.component == 'qualys' && mapping.source == 'vuln_element'' section lets you create new field mappings in the new template in addition to the copied mappings, using the same formatting as in the Configure the Mappings Manager guide above. Just make sure to adjust the if statement so that the new fields only apply to the correct tool/source! Please note that if you add a new mapping without including it in your Report Template Properties, it will be added as a 'Custom Field'.
Seeding the Rules Engine
The rules_seed.rb file creates new Rules in the Rules Engine:
# ================================================================ Rules Engine
project      = Project.last
tag_critical = project.tags.find_by(name: '!9467bd_critical').try(:name)
tag_high     = project.tags.find_by(name: '!d62728_high').try(:name)
tag_medium   = project.tags.find_by(name: '!ff7f0e_medium').try(:name)
tag_low      = project.tags.find_by(name: '!6baed6_low').try(:name)
tag_info     = project.tags.find_by(name: '!2ca02c_info').try(:name)

if Dradis::Pro::Rules::Rules::AndRule.where(name: 'Nessus N/A CVSS to 0.0').empty?
  nessus1 = Dradis::Pro::Rules::Rules::AndRule.create!(name: 'Nessus N/A CVSS to 0.0')
  Dradis::Pro::Rules::Conditions::FieldCondition.create!(rule: nessus1, properties: { plugin: :nessus, field: 'CVSSv3.BaseScore', operator: '==', value: 'n/a' })
  Dradis::Pro::Rules::Actions::ChangeValueAction.create!(rule: nessus1, properties: { field: 'CVSSv3.BaseScore', new_value: '0.0' })
end

if Dradis::Pro::Rules::Rules::AndRule.where(name: 'Nessus: Tag High').empty?
  nessus3 = Dradis::Pro::Rules::Rules::AndRule.create!(name: 'Nessus: Tag High')
  Dradis::Pro::Rules::Conditions::FieldCondition.create!(rule: nessus3, properties: { plugin: :nessus, field: 'CVSSv3.BaseScore', operator: '<=', value: '8.9' })
  Dradis::Pro::Rules::Conditions::FieldCondition.create!(rule: nessus3, properties: { plugin: :nessus, field: 'CVSSv3.BaseScore', operator: '>=', value: '7.0' })
  Dradis::Pro::Rules::Actions::TagAction.create!(rule: nessus3, properties: { tag_name: tag_high })
end
First, the tags are defined, then individual rules are created. The Rule Title is set with name: (e.g. "Nessus: Tag High").
Then, the Triggers are created with Conditions. If you want to use Match All, use Conditions::MatchAllCondition, and if you want to Match Field, use Conditions::FieldCondition.
To match properly on the field, you'll want to define the plugin, field, operator, and value.
| plugin | field | operator | value |
|---|---|---|---|
|
acunetix |
The field name is specific to the plugin |
Equals: Does not equal: Is greater than: Is greater than or equals: Is less than: Is less than or equals: Contains: |
The value will contain a number, word, |
Next, the Actions are created. You can use 5 different actions and set properties within them to configure the Rule.
| Action | Example | Properties |
|---|---|---|
| ChangeValueAction | Dradis::Pro::Rules::Actions::ChangeValueAction.create!(rule: nessus1, properties: { field: 'CVSSv3.BaseScore', new_value: '0.0' }) |
|
| TagAction | Dradis::Pro::Rules::Actions::TagAction.create!(rule: nessus1, properties: { tag_name: tag_high }) |
tag_name: populate with one of the variables at the beginning of the .rb file where the tags are defined. |
| DiscardAction | Dradis::Pro::Rules::Actions::DiscardAction.create!(rule: nessus1) |
None |
| FindMatchAction | Dradis::Pro::Rules::Actions::FindMatchAction.create!(rule: nessus1, properties: { plugin: :issuelib }) |
plugin: populate with :issuelib |
| SwapBodyAction | Dradis::Pro::Rules::Actions::SwapBodyAction.create!(rule: nessus1, properties: { plugin: :issuelib, field: 'Title', value: 'SQL Injection'}) |
|
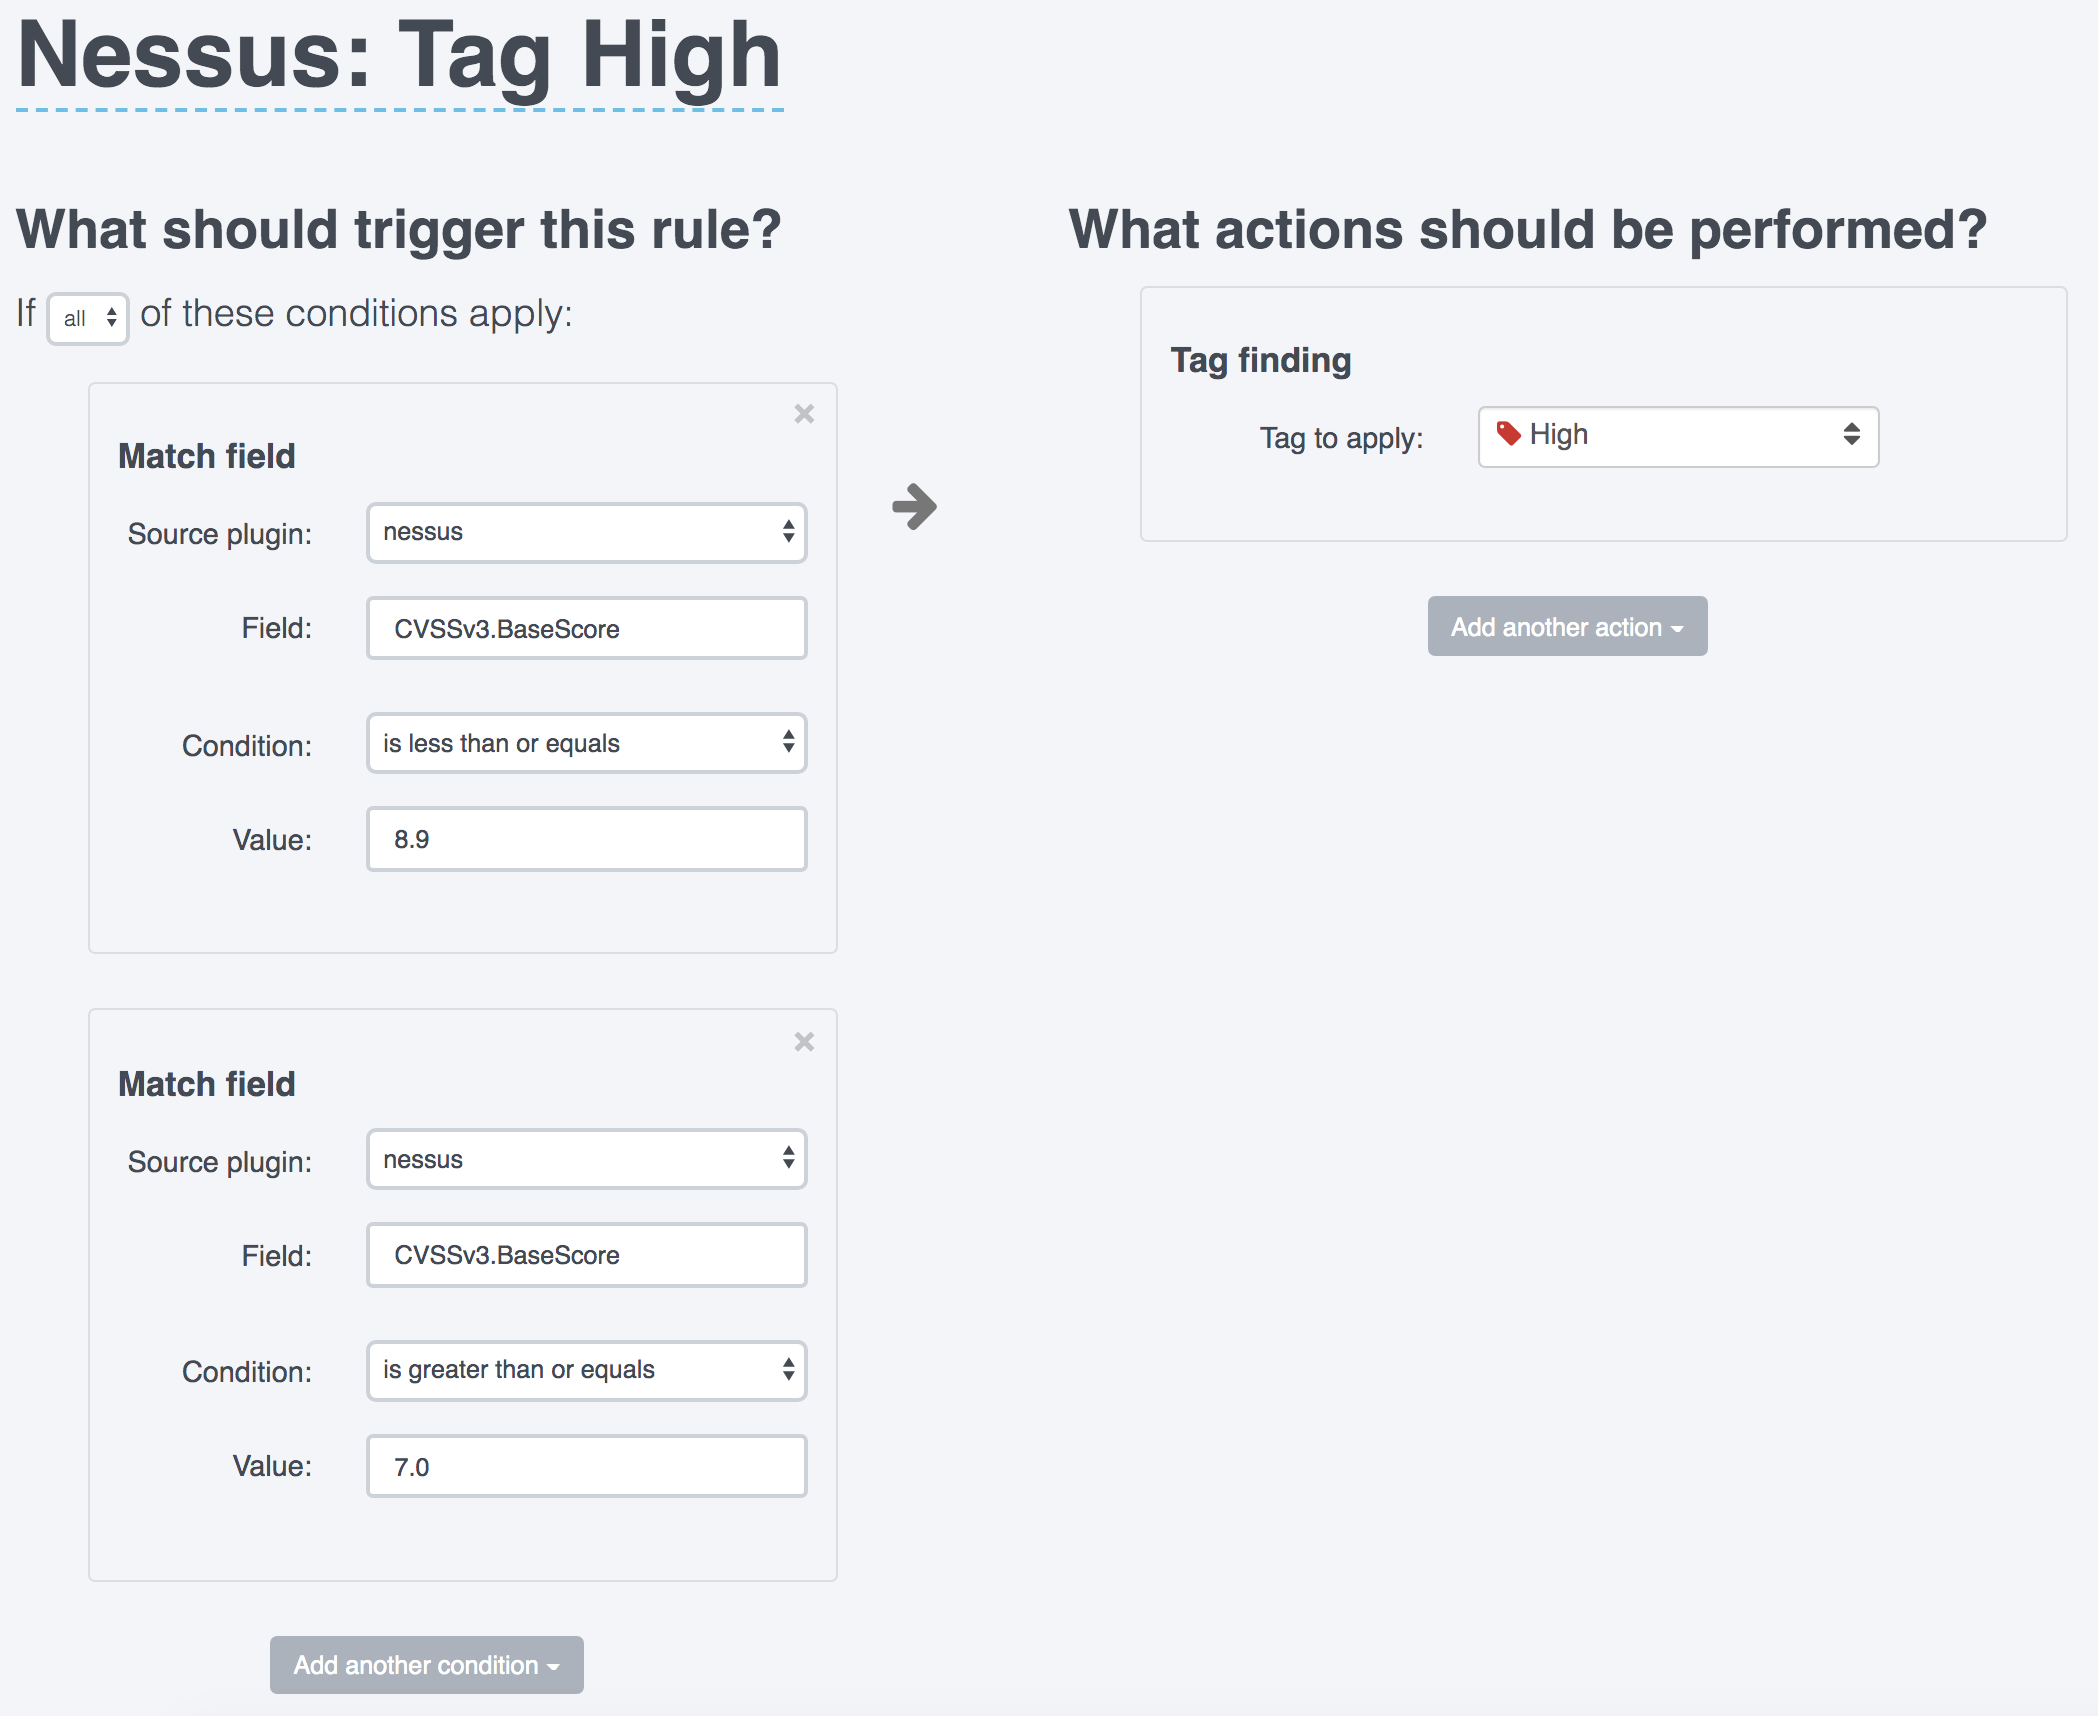
The end of rules_seed.rb file above creates Rules to automatically tag Nessus findings based on CVSS score. For example, the "Tag High" rule shown above creates a Rule in the Rules Engine like:

Uploading a kit
Sign in as an Administrator.
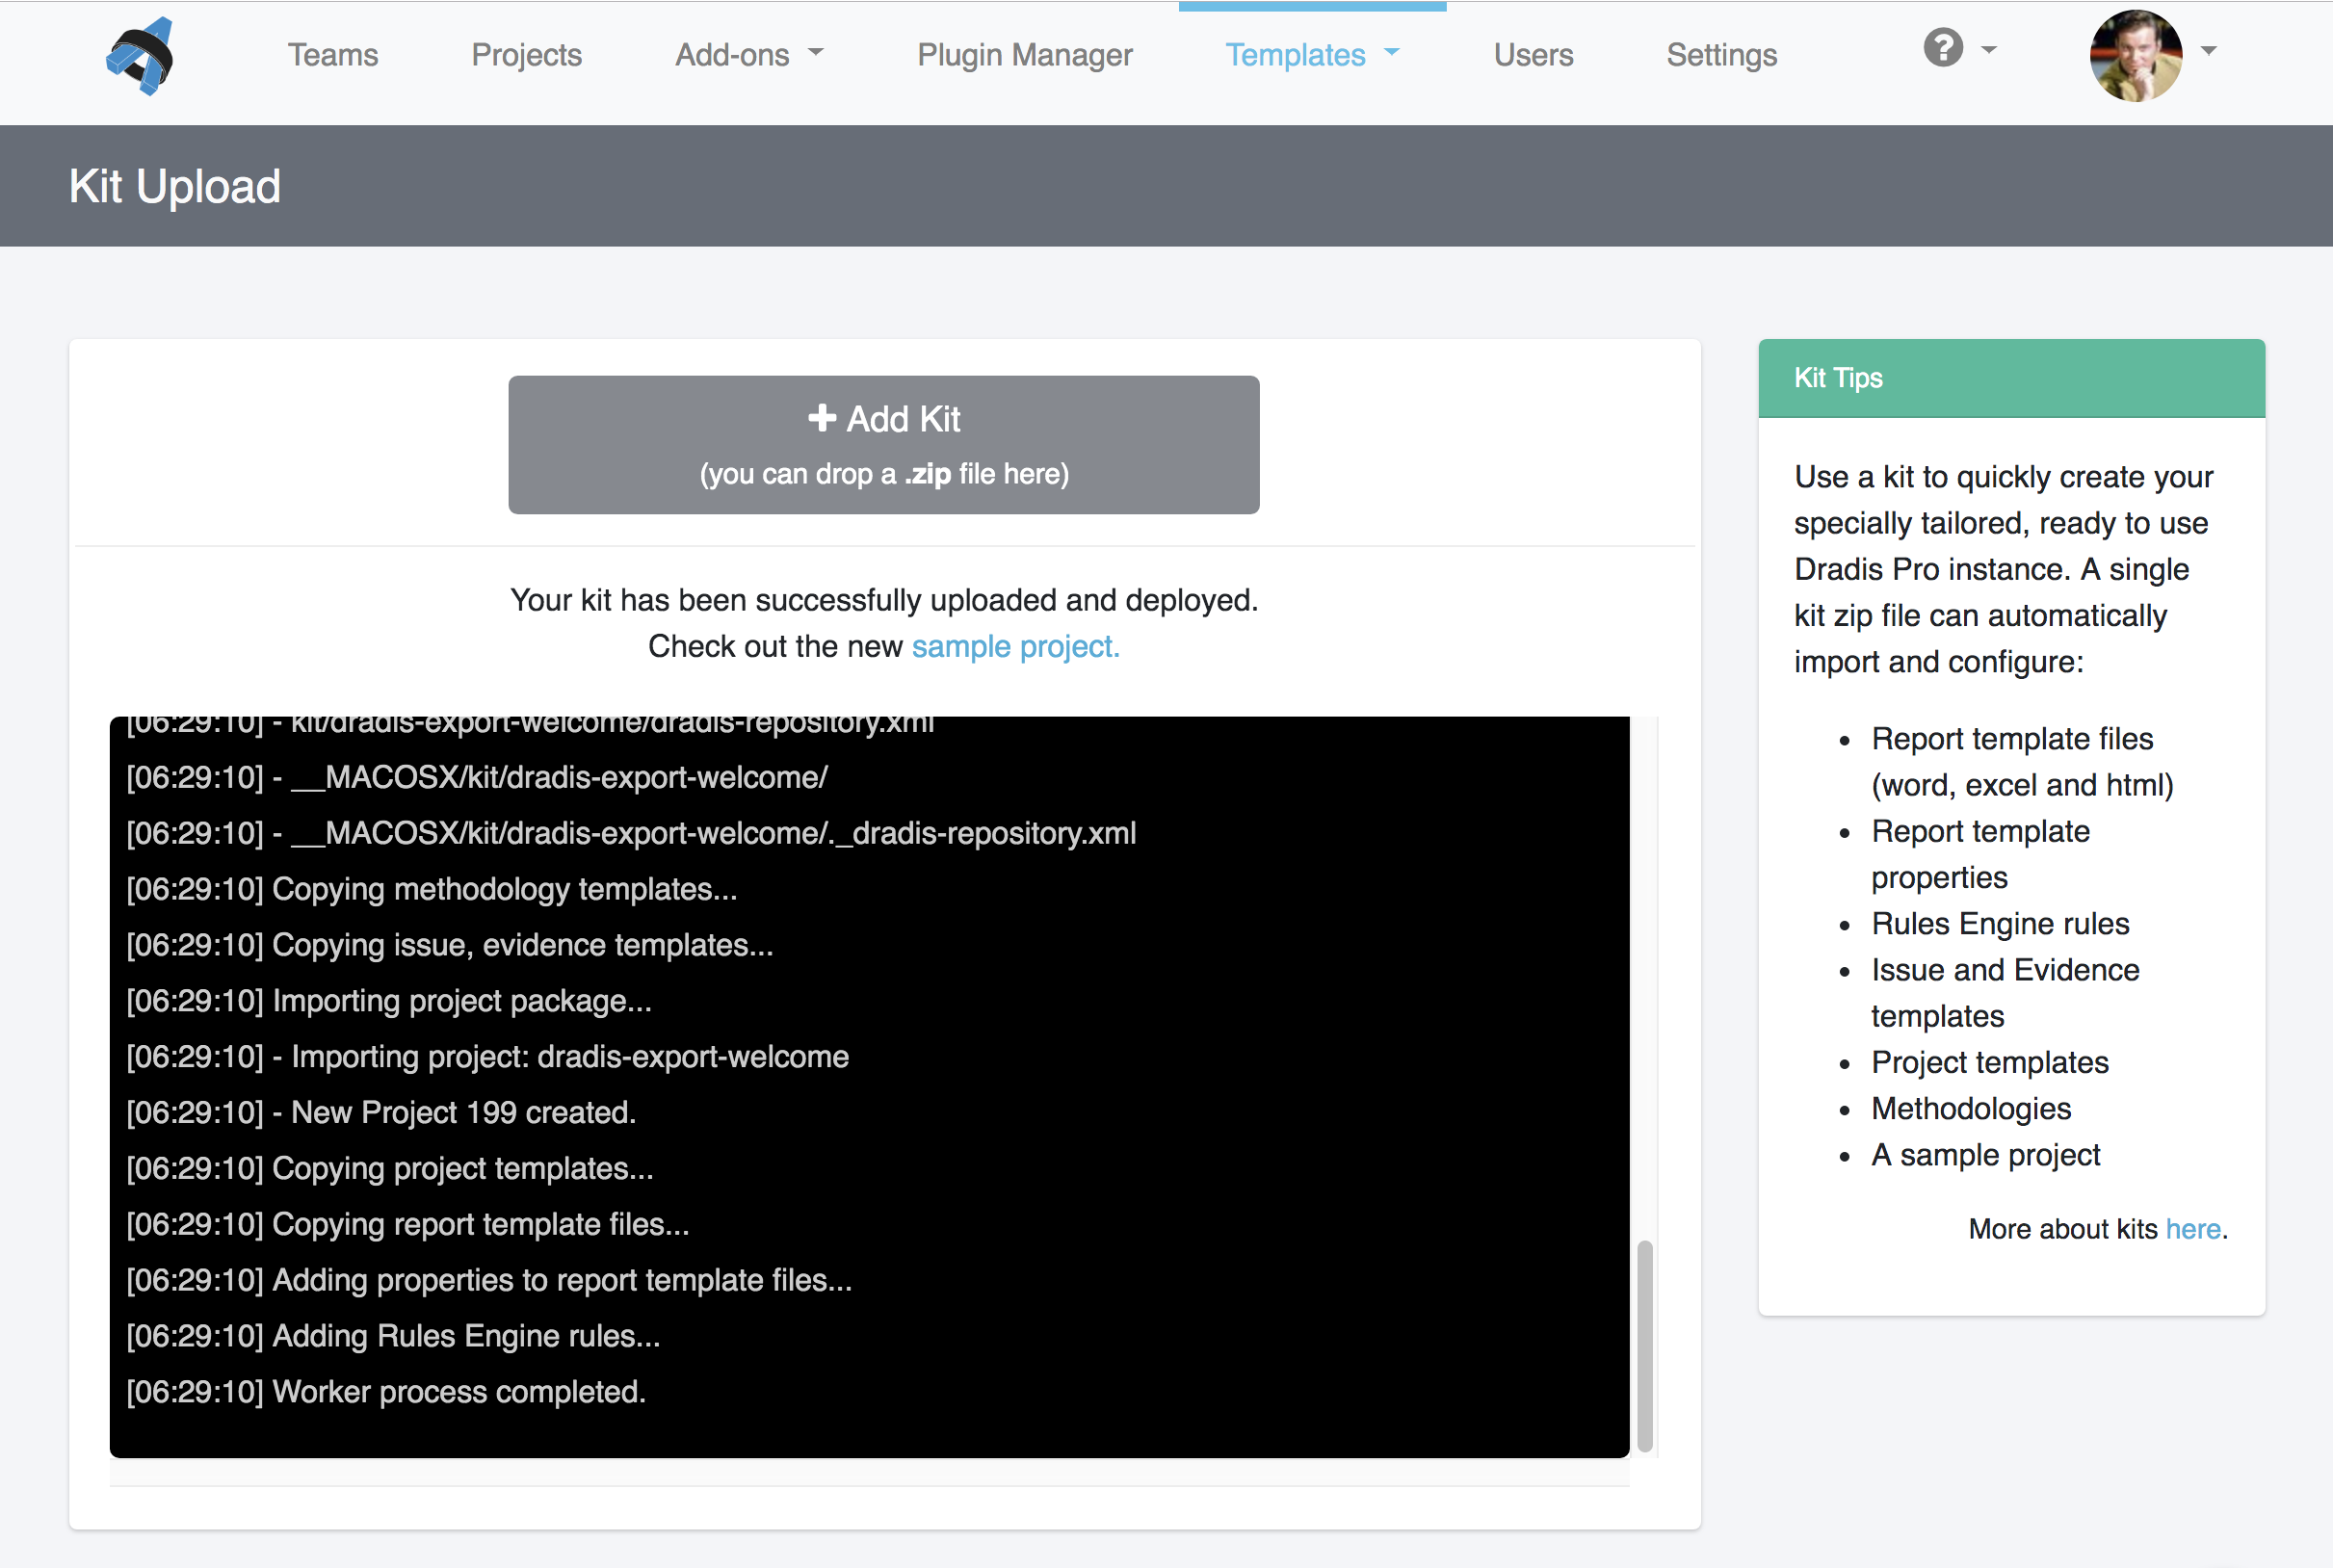
Navigate to Templates > Kit Upload.
-
Use the Drop zone or the blue Add kit button to select your
kit.zipfile.You will be prompted if you want to create new Mappings manually, or use a script included in the Kit, or copy mappings associated with an existing Word and/or Excel template.

Then, just click the green Start button to upload it.
-
The on-screen log will display all the changes that are being made. Wait until it displays
Worker process completedbefore moving on.
Uploading a kit via the command line
SCP your kit (e.g.
kit.zip) to your Dradis instance (e.g. to the/tmpfolder).-
Run the following commands in the console as dradispro:
$ cd /opt/dradispro/dradispro/current/
$ RAILS_ENV=production bundle exec thor dradis:setup:kit --file=/tmp/kit.zip
Make sure to update the filename and path to match yours!
Next help article: System settings →