Qualys with Dradis
Cloud-based security and compliance

Qualys is a cloud-based security suite with solutions that include vulnerability assessments and web application scanning. With the Qualys integration for Dradis, all assessment details and findings are kept together, eliminating the need to dig through emails, files, and shared directories, saving everyone time. Team collaboration is more effective, reducing the time between detection and mitigation of security vulnerabilities.
The Qualys® name, if trademarked, is the intellectual property of the vendor. Uses of the Qualys® name in this page are for identification purposes only and do not imply an endorsement by the trademark owner. Dradis is not endorsed or owned by, or affiliated with, the Qualys® vendor.

Ken Johnson
Former App Security Manager at LivingSocialAvailable for
Vendor
Support Documentation
Qualys scans produce comprehensive vulnerability data – severity ratings, CVSS scores, CVE references, diagnosis and consequence descriptions, and remediation guidance – but consolidating those results into a structured pentest report means navigating XML exports with nested host and vulnerability categories. Dradis imports your Qualys scan XML directly, mapping each vulnerability to a structured Issue with linked Evidence per host, so you can combine Qualys results with other tools and generate a unified client report without manually copying findings.
.xml format (Qualys Scan XML with <SCAN> root element)| Detail | Value |
|---|---|
| Dradis Plugin | Dradis::Plugins::Qualys::Vuln (traditional scan), Qualys::Asset (asset-based), Qualys::WAS (web application) |
| Supported File Format | .xml (Qualys Scan XML) |
| Available In | Community Edition and Professional |
| Data Imported | Issues, Evidence (with port/protocol context), Nodes (hosts) |
| Typical Import Time | ~3 seconds for 20 findings, ~20 seconds for 500+ |
When you import a Qualys Vuln XML file, the Dradis Qualys plugin parses the <SCAN> root element and processes the nested host and vulnerability data to create three types of objects:
Nodes: Each <IP> element in the Qualys XML becomes a Node in Dradis, labeled with the IP address (e.g., 203.0.113.10). All host nodes appear under the Scanner output parent node in the sidebar.
Issues: Each unique vulnerability entry becomes a single Issue. Qualys organizes findings into four data categories within each host block – VULNS (confirmed vulnerabilities), SERVICES (detected services), INFOS (informational findings), and PRACTICES (best-practice checks). Each finding within these categories becomes its own Issue. If the same vulnerability appears across multiple hosts, Dradis creates one Issue and links it to each host through Evidence.
Evidence: For every occurrence of a finding on a specific host, Dradis creates an Evidence entry linking the Issue to the Node. Evidence captures port, protocol, FQDN, and other context from the <CAT> (category) element that wraps each finding, along with host-specific scan results.
Qualys organizes scan findings into four categories within each <IP> block, and the Dradis plugin imports all of them:
| Category | XML Element | What It Contains |
|---|---|---|
| VULNS | <VULNS><CAT> |
Confirmed vulnerabilities with severity, diagnosis, and remediation |
| SERVICES | <SERVICES><CAT> |
Detected network services and their versions |
| INFOS | <INFOS><CAT> |
Informational findings (host details, banners, configurations) |
| PRACTICES | <PRACTICES><CAT> |
Security best-practice recommendations |
All four categories use the same XML structure and field mapping, so you get consistent Issue and Evidence fields regardless of the finding type.
The Qualys Vuln plugin maps these fields to each Issue by default:
| Dradis Field | Qualys XML Source | Template Variable |
|---|---|---|
| Title | Element title | {{ qualys[element.title] }} |
| Severity | <SEVERITY> (1-5 scale) |
{{ qualys[element.severity] }} |
| CVE ID | <CVE_ID_LIST> |
{{ qualys[element.cve_id_list] }} |
| QID | Element number | {{ qualys[element.number] }} |
| LastUpdate | <LAST_UPDATE> |
{{ qualys[element.last_update] }} |
| Diagnosis | <DIAGNOSIS> |
{{ qualys[element.diagnosis] }} |
| Consequence | <CONSEQUENCE> |
{{ qualys[element.consequence] }} |
| Solution | <SOLUTION> |
{{ qualys[element.solution] }} |
| CVSS Base | <CVSS_BASE> |
{{ qualys[element.cvss_base] }} |
| CVSS Temporal | <CVSS_TEMPORAL> |
{{ qualys[element.cvss_temporal] }} |
| PCI Flag | <PCI_FLAG> |
{{ qualys[element.pci_flag] }} |
| Dradis Field | Qualys XML Source | Template Variable |
|---|---|---|
| Protocol | <CAT> protocol attribute |
{{ qualys[evidence.cat_protocol] }} |
| Port | <CAT> port attribute |
{{ qualys[evidence.cat_port] }} |
| FQDN | <CAT> fqdn attribute |
{{ qualys[evidence.cat_fqdn] }} |
| Value | <CAT> value attribute |
{{ qualys[evidence.cat_value] }} |
| Misc | <CAT> misc attribute |
{{ qualys[evidence.cat_misc] }} |
| Result | <RESULT> element |
{{ qualys[evidence.result] }} |
The Qualys plugin exposes these fields for use in custom templates (available via the Mappings Manager in Dradis Pro):
Issue fields (element.*):
| Field | Description |
|---|---|
element.title |
Vulnerability or finding title |
element.severity |
Qualys severity rating (1=Minimal, 2=Medium, 3=Serious, 4=Critical, 5=Urgent) |
element.number |
Qualys ID (QID) number for the finding |
element.cveid |
Primary CVE identifier |
element.cve_id_list |
Full list of associated CVE identifiers |
element.last_update |
Date of the last update to the Qualys knowledge base entry |
element.diagnosis |
Detailed technical description of the vulnerability |
element.consequence |
Description of the potential impact if exploited |
element.solution |
Remediation guidance and steps to resolve |
element.vendor_reference_list |
Vendor advisory references |
element.bugtraq_id_list |
Bugtraq IDs associated with the vulnerability |
element.pci_flag |
Whether the finding is relevant to PCI DSS compliance |
element.result |
Scan result output specific to the finding |
element.cvss_base |
CVSS v2 base score |
element.cvss_temporal |
CVSS v2 temporal score |
element.cvss3_base |
CVSS v3 base score |
element.cvss3_temporal |
CVSS v3 temporal score |
element.cvss3_version |
CVSS v3 version string (e.g., "3.1") |
element.compliance |
Compliance-related information for the finding |
Evidence fields (from <CAT> attributes):
| Field | Description |
|---|---|
evidence.cat_protocol |
Protocol associated with the finding (e.g., tcp, udp) |
evidence.cat_port |
Port number where the finding was detected |
evidence.cat_fqdn |
Fully qualified domain name of the host |
evidence.cat_value |
Category value from the Qualys XML |
evidence.cat_misc |
Additional miscellaneous context from the category |
evidence.result |
Host-specific scan output for this finding |
In the Qualys Vulnerability Management console:
<SCAN> as the root element. This is the traditional Vuln format the Dradis::Plugins::Qualys::Vuln importer expects..xml file to your local machine.Qualys also supports Asset-based and WAS (Web Application Scanning) exports with different XML schemas. If you have those formats, select Qualys::Asset or Qualys::WAS during upload instead.
Log into Dradis and open your project. Click the Upload tab in the navigation bar.
You will see the Upload Output Files form with three sections: tool selection, record state, and file selection.
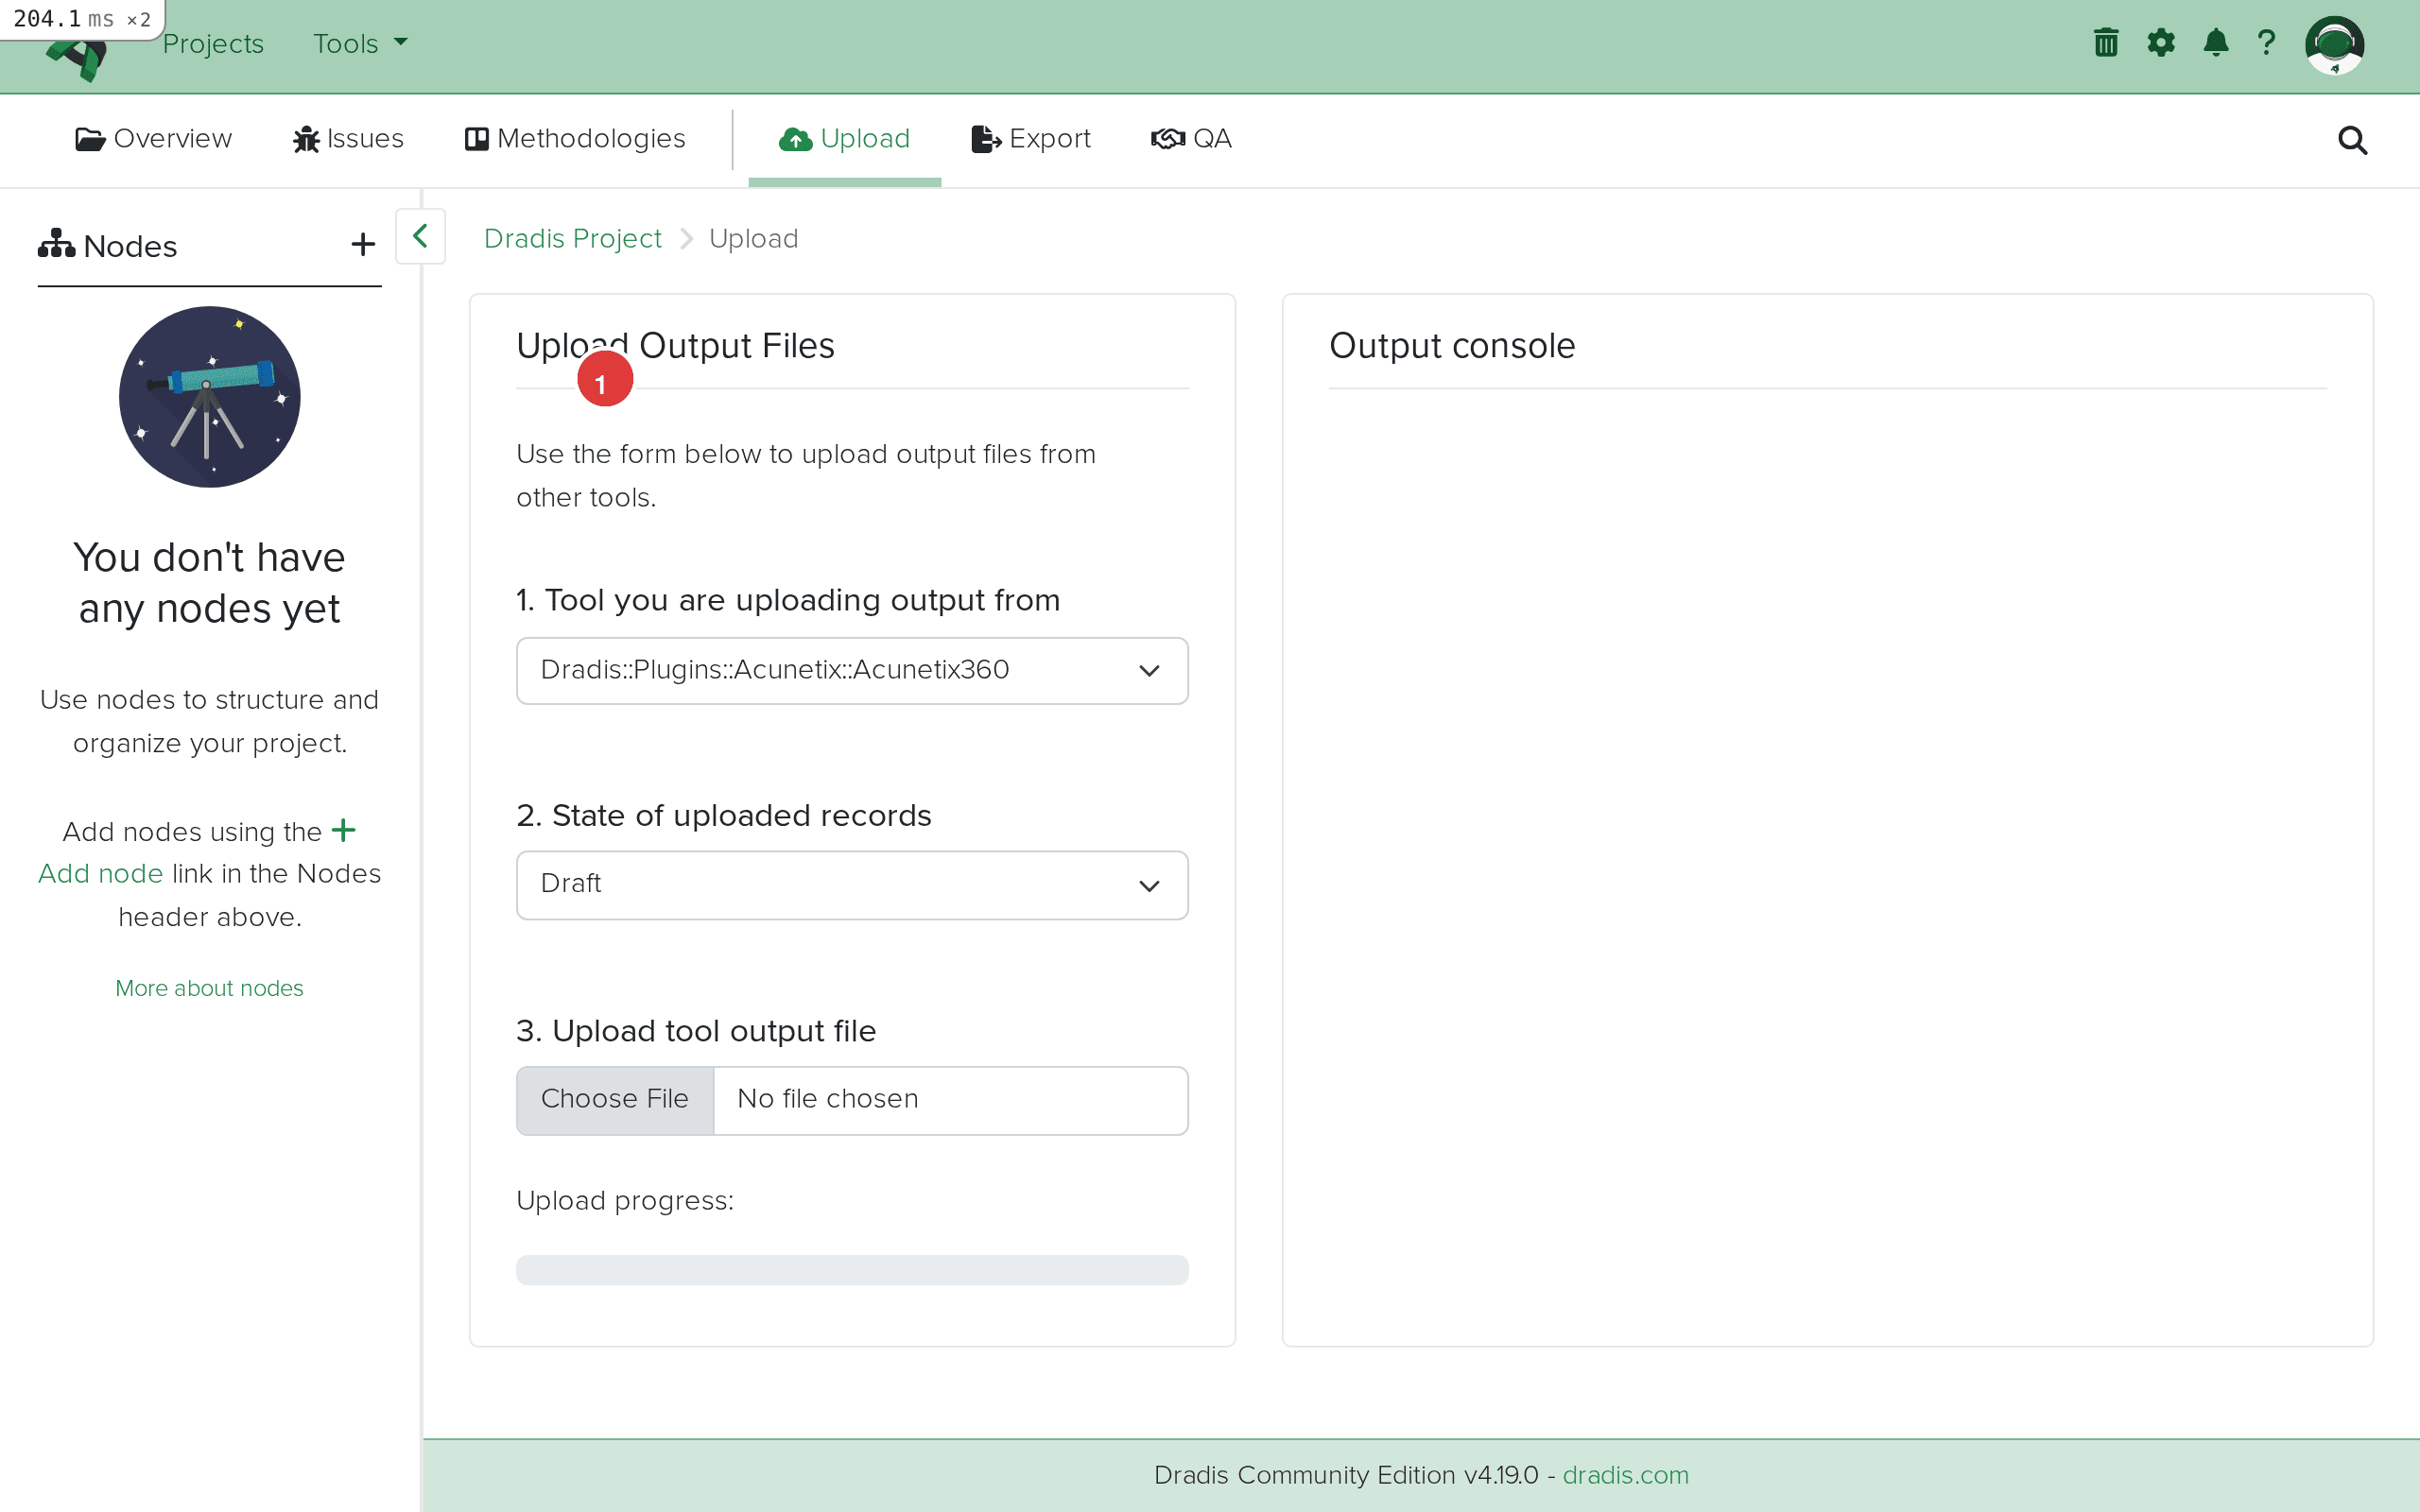 The Upload interface in Dradis. Step 1 (highlighted) selects the plugin, step 2 sets the state, step 3 selects your file.
Click the Tool you are uploading output from dropdown and select Dradis::Plugins::Qualys::Vuln. Dradis offers three Qualys importers (Qualys::Vuln, Qualys::Asset, Qualys::WAS) – for standard vulnerability scans with a <SCAN> root element, select Qualys::Vuln.
 Select Dradis::Plugins::Qualys::Vuln (1) from the tool dropdown for traditional vulnerability scan XML exports.
Click Choose File and select your .xml file. The upload begins automatically once the file is selected.
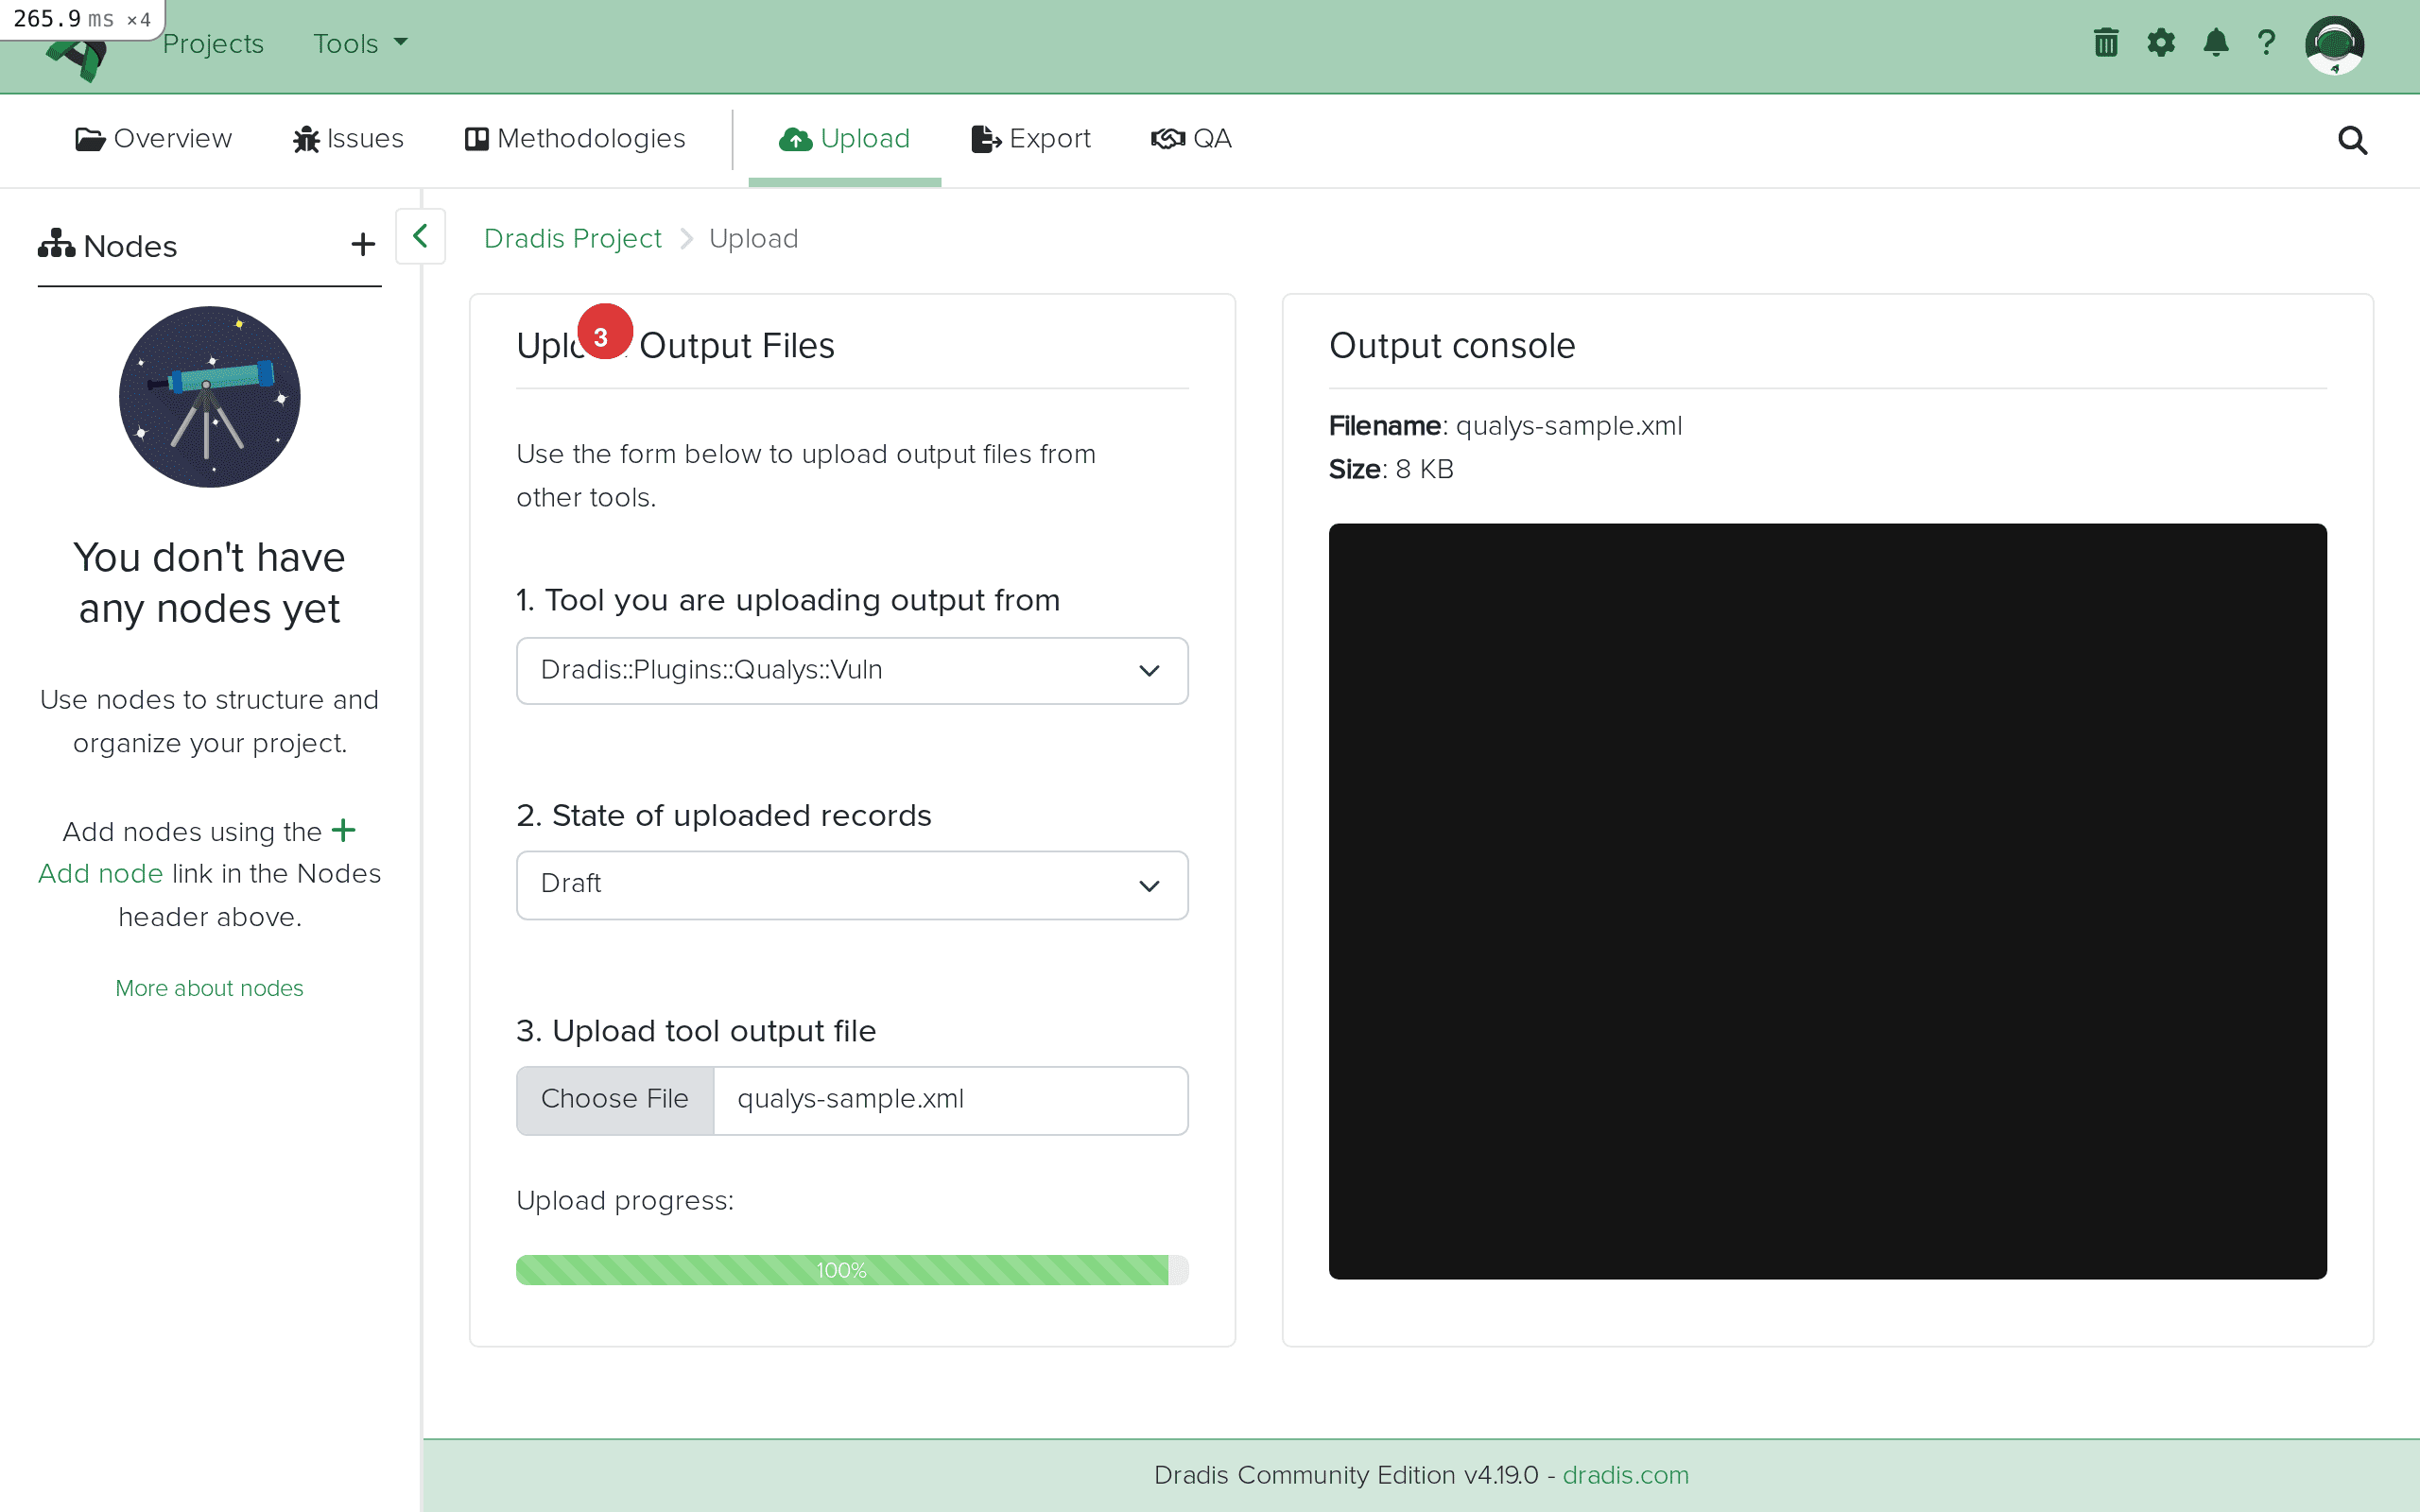 Your Qualys XML file is selected and ready to upload.
The Output console streams the import progress in real time. You will see entries like:
Processing IP: 203.0.113.10
Creating new issue: HTTP/2 Rapid Reset Attack (QID: 730963)
Adding evidence for this instance to 203.0.113.10
Creating new issue: Apache ActiveMQ RCE (QID: 731041)
Adding evidence for this instance to 203.0.113.10
Processing IP: 203.0.113.20
Adding evidence for this instance to 203.0.113.20
Creating new issue: SWEET32 Birthday Attack (QID: 38657)
...
Qualys Scan results successfully imported
Each "Creating new issue" line means a new QID was encountered. "Adding evidence" means an Evidence entry was created linking an existing Issue to the current host.
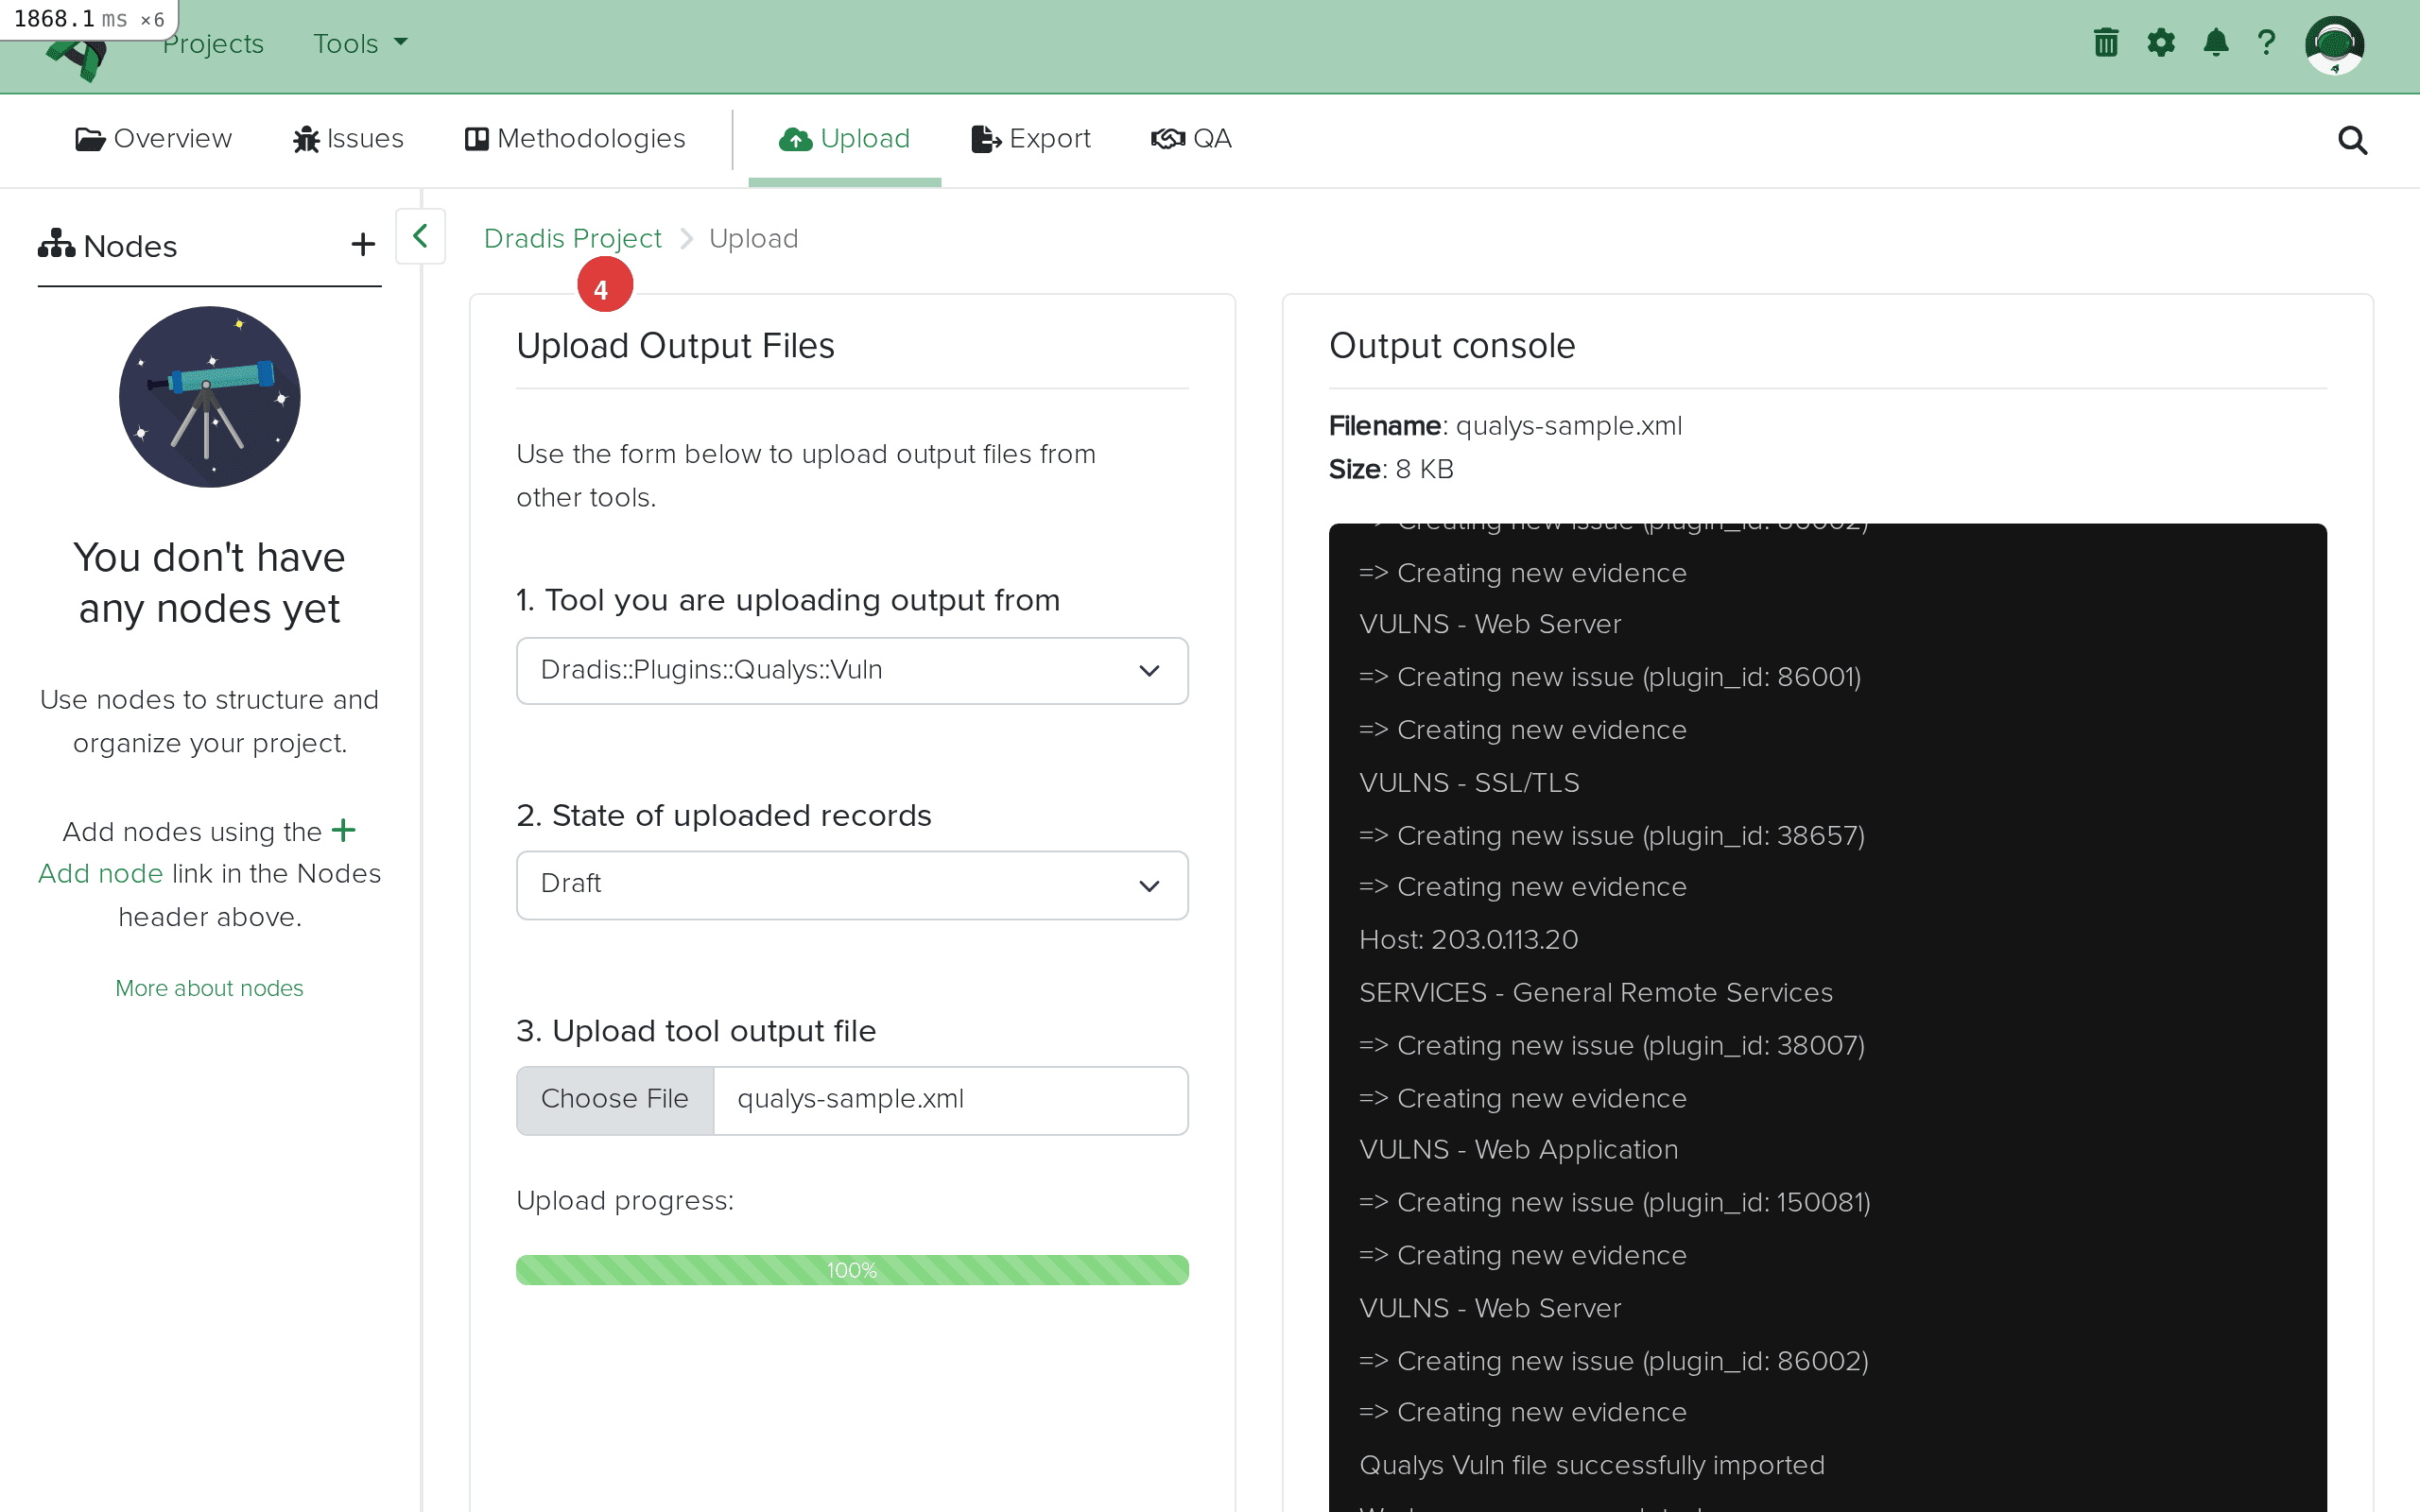 Import complete. The Output console (1) shows each issue created with its QID and host assignments. "Qualys Scan results successfully imported" confirms success.
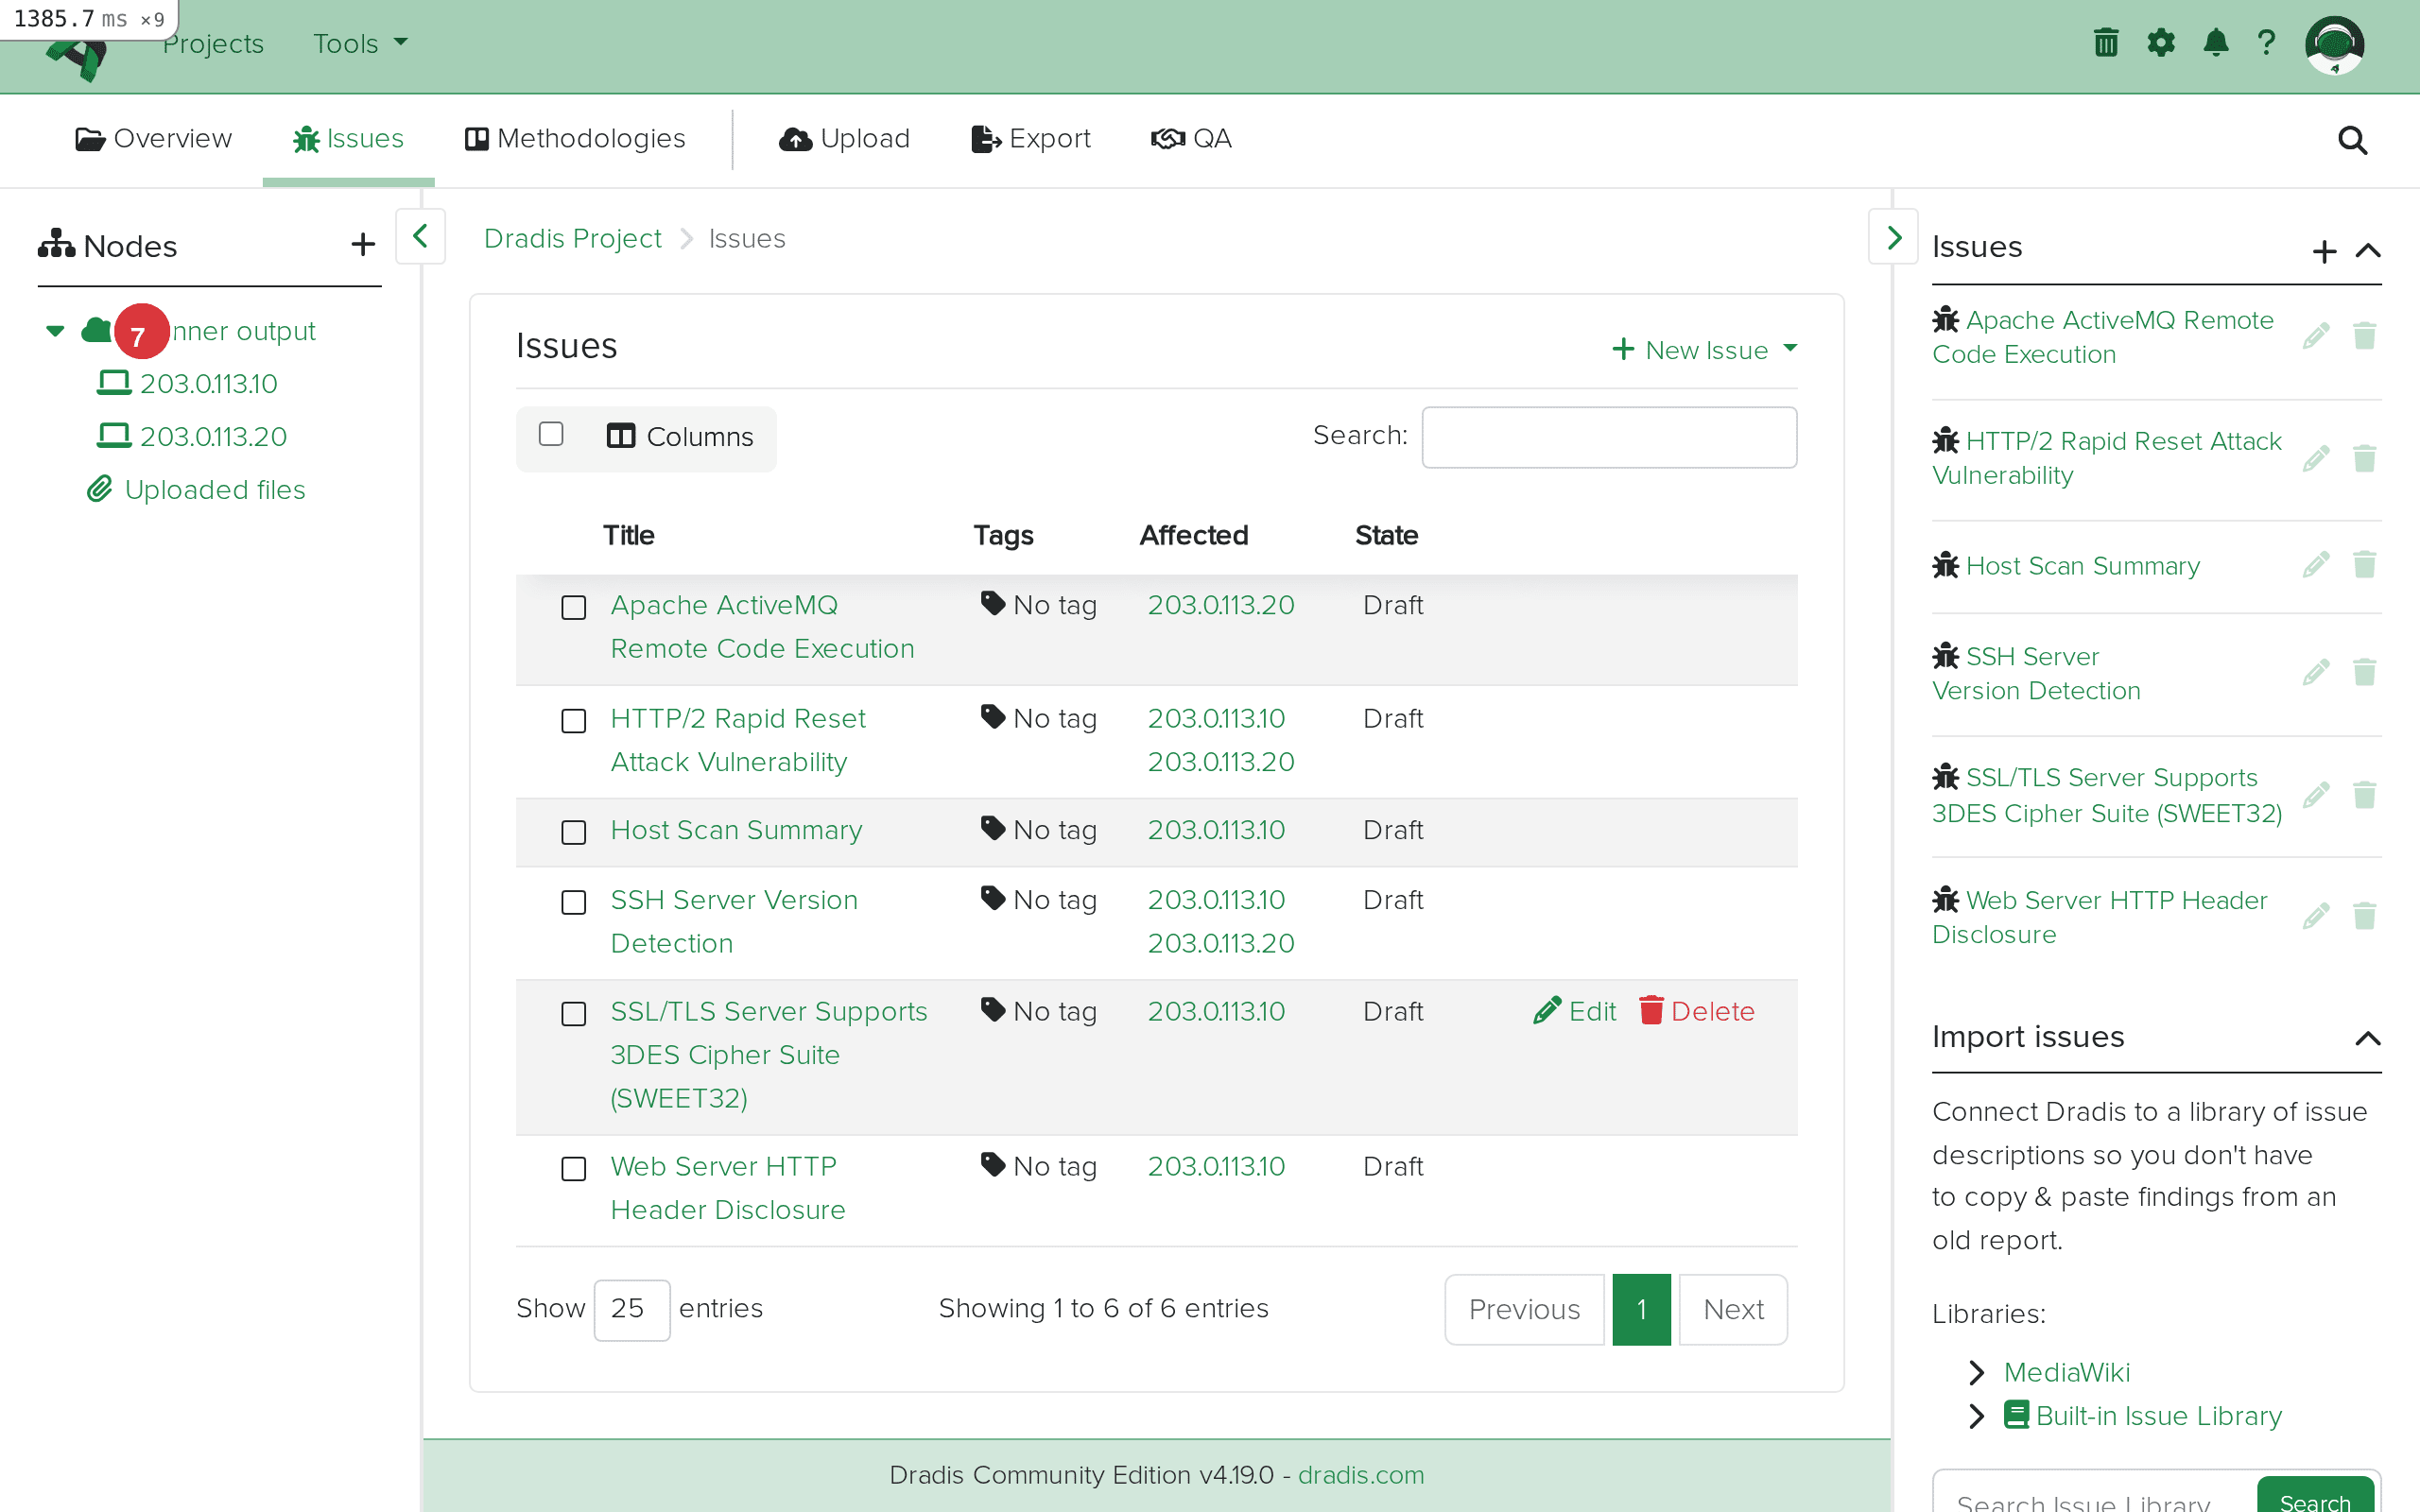
Click the Issues tab to see all imported Qualys findings. Each unique vulnerability or informational finding becomes one Issue.
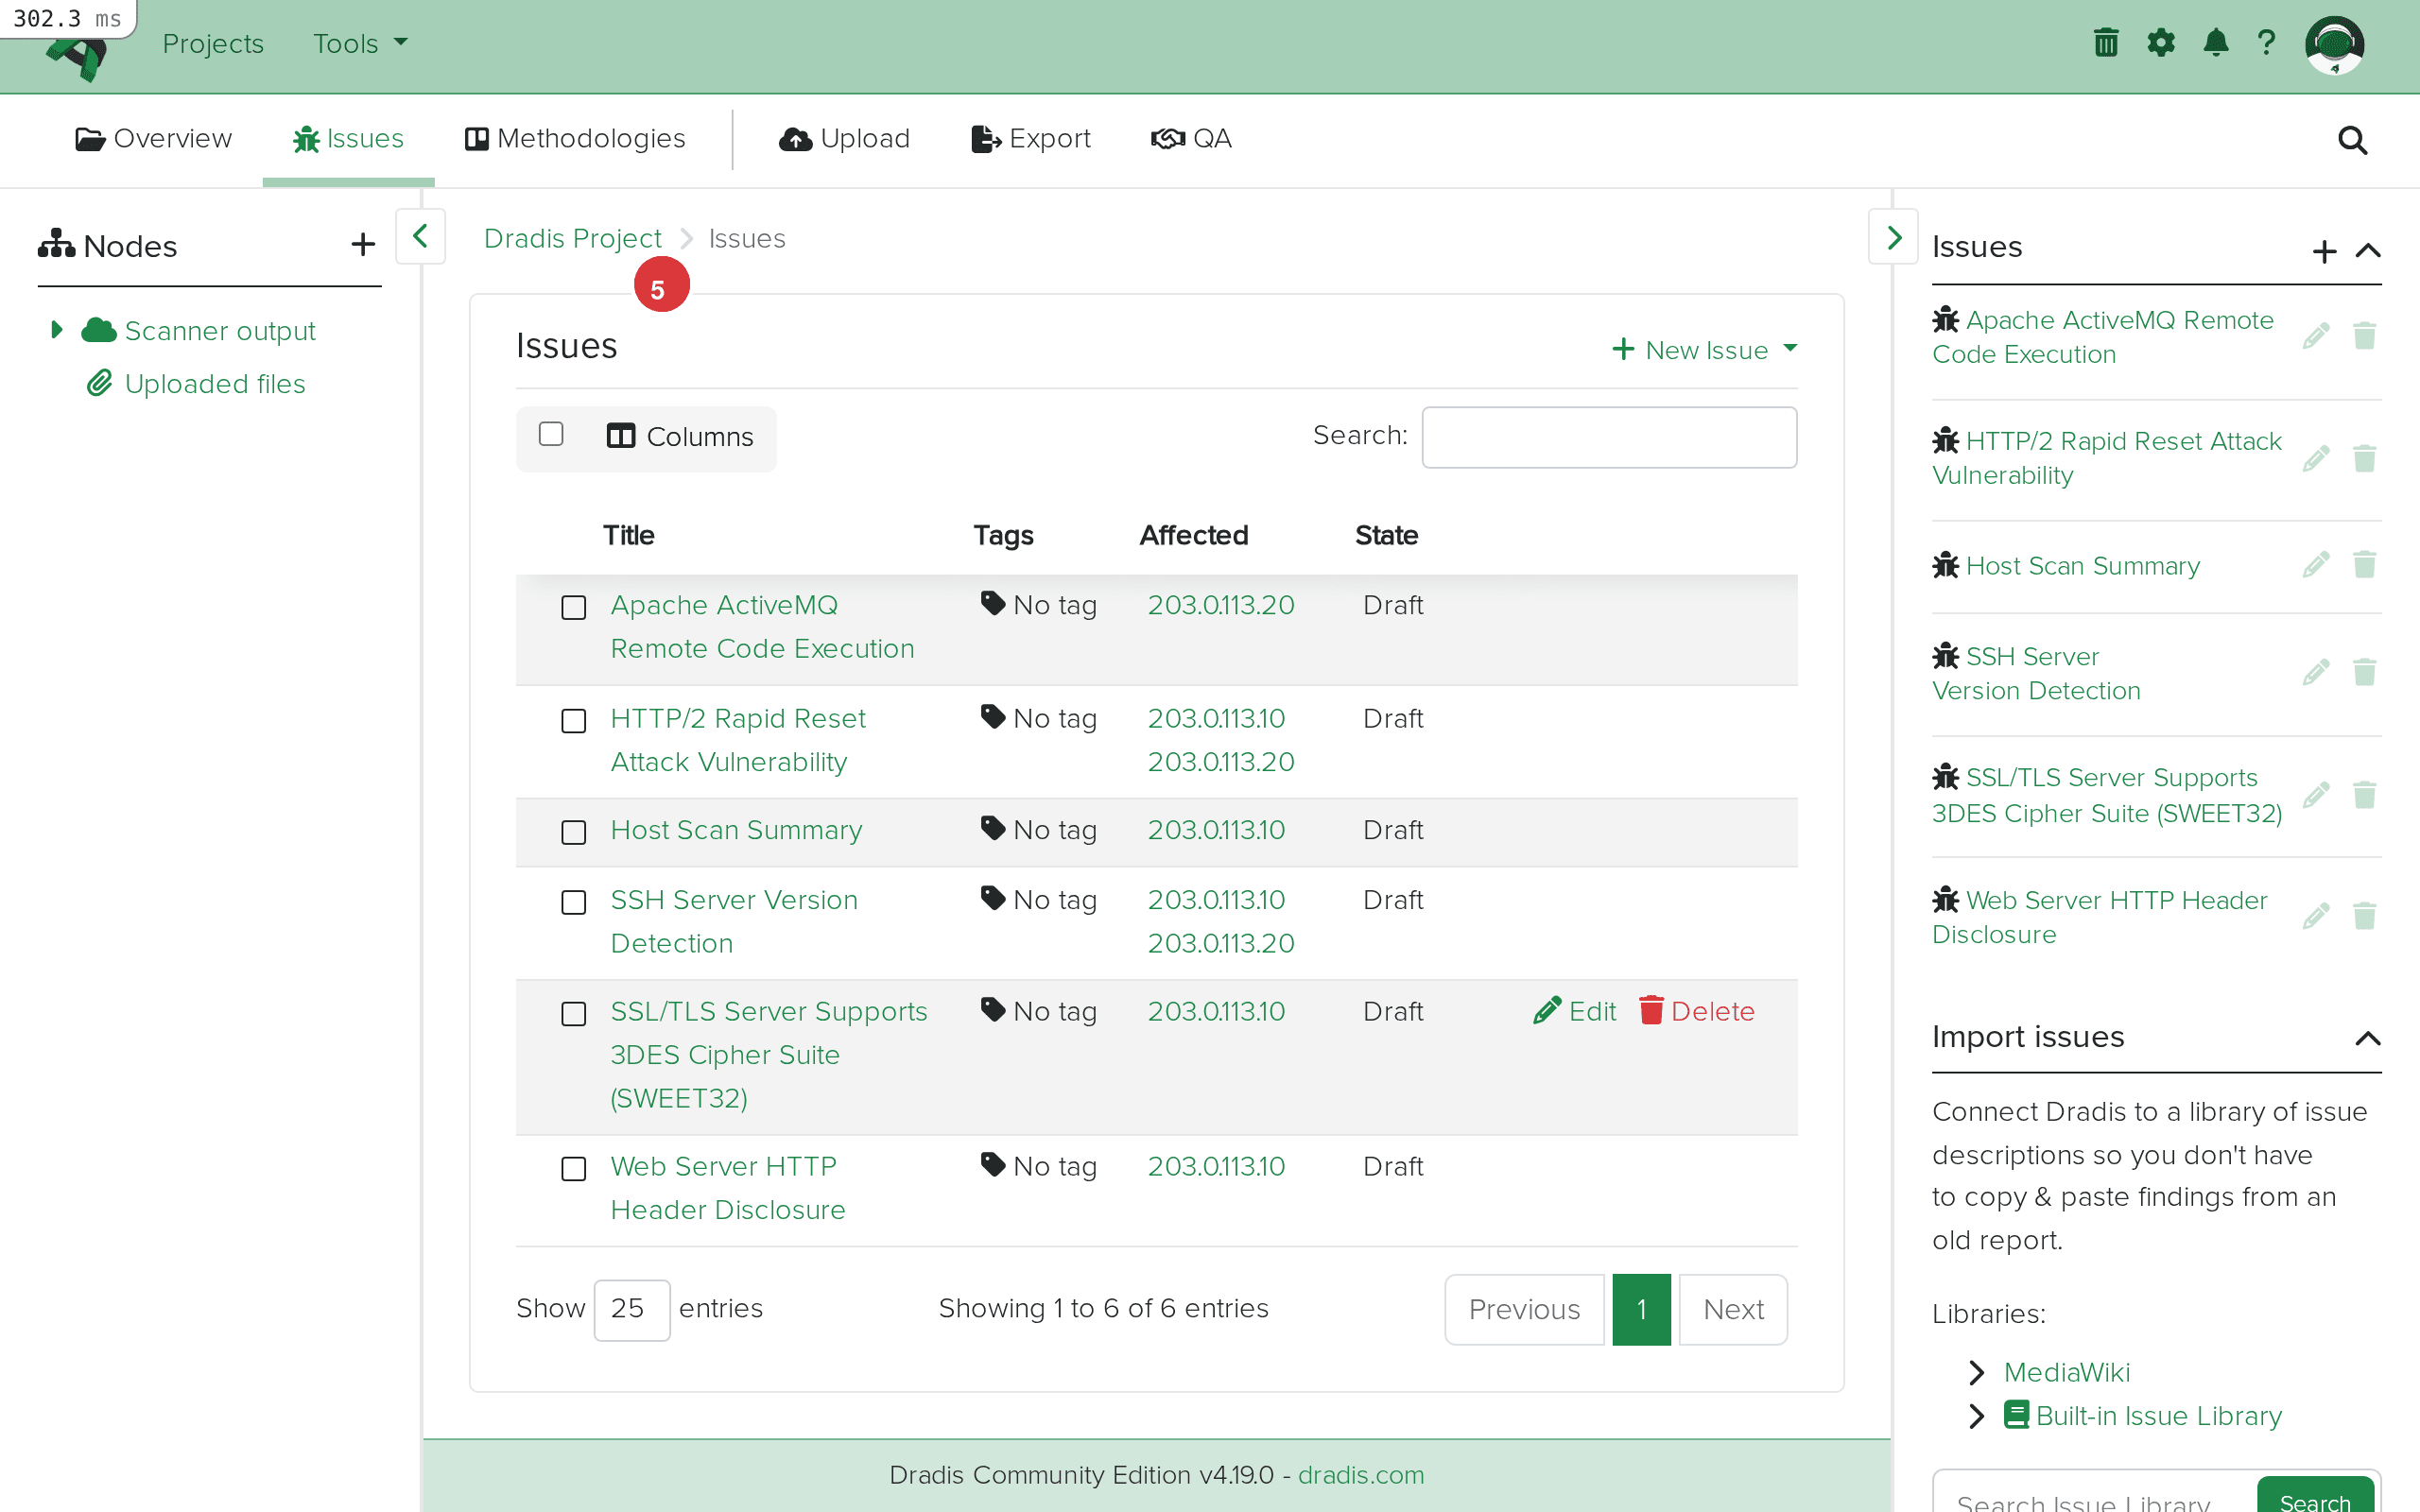 The Issues tab (1) shows all imported findings. The table (2) displays each issue with its title, affected hosts, and current state. In this example, 6 issues were imported including HTTP/2 Rapid Reset, ActiveMQ RCE, SWEET32, HTTP Header Disclosure, SSH Version Detection, and Host Scan Summary.
Click any Issue to see its full detail. Fields map directly from the Qualys XML: Title, Severity (1-5), Diagnosis, Consequence, Solution, CVSS scores, and CVE references.
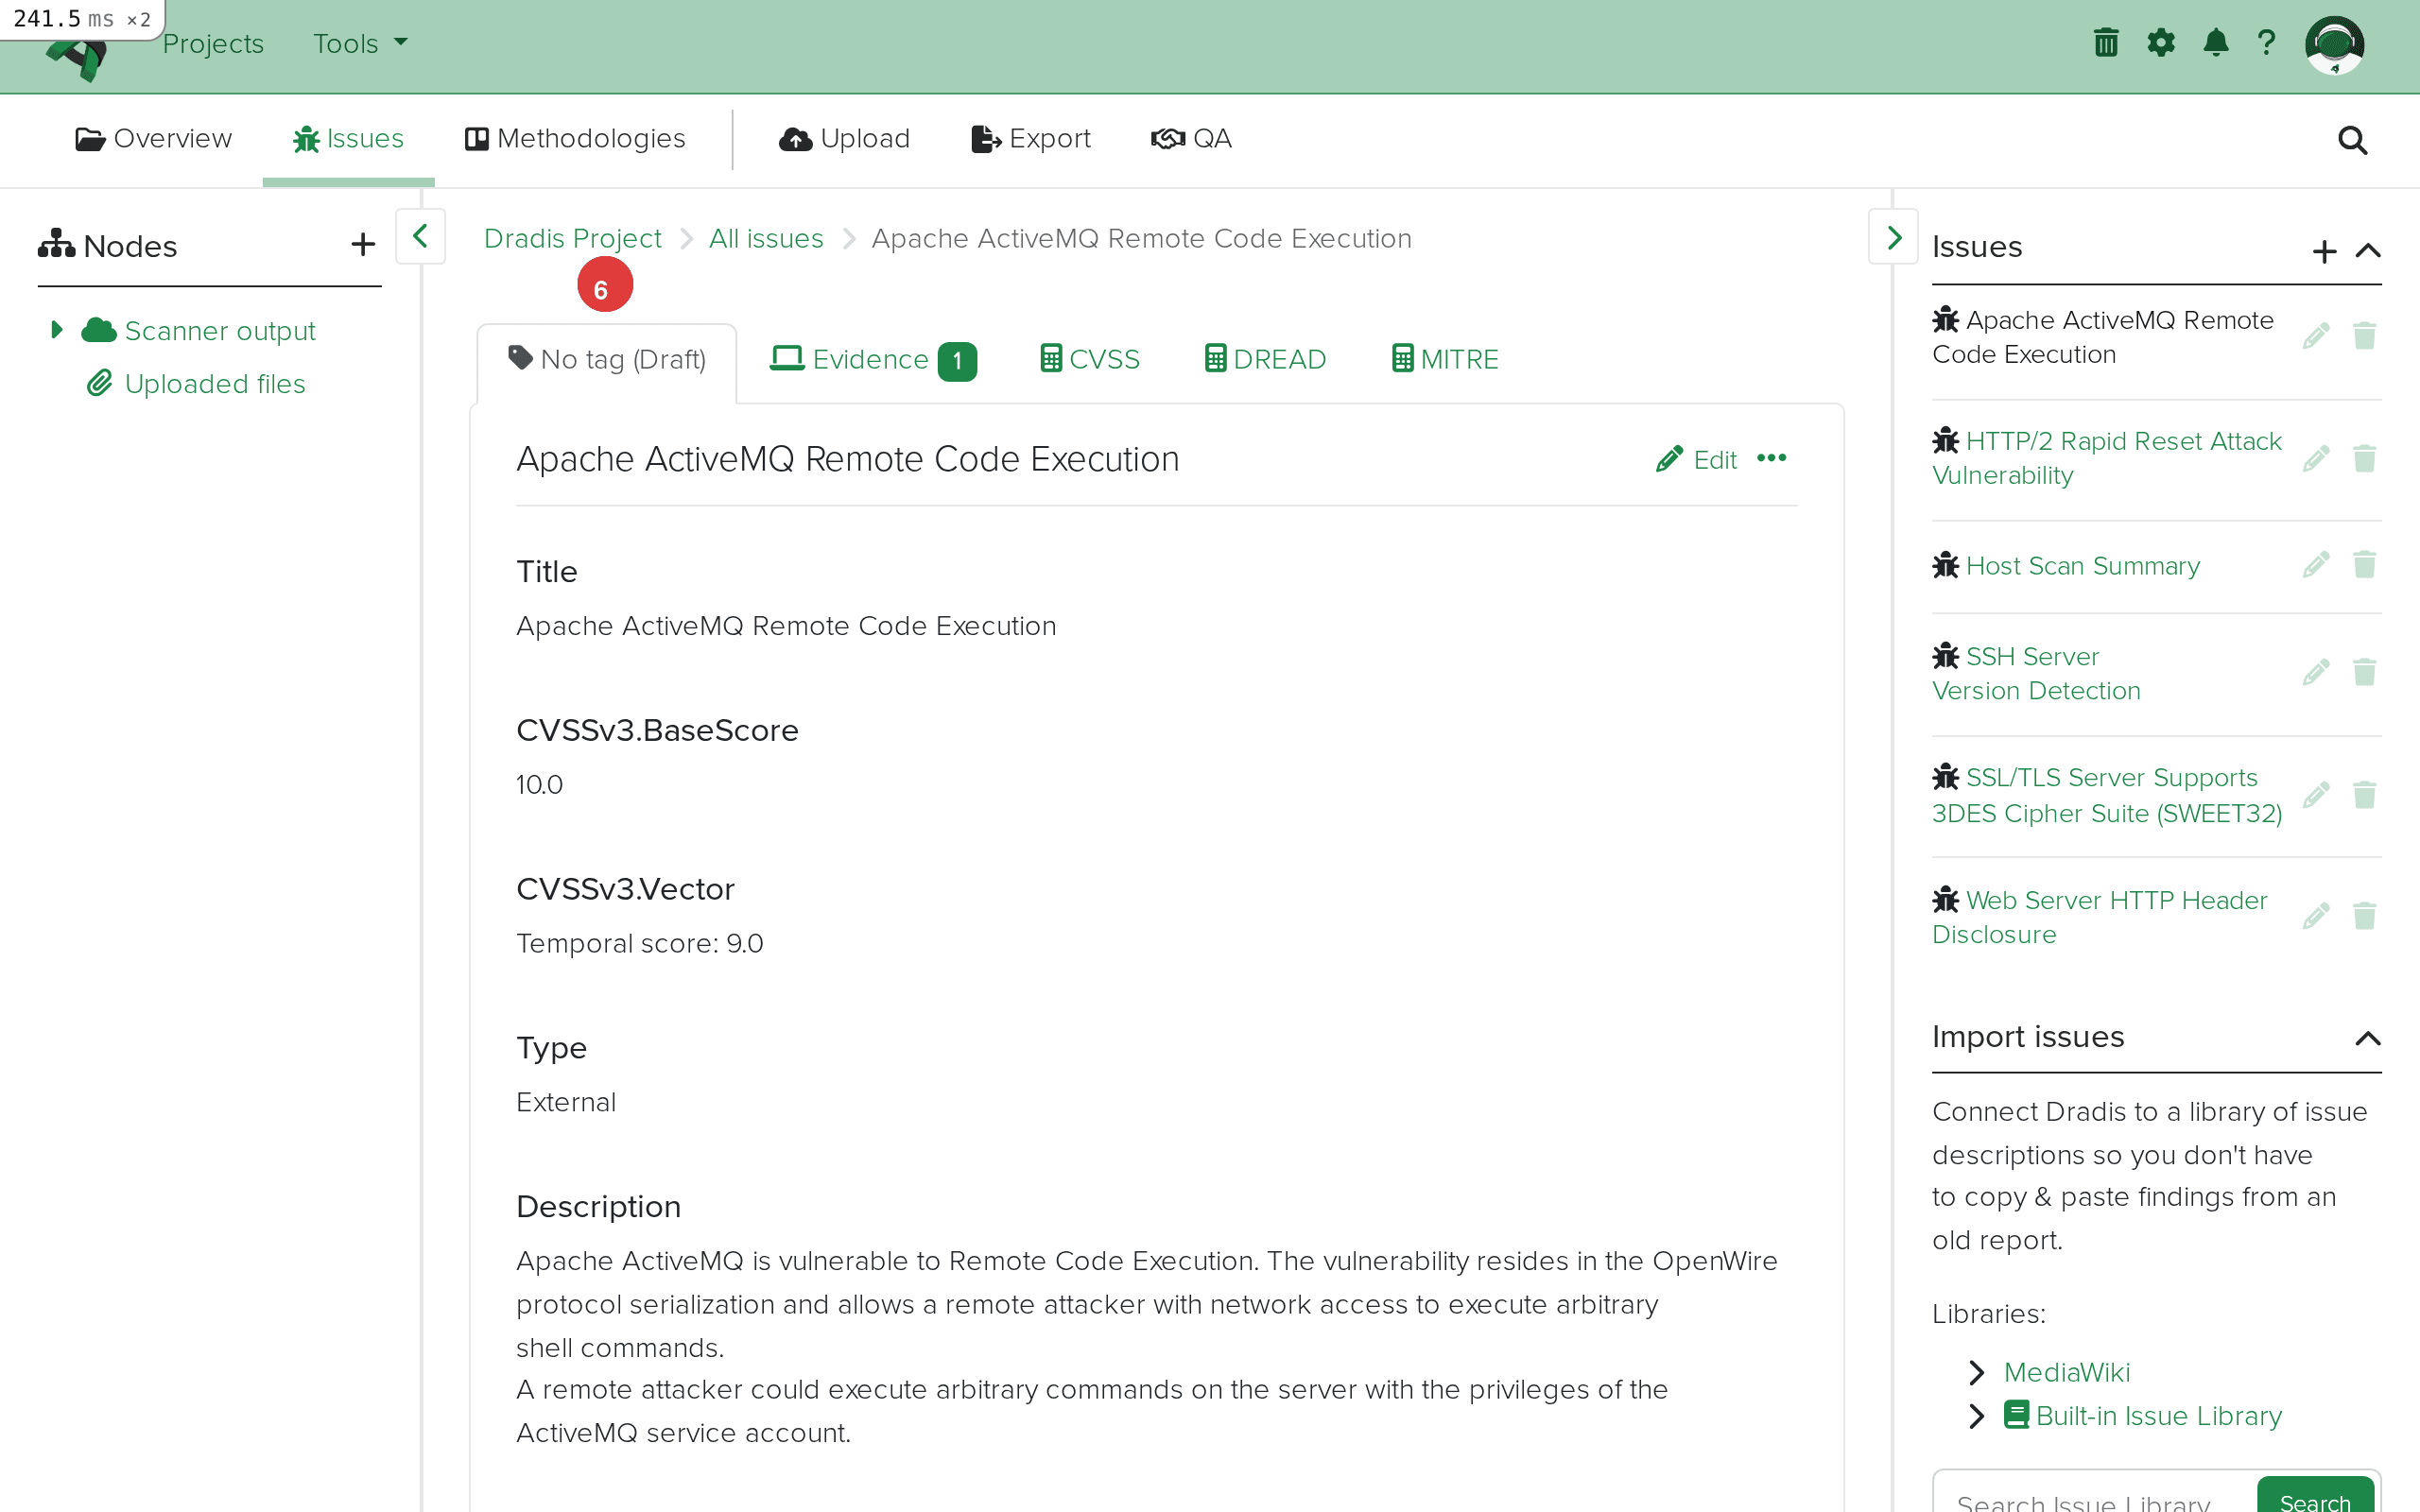 Issue detail view. The breadcrumb (1) shows the navigation path. The main content area (2) displays the imported fields: Title, Severity, QID, Diagnosis, Consequence, Solution, CVSS scores, and CVE references.
Expand the Scanner output node in the sidebar. Each <IP> element from the Qualys scan appears as a child node – in this example, 203.0.113.10 and 203.0.113.20.
 The sidebar node tree (1) shows the Scanner output parent with individual host nodes (2) for each scanned target.
Click a host node to see its properties, including the IP address and any FQDN information from the scan.
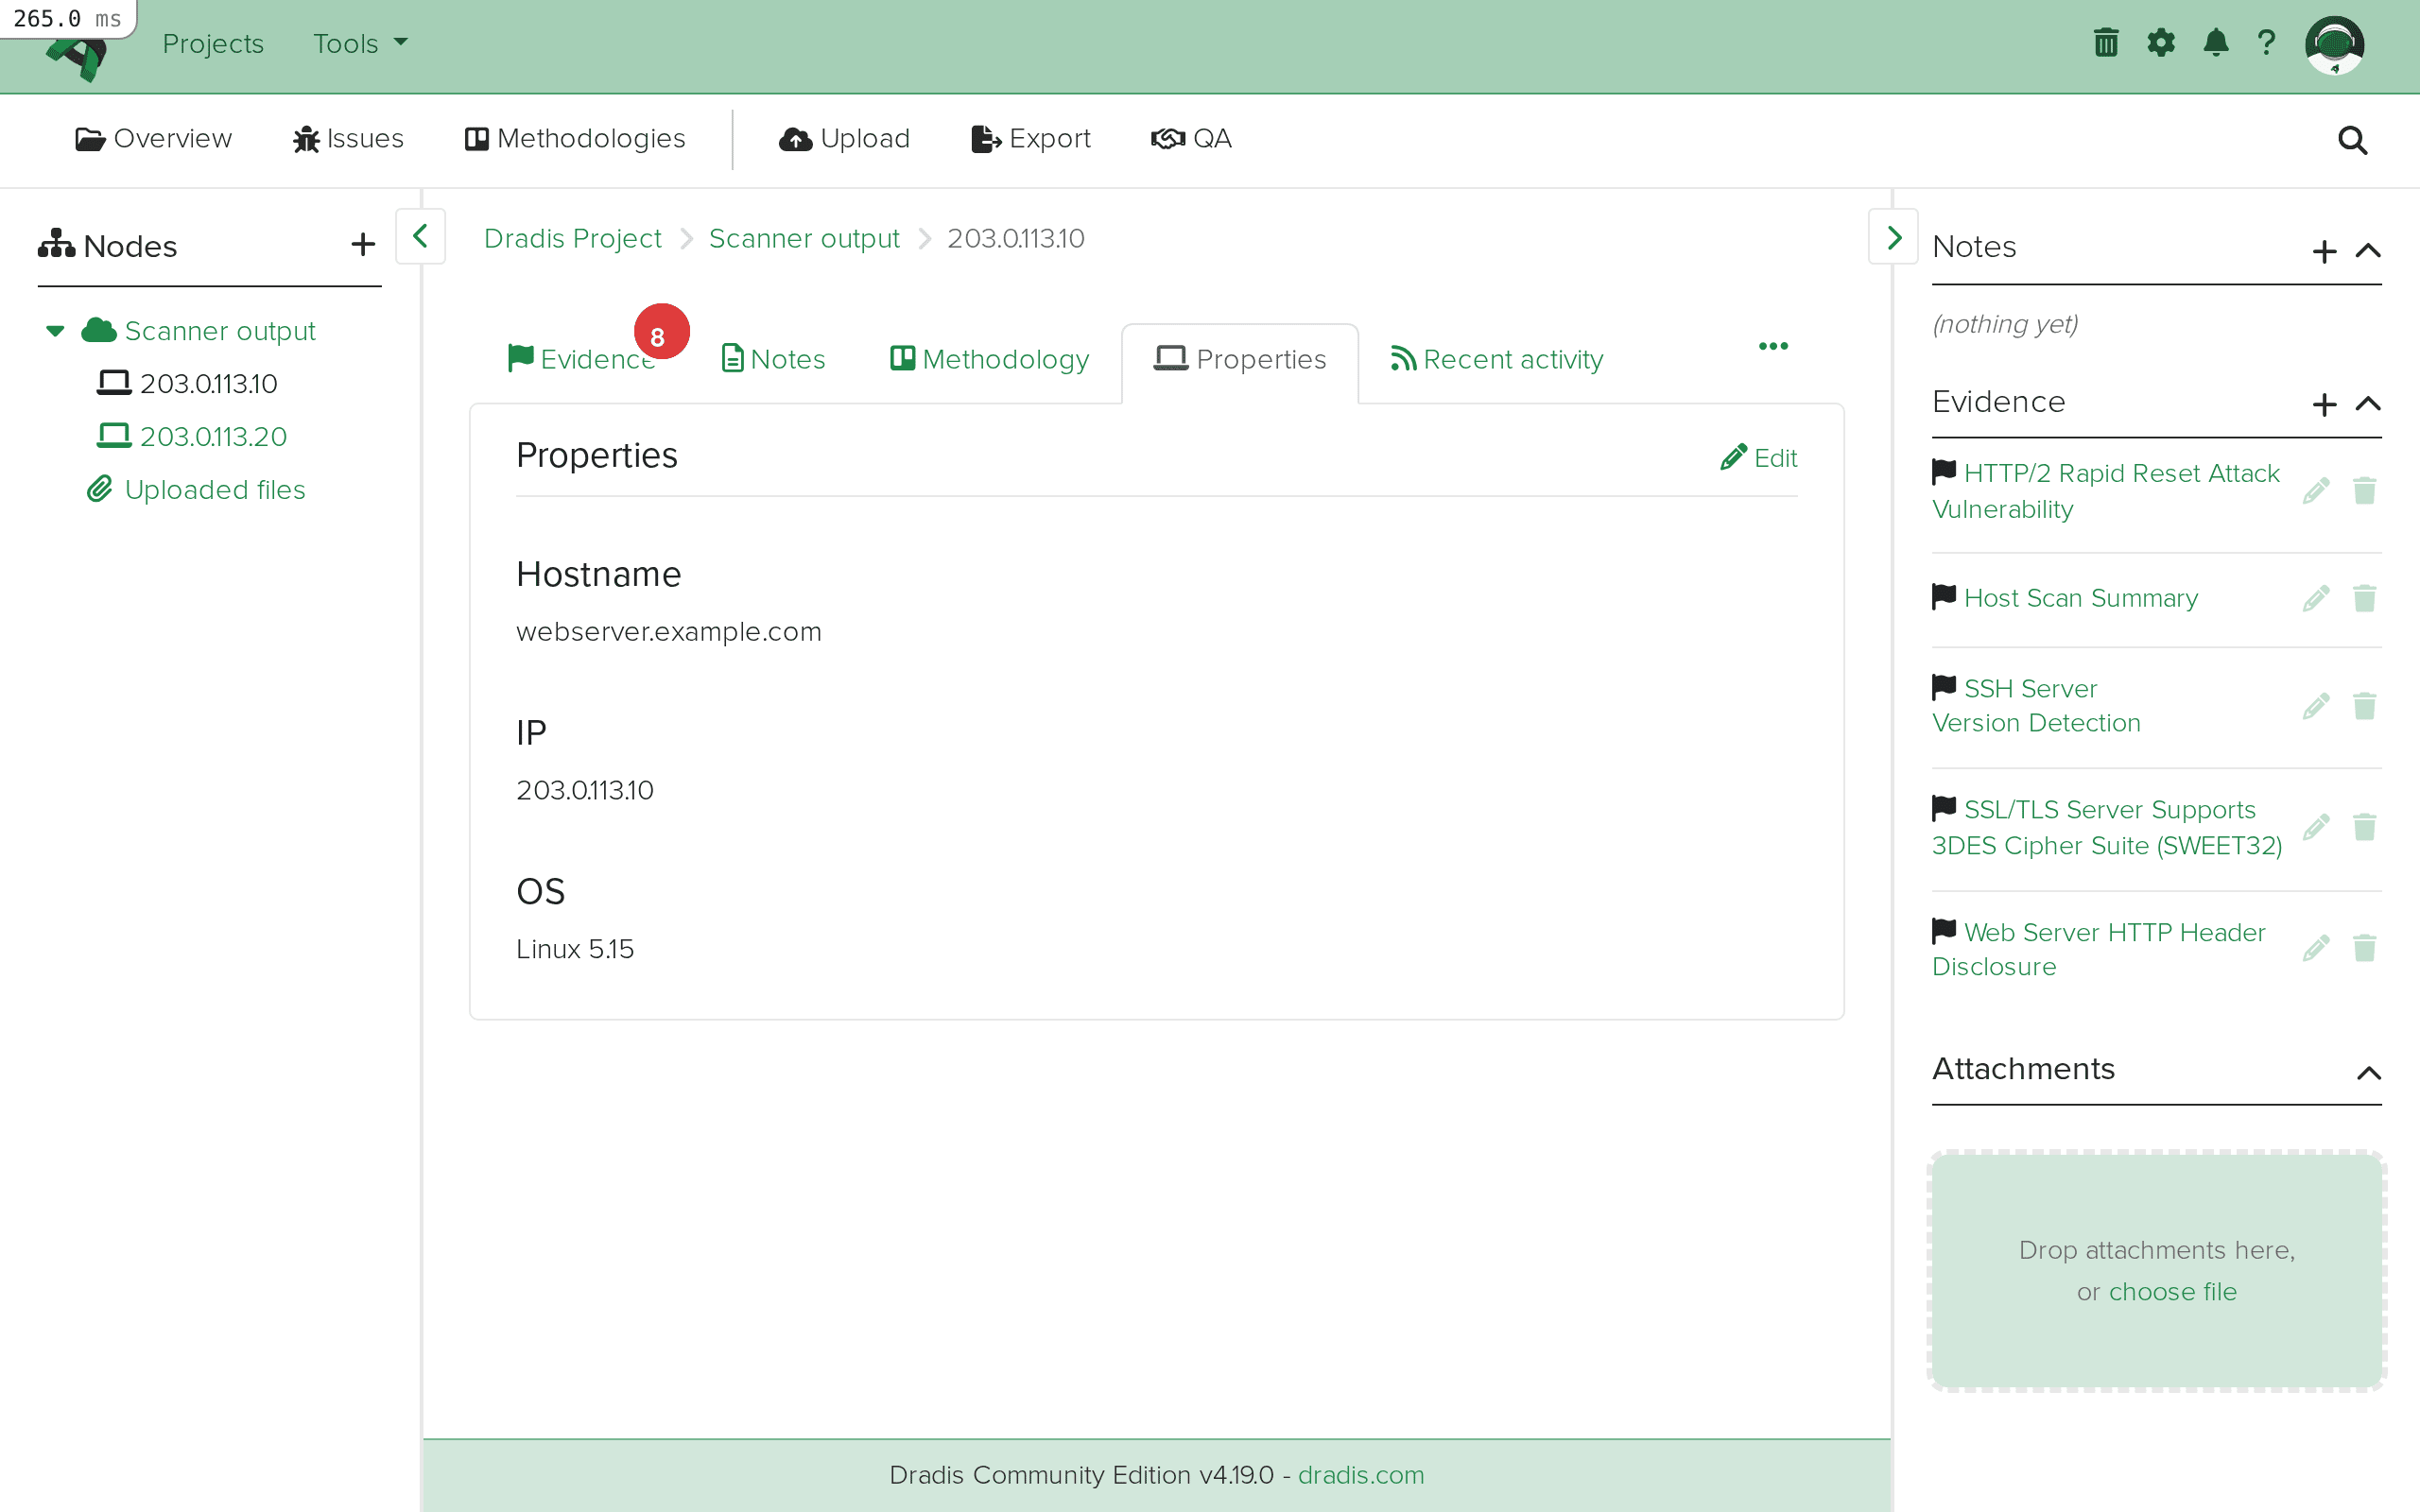 The host node view for 203.0.113.10. The breadcrumb (1) shows the navigation path. The node properties (2) display the host information from the Qualys scan.
Click the Evidence tab on a host node to see all findings linked to that specific host. Each Evidence entry shows the linked Issue title along with the port, protocol, and FQDN context extracted from the Qualys <CAT> elements.
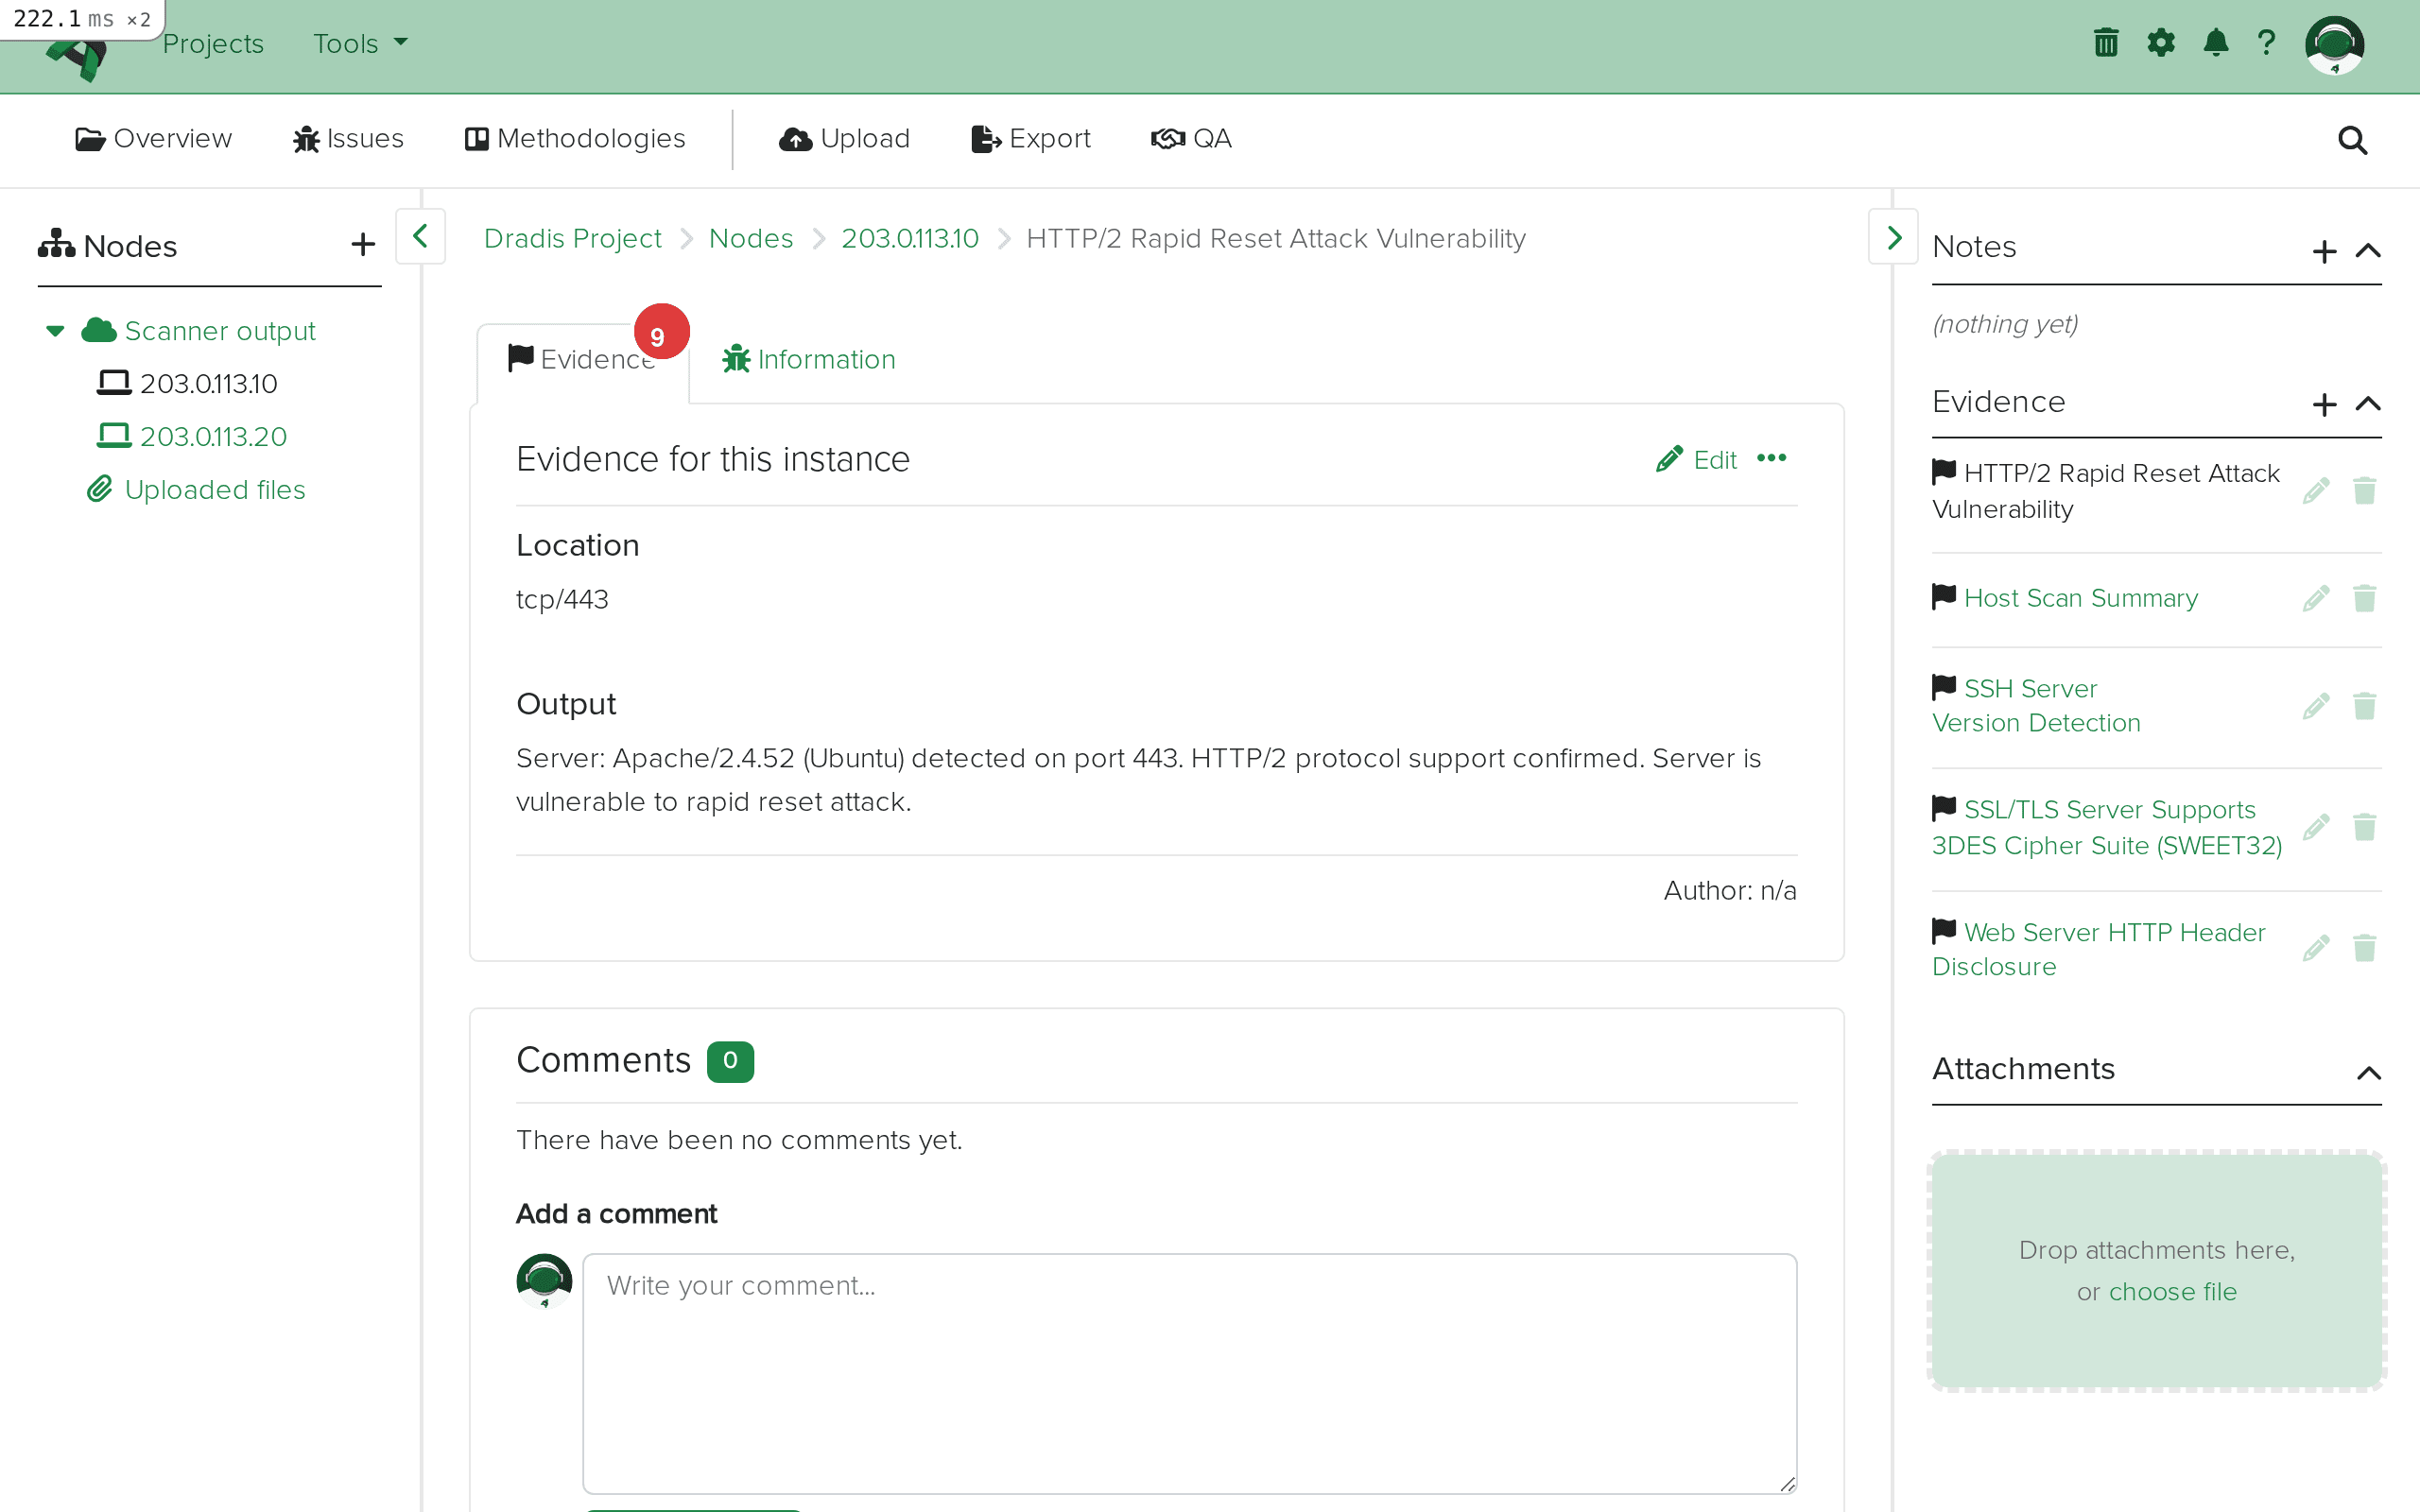 The Evidence tab (1) for 203.0.113.10 lists every evidence entry (2) with the protocol, port, and linked Issue title. The result field contains host-specific scan output from Qualys.
With your Qualys data imported, you can upload results from other tools – Nessus, OpenVAS, Nmap – into the same project. When multiple tools scan the same IP address, their findings appear under the same host node, giving you a consolidated view with cross-validated evidence.
Qualys uses a 1-5 severity scale: 1 is Minimal (informational), 2 is Medium, 3 is Serious, 4 is Critical, and 5 is Urgent. This is independent of the CVSS scores Qualys also provides. When building reports, reference both the Qualys severity and CVSS base score for a complete risk picture. In Dradis Pro, use the Mappings Manager to include both element.severity and element.cvss3_base in your Issue template.
Qualys marks certain findings with a PCI flag indicating PCI DSS relevance. The element.pci_flag field is available in Dradis to quickly identify PCI-relevant Issues. In Dradis Pro, use the Rules Engine to auto-tag any Issue where PCI flag is set, making it simple to filter and generate a PCI-focused report section.
Dradis supports three Qualys importers. Qualys::Vuln handles the traditional scan format (<SCAN> root element) and is the most common. Qualys::Asset handles asset-based data organized by asset rather than scan. Qualys::WAS handles Web Application Scanning results with web-specific findings like SQL injection and XSS. Always verify your XML root element before choosing a plugin – <SCAN> means Vuln format, while Asset and WAS use different schemas.
Qualys provides both CVSS v2 and v3 scores for most vulnerabilities. The plugin exposes element.cvss_base and element.cvss_temporal for v2, and element.cvss3_base, element.cvss3_temporal, and element.cvss3_version for v3. Prefer the v3 scores in report templates as they are the current industry standard.
Since all four data categories (VULNS, SERVICES, INFOS, PRACTICES) are imported as Issues, your project will contain a mix of vulnerabilities and informational findings. After import, use Dradis tags or the Rules Engine (Pro) to categorize them. Identify informational items by severity level 1 (Minimal) and tag them separately so they do not dilute vulnerability findings in the executive report.
Verify you selected the correct plugin variant: Qualys::Vuln for traditional scans, Qualys::Asset for asset data, or Qualys::WAS for web app scans. Open the file in a text editor and check the root element – <SCAN> indicates Vuln format. Also confirm it contains <IP> elements with nested <VULNS>, <SERVICES>, <INFOS>, or <PRACTICES> blocks.
Evidence fields come from <CAT> element attributes (protocol, port, fqdn, value, misc) and the <RESULT> element. If your export lacks these attributes – for example, a host-level assessment without port-specific data – the Evidence fields will be blank. The Issues will still contain full vulnerability data.
This is expected. Qualys uses numeric severity levels (1-5) in its XML, and the plugin preserves these raw values. You can map them to descriptive labels in your report template using Dradis Pro's Mappings Manager, or manually edit Issues after import.
Enterprise Qualys scans can produce XML files exceeding 100MB. The Dradis worker processes each <IP> block sequentially, so large files may take several minutes. Check the server logs (log/production.log) for progress. Consider splitting the export by IP range before uploading.
If you upload the same file twice, Issues are deduplicated by QID, but you will get duplicate Evidence entries. To re-import cleanly, delete existing Nodes and Evidence first, or start a fresh project.
| Feature | Community Edition | Professional |
|---|---|---|
| Qualys Vuln/Asset/WAS import | Yes | Yes |
| Default field mapping | Fixed template | Customizable via Mappings Manager |
| Custom Issue/Evidence templates | No | Yes – remap any Qualys field to any Dradis field |
| CVSS v2 and v3 in reports | Manual formatting | Automated with template variables |
| Rules Engine | No | Yes – auto-tag by severity, PCI flag, data category, or CVSS score |
| Report generation with Qualys data | Manual (HTML export) | Automated Word/Excel reports with Qualys field placeholders |
| Integration with Jira/ServiceNow | No | Yes – push Qualys findings as remediation tickets |
The Mappings Manager in Pro is particularly valuable for Qualys imports because Qualys provides detailed Diagnosis, Consequence, and Solution fields that map directly to structured report sections, including both CVSS v2 and v3 scores. Request a demo to see the Mappings Manager in action.
Yes. Dradis provides three Qualys importers: Qualys::Vuln for traditional scans (<SCAN> root element), Qualys::Asset for asset-based data, and Qualys::WAS for web application scan results. Each handles its corresponding XML schema. This guide focuses on the Vuln format, the standard output from Qualys Vulnerability Management.
Yes. Each import adds new Nodes, Issues, and Evidence to the existing project. If a second file contains the same host IP, the existing Node is reused with new Evidence added. Issues are deduplicated by QID – if the same vulnerability already exists, the plugin creates new Evidence linking to the existing Issue rather than creating a duplicate.
The Qualys severity scale (1-5) is proprietary and does not directly correspond to CVSS. Severity 1 is Minimal, 2 is Medium, 3 is Serious, 4 is Critical, and 5 is Urgent. Qualys also provides separate CVSS v2 and v3 scores in dedicated fields (element.cvss_base, element.cvss3_base, etc.). Use whichever scoring system your reporting standard requires.
All four categories – VULNS, SERVICES, INFOS, and PRACTICES – are imported as Issues with corresponding Evidence. There is no filtering by category during import. After import, differentiate them by severity level (INFOS and SERVICES typically have severity 1-2) and use tags or the Rules Engine in Dradis Pro to organize them into separate report sections.
No. The WAS format uses a different XML schema. Importing a WAS file with the Qualys::Vuln plugin will fail because the parser expects a <SCAN> root element with <IP> children. For WAS results, select Dradis::Plugins::Qualys::WAS instead. Similarly, asset-based exports require the Qualys::Asset plugin.
Loading form...
Your email is kept private. We don't do the spam thing.