Increase the number of export worker processes
By default, your instance of Dradis ships with one Resque worker process that clears the queue of background jobs, including report exports. Use the steps in this guide to add more Resque workers so that several reports can be generated at the same time.
Each worker loads its own copy of the application, so make sure the host has enough free memory for every worker you add.
Before making these changes, be sure to take a backup of your Dradis instance: Docker deployments or VM deployments. On a VM, take a snapshot as well.
Docker deployments
On a Docker deployment, each Resque worker runs in its own container. You add a worker by defining a new service in a compose.override.yaml file, which Docker Compose merges automatically with the base compose.yaml. The upgrade process does not touch override files, so the extra worker stays in place across upgrades.
The new service copies the settings of the existing resque service and only changes the three values that must be unique per worker: the container name, the PID file, and the log directory.
To add a worker:
- Run all commands from the Docker host, in the Dradis installation directory (where
compose.yamllives). - Create a log directory for the new worker and make it writable:
mkdir -p log/resque-2 && chmod 777 log/resque-2Don't skip this step. If the directory doesn't exist, Docker creates it owned by
root, the worker can't write its logs, and the container restarts in a loop. - Create a
compose.override.yamlfile with the following content. Make sure the file is in the same directory as the originalcompose.yaml. If the file already exists, add theresque-2service under its existingservices:key instead.services: resque-2: extends: file: compose.yaml service: resque container_name: resque-2 environment: PIDFILE: tmp/pids/dradispro-resque-2.pid volumes: - ./log/resque-2:/dradispro/log - Start the new worker:
docker compose up -d resque-2 - To confirm the change, run:
docker compose ps resque resque-2Both containers should show a status of
Up. Ifresque-2showsRestarting, check the ownership of thelog/resque-2directory from step 2. - To verify that the workers are registered with Resque:
docker compose exec redis redis-cli smembers resque:workersYou should see one line per worker, for example:
53d18c161c4d:1:*
7a3cd2d70a78:1:*
To add more workers, repeat these steps with resque-3, resque-4, and so on. Each one needs its own log directory and its own service in compose.override.yaml with a unique container_name, PIDFILE, and log path.
To remove a worker:
- Stop and remove the worker's container:
docker compose rm -sf resque-2 - Delete the
resque-2service fromcompose.override.yaml. If it was the only entry underservices:, delete the file.
VM deployments
On a VM deployment, each Resque worker is a process supervised by god. You add a worker by copying the existing god configuration file.
To increase the number export worker processes:
- SSH into the console as root. Default credentials are available in the User Portal.
- Run the following commands:
cp /etc/god.d/dradispro-resque-1.god /etc/god.d/dradispro-resque-2.godchmod 0777 /etc/god.d/dradispro-resque-2.god - Open the
/etc/god.d/dradispro-resque-2.godfile and edit the following lines to replace instances ofdradispro-resque-1withdradispro-resque-2:- Line #2:
w.name = "dradispro-resque-2" - Line #3:
w.log = '/var/log/god/dradispro-resque-2.log' - Line #7:
"PIDFILE" => "/var/run/god/dradispro-resque-2.pid" - Line #12:
... sudo touch /var/run/god/dradispro-resque-2.pid && sudo chown dradispro.staff /var/run/god/dradispro-resque-2.pid...
- Line #2:
- Save the file, then run:
chmod 0440 /etc/god.d/dradispro-resque-2.god - Load your new worker by running:
god load /etc/god.d/dradispro-resque-2.god - To confirm the change, run:
god statusYou should see the following output:
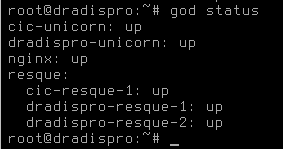
- To verify that the worker is running:
ps aux | grep resque | grep WaitingYou should see a list of all the resque workers that are running.
Reminder: on a VM deployment, local changes will be overwritten the next time you upgrade. If you make any local changes, make sure to re-apply them every time you upgrade Dradis.
Next help article: Set maximum login attempts →