Acunetix with Dradis
Step-by-step guide to importing Acunetix Web Vulnerability Scanner (WVS) results into Dradis. Includes screenshots, field mappings, tips for managing DAST findings, false positives, and common troubleshooting.

Acunetix is a web application security testing tool that can be used to perform both automated and manual vulnerability and penetration testing. By integrating Acunetix with Dradis, upload the results of your testing to the security engagement project. Combine findings from Acunetix with other security scanning tools in Dradis to make it easier for testers to perform a comprehensive analysis and collaborate on security engagements. Generate a customized vulnerability or pentest report with a few clicks that include the findings from Acunetix and save valuable research time for the testing team.
The Acunetix® name, if trademarked, is the intellectual property of the vendor. Uses of the Acunetix® name in this page are for identification purposes only and do not imply an endorsement by the trademark owner. Dradis is not endorsed or owned by, or affiliated with, the Acunetix® vendor.

Ken Johnson
Former App Security Manager at LivingSocialAvailable for
Support Documentation
Acunetix Web Vulnerability Scanner (WVS) is a commercial dynamic application security testing (DAST) tool that crawls and scans web applications for SQL injection, cross-site scripting, misconfigurations, and hundreds of other vulnerability types. Its reports are detailed, often containing dozens or even hundreds of findings per scan, complete with severity ratings, CVSS scores, remediation advice, and Acunetix Origin Pinpointing (AOP) data that traces vulnerabilities back to source code locations. However, consolidating those findings into a client-ready pentest report alongside output from other tools is a manual grind without an integration layer. The Dradis Acunetix plugin imports the standard Acunetix XML export directly, creating structured Issues with full vulnerability metadata, Evidence entries that track each affected URL and parameter, and host Nodes that organize everything by scan target. This guide walks you through the complete import process, explains the data model, and shows you how to get the most out of Acunetix data in your Dradis projects.
| Detail | Value |
|---|---|
| Dradis Plugin | Dradis::Plugins::Acunetix::Standard |
| Supported File Format | .xml (Acunetix WVS Standard XML) |
| Available In | Community Edition and Professional |
| Data Imported | Issues, Evidence, Nodes (scan targets), Notes (scan summary) |
| Typical Import Time | ~2 seconds for 10 findings, ~10 seconds for 100+ |
Note: Dradis also ships with a separate
Dradis::Plugins::Acunetix::Acunetix360importer for the Acunetix 360 platform (now part of the Invicti family). This guide covers the Standard importer, which handles the classic Acunetix WVS XML format. If you are using Acunetix 360 or Invicti, select the Acunetix360 plugin instead.
When you import an Acunetix XML file, the Dradis plugin parses the scan structure and creates four types of objects:
Nodes: The plugin creates one Node per scan target, derived from the <StartURL> element's hostname. For example, if the scan targets http://shop.example.com/, the resulting Node is labeled shop.example.com. All host nodes appear under the Scanner output parent node in the sidebar. If you scan multiple targets in separate XML files and import them into the same project, each unique hostname gets its own Node.
Notes (Scan Summary): For each scan, the plugin creates a Note on the host Node that captures scan-level metadata – the scan name, start URL, start and finish times, whether the scan was aborted, server responsiveness status, and a fingerprint section with web server banner, detected operating system, web server software, and application technologies. This scan summary note is titled using the scan start time and provides context about the scanning environment without cluttering your vulnerability findings.
Issues: Each <ReportItem> in the XML becomes an Issue in Dradis, uniquely identified by the combination of ModuleName and Name. This deduplication key means that if Acunetix detects SQL Injection on three different pages, the plugin creates one Issue called "SQL Injection" and links it to each affected location through Evidence. The Issue contains the vulnerability description, severity, impact assessment, detailed technical information, remediation guidance, CVSS v2 and v3 scores and vectors, CVE references, and external reference links.
Evidence: For every <ReportItem>, the plugin also creates an Evidence entry linking the Issue to the Node. Evidence captures the instance-specific details: which URL is affected, which parameter was vulnerable, the detailed findings for that specific location, and Acunetix Origin Pinpointing (AOP) data if available. AOP is a feature unique to Acunetix that attempts to trace web vulnerabilities back to the source file and line number responsible, bridging the gap between DAST results and source code remediation.
The Acunetix plugin uses the combination of ModuleName and Name as the unique key for Issues. This is an important distinction from how some other scanners work:
ModuleName is the internal Acunetix scanner module that detected the vulnerability (e.g., Scripting, Server_Configuration, Session_Cookie)Name is the human-readable vulnerability name (e.g., SQL Injection, Cross-site scripting (reflected))Two findings are considered the same Issue only when both their ModuleName and Name match. This prevents false deduplication – for instance, a "Session cookie without HttpOnly flag" finding from the Session_Cookie module would be treated separately from a similarly-named finding originating in a different module, even if the names partially overlap. When the same ModuleName/Name combination appears on multiple pages, the plugin creates a single Issue and multiple Evidence entries, one per affected location.
The plugin maps Acunetix XML elements to Dradis Issue fields using the report_item namespace:
| Dradis Field | Acunetix XML Source | Template Placeholder |
|---|---|---|
| Title | <Name> |
{{ acunetix[report_item.name] }} |
| Severity | <Severity> |
{{ acunetix[report_item.severity] }} |
| Type | <Type> |
{{ acunetix[report_item.type] }} |
| Impact | <Impact> |
{{ acunetix[report_item.impact] }} |
| Description | <Description> |
{{ acunetix[report_item.description] }} |
| DetailedInformation | <DetailedInformation> |
{{ acunetix[report_item.detailed_information] }} |
| Recommendation | <Recommendation> |
{{ acunetix[report_item.recommendation] }} |
| CVSSVector | <CVSSDescriptor> |
{{ acunetix[report_item.cvss_descriptor] }} |
| CVSSScore | <CVSSScore> |
{{ acunetix[report_item.cvss_score] }} |
| CVSS3Vector | <CVSS3Descriptor> |
{{ acunetix[report_item.cvss3_descriptor] }} |
| CVSS3Score | <CVSS3Score> |
{{ acunetix[report_item.cvss3_score] }} |
| CVSS3TempScore | <CVSS3TempScore> |
{{ acunetix[report_item.cvss3_tempscore] }} |
| CVSS3EnvScore | <CVSS3EnvScore> |
{{ acunetix[report_item.cvss3_envscore] }} |
| CVEList | <CVEList> |
{{ acunetix[report_item.cve_list] }} |
| References | <References> |
{{ acunetix[report_item.references] }} |
Evidence fields use the evidence namespace and capture the per-instance details:
| Dradis Field | Acunetix XML Source | Template Placeholder |
|---|---|---|
| Details | Instance-specific finding details | {{ acunetix[evidence.details] }} |
| Affects | Affected URL | {{ acunetix[evidence.affects] }} |
| Parameter | Vulnerable parameter | {{ acunetix[evidence.parameter] }} |
| AOPSourceFile | Source file (AOP) | {{ acunetix[evidence.aop_source_file] }} |
| AOPSourceLine | Source line (AOP) | {{ acunetix[evidence.aop_source_line] }} |
| AOPAdditional | Additional AOP info | {{ acunetix[evidence.aop_additional] }} |
| FalsePositive | False positive flag | {{ acunetix[evidence.is_false_positive] }} |
The scan summary Note uses the scan namespace:
| Dradis Field | Acunetix XML Source | Template Placeholder |
|---|---|---|
| Title | Scan start time | Acunetix scanner notes ({{ acunetix[scan.start_time] }}) |
| ScanName | <Name> |
{{ acunetix[scan.name] }} |
| StartURL | <StartURL> |
{{ acunetix[scan.start_url] }} |
| StartTime | <StartTime> |
{{ acunetix[scan.start_time] }} |
| FinishTime | <FinishTime> |
{{ acunetix[scan.finish_time] }} |
| ScanTime | <ScanTime> |
{{ acunetix[scan.scan_time] }} |
| Aborted | <Aborted> |
{{ acunetix[scan.aborted] }} |
| Responsive | <Responsive> |
{{ acunetix[scan.responsive] }} |
| Banner | <Banner> |
{{ acunetix[scan.banner] }} |
| OS | <Os> |
{{ acunetix[scan.os] }} |
| WebServer | <WebServer> |
{{ acunetix[scan.web_server] }} |
| Technologies | <Technologies> |
{{ acunetix[scan.technologies] }} |
In Acunetix WVS, navigate to your completed scan results and export the report in XML format. The standard Acunetix XML report is the format Dradis expects – it starts with a root element containing <Scan> blocks, each with <ReportItems> nested inside. Make sure you select the full XML export rather than a summary or PDF report, as only the XML format preserves the structured data that Dradis maps to Issues, Evidence, and Notes.
If you are using Acunetix through its web-based UI, go to Reports, select the scan you want to export, and choose Developer or XML as the export format. For the desktop version, use File > Save Scan Results and select the XML option. The resulting file typically starts with <?xml and contains a <ScanGroup> root element. Verify this before uploading to Dradis.
Log into Dradis and open the project where you want to import the Acunetix results. Click the Upload tab in the top navigation bar to reach the Upload Manager.
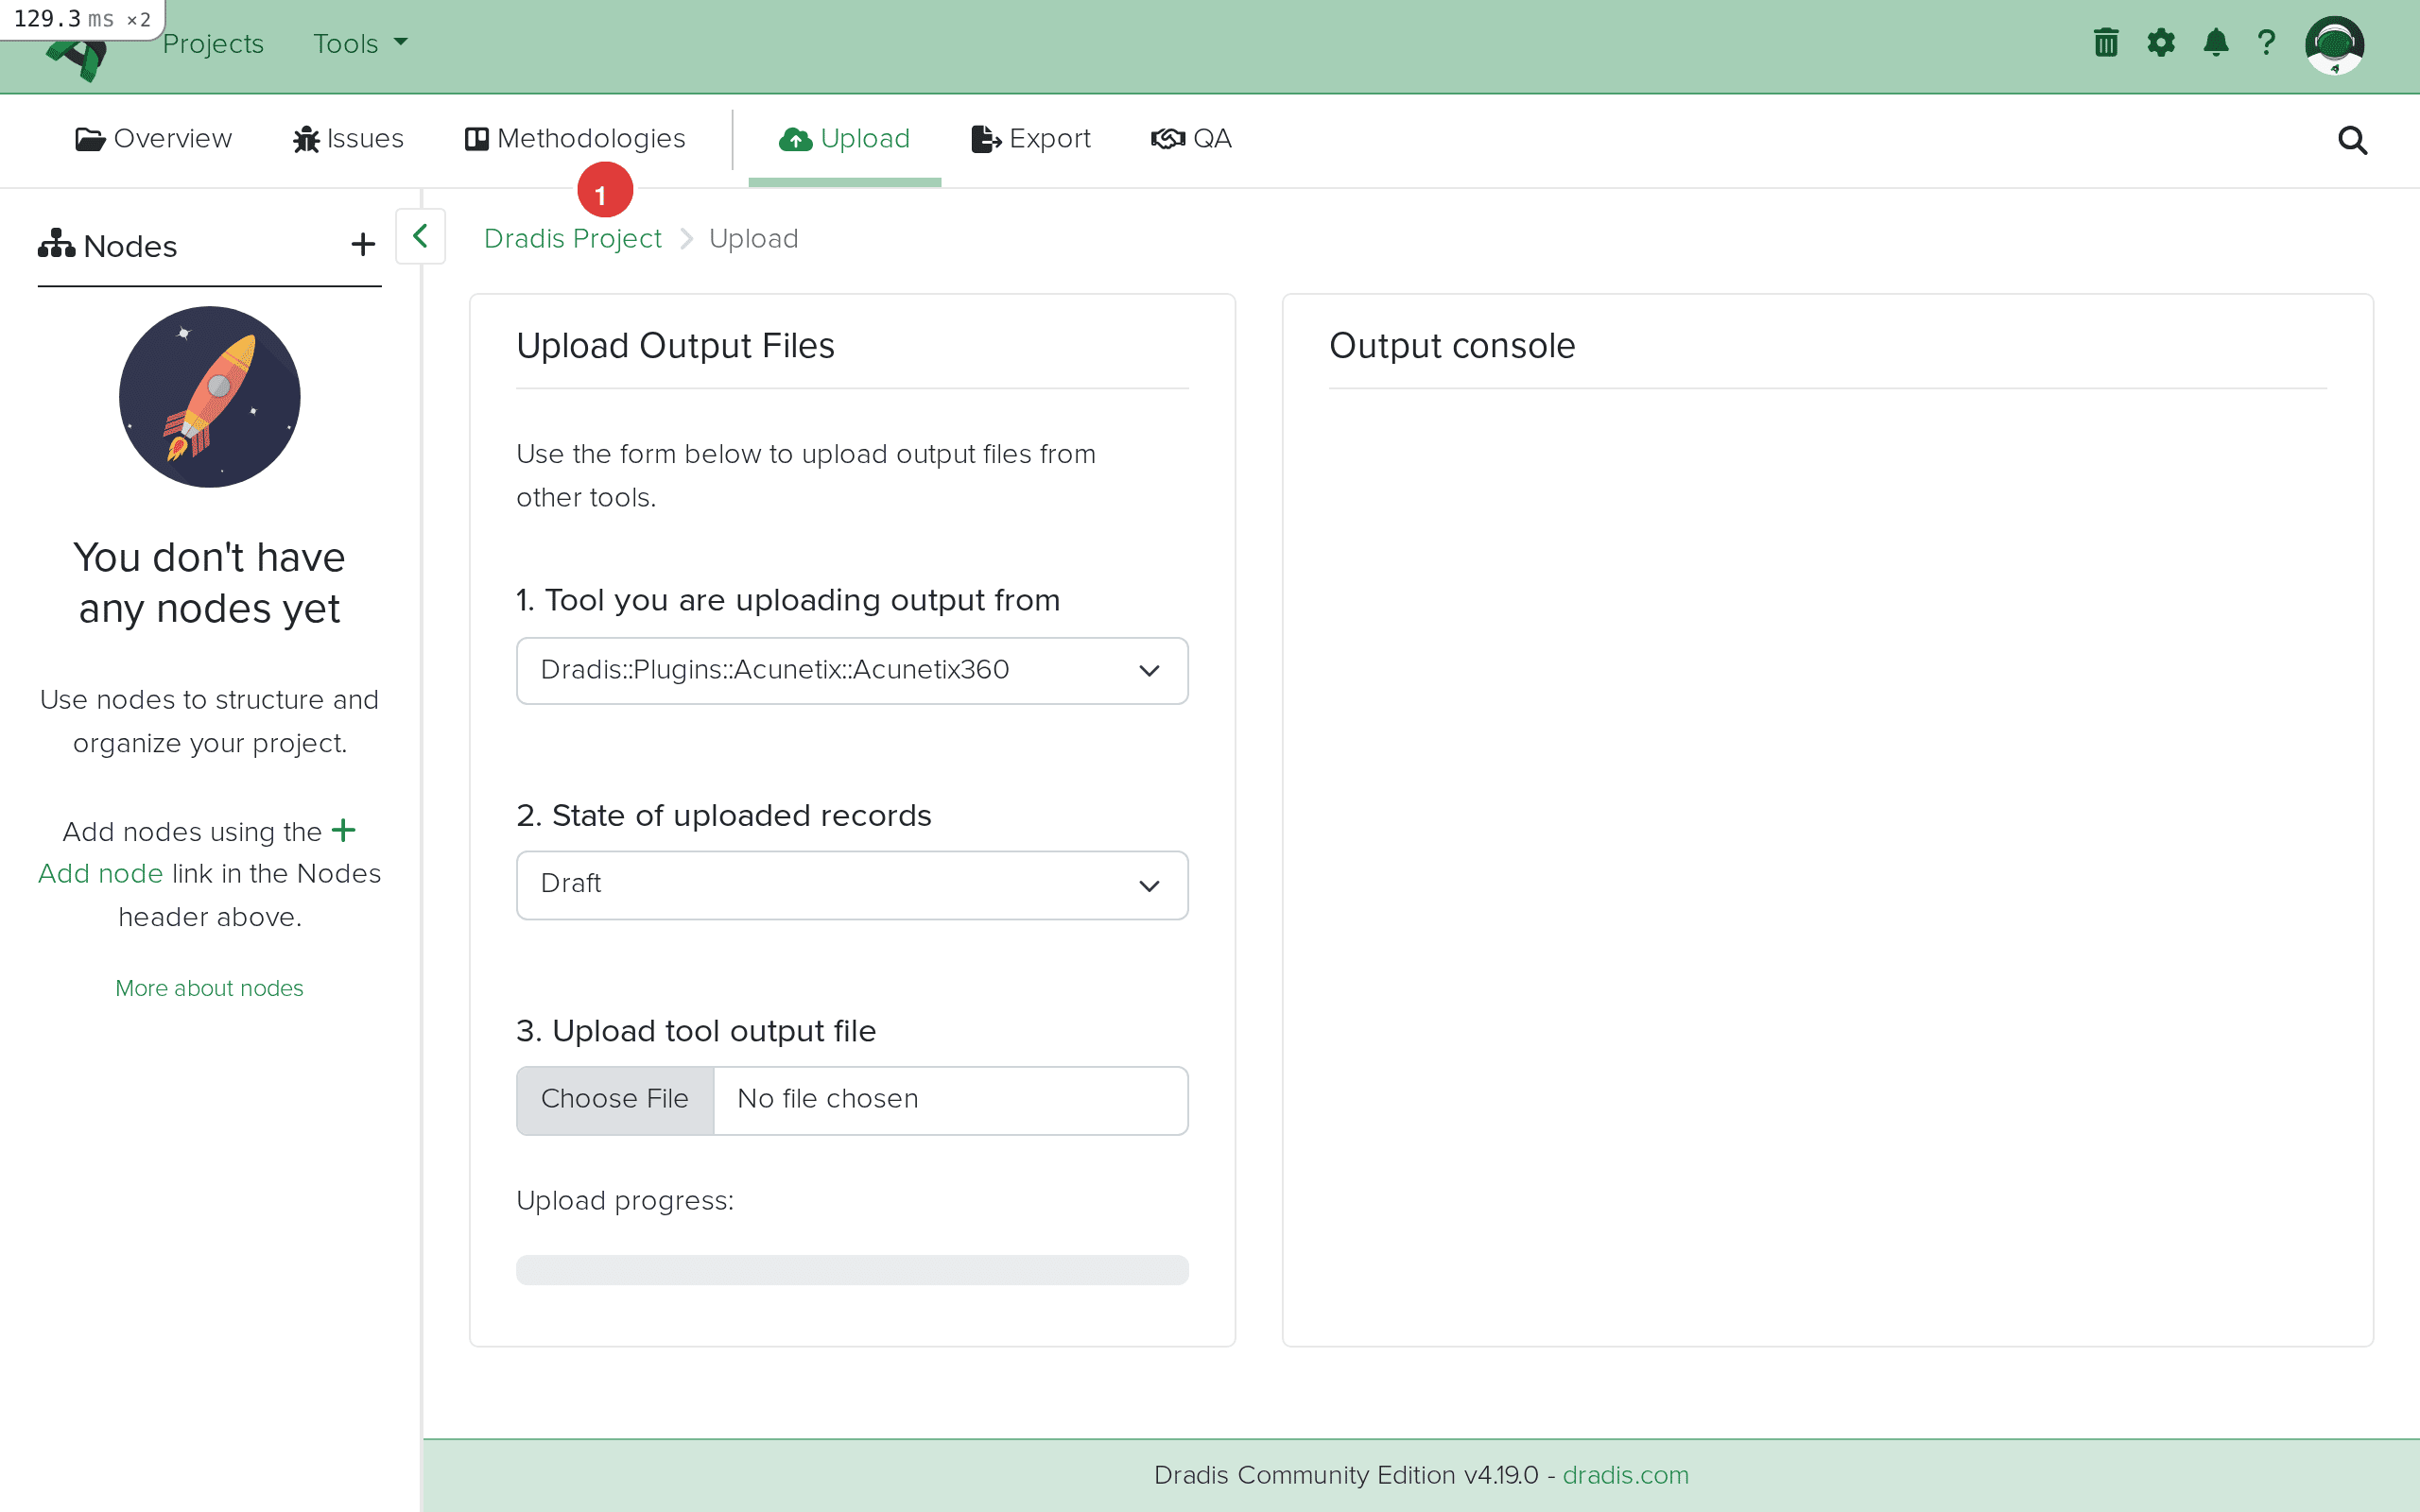
The Upload Manager presents the standard three-part form: tool selection dropdown, record state selector, and file picker. This is the same interface you use for all scanner imports in Dradis.
Click the tool dropdown and select Dradis::Plugins::Acunetix::Standard. This tells Dradis to use the standard Acunetix WVS parser. If you have an Acunetix 360 or Invicti export instead, you would select the Acunetix360 plugin, but for classic Acunetix WVS XML files, Standard is the correct choice.

The dropdown lists all available import plugins. Acunetix Standard appears alongside other web application scanner plugins like Burp, ZAP, and Nikto. Selecting the correct plugin is essential because each parser expects a specific XML schema – using the wrong plugin will result in an empty import.
Click Choose File and select the XML file you exported from Acunetix. The filename typically follows Acunetix's default naming pattern, though you can rename it to anything as long as it retains the .xml extension.

Verify the file size looks reasonable for your scan. A scan with a handful of findings typically produces an XML file between 50KB and 500KB. Larger scans with hundreds of findings and detailed technical information can produce multi-megabyte files, which Dradis handles without issue.
Click Upload to begin the import. Dradis parses the XML file, creates the host Node from the scan's StartURL, attaches the scan summary Note, and then processes each ReportItem to create Issues and Evidence entries. The output console streams the import progress in real time.
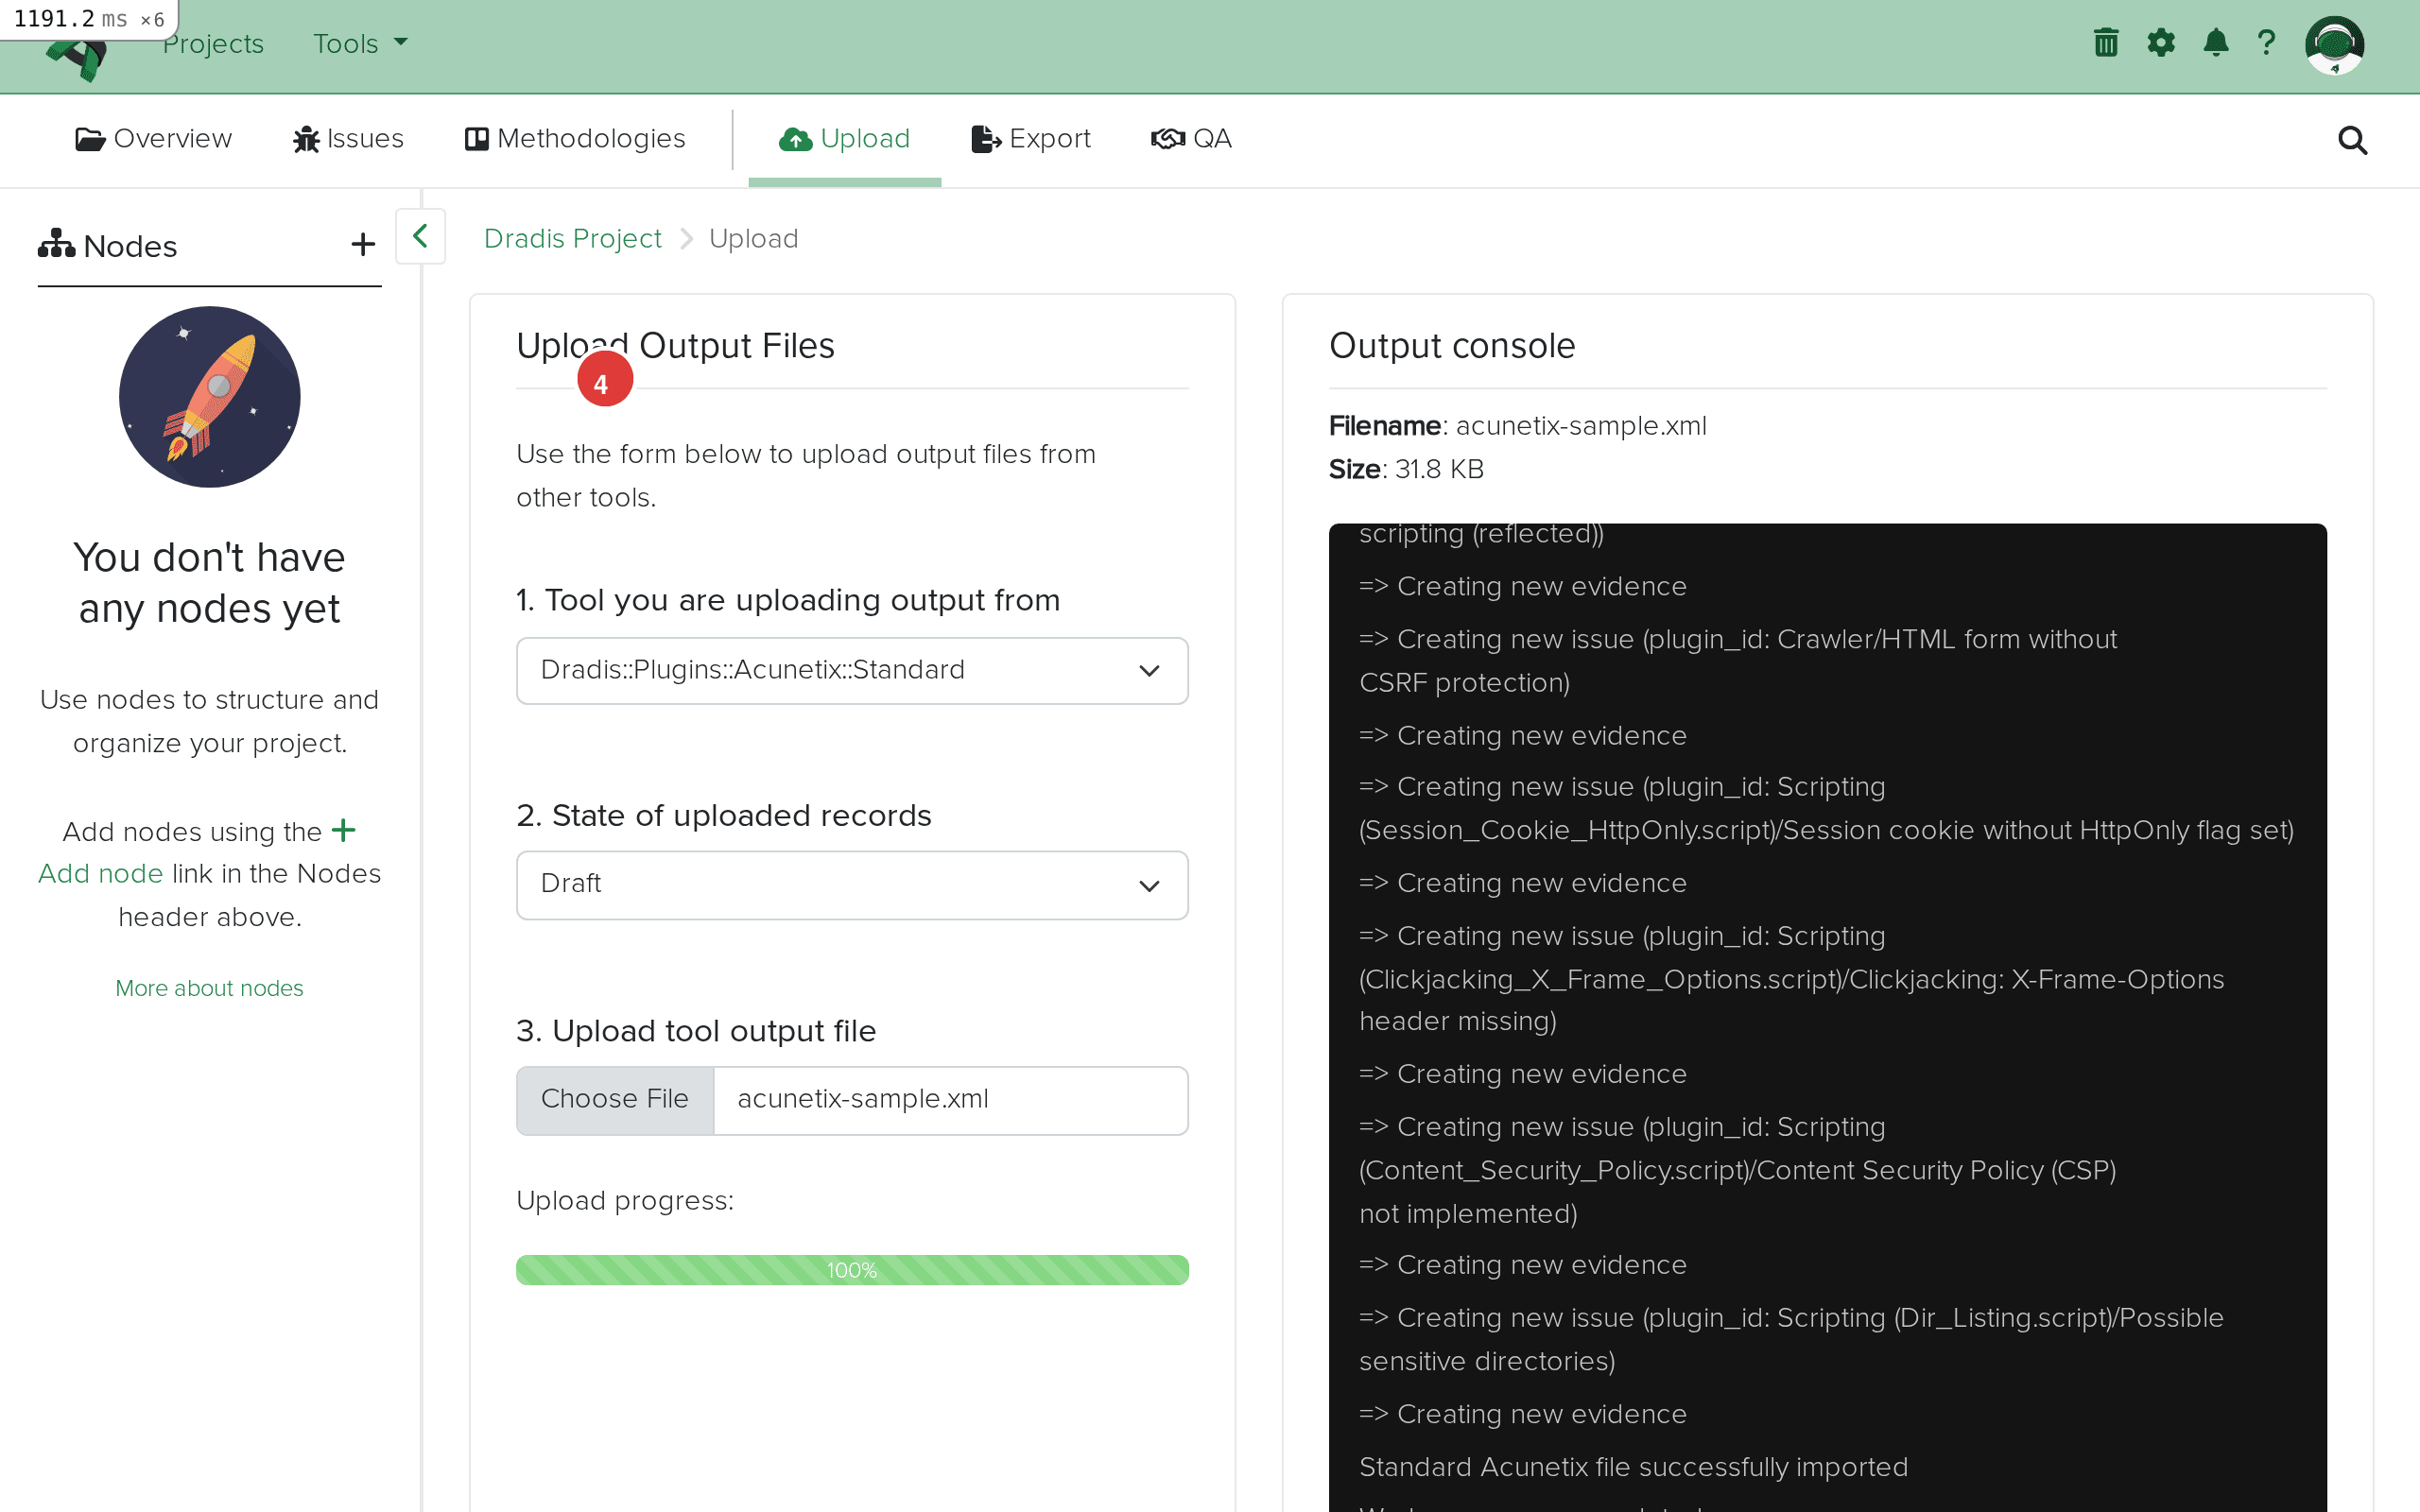
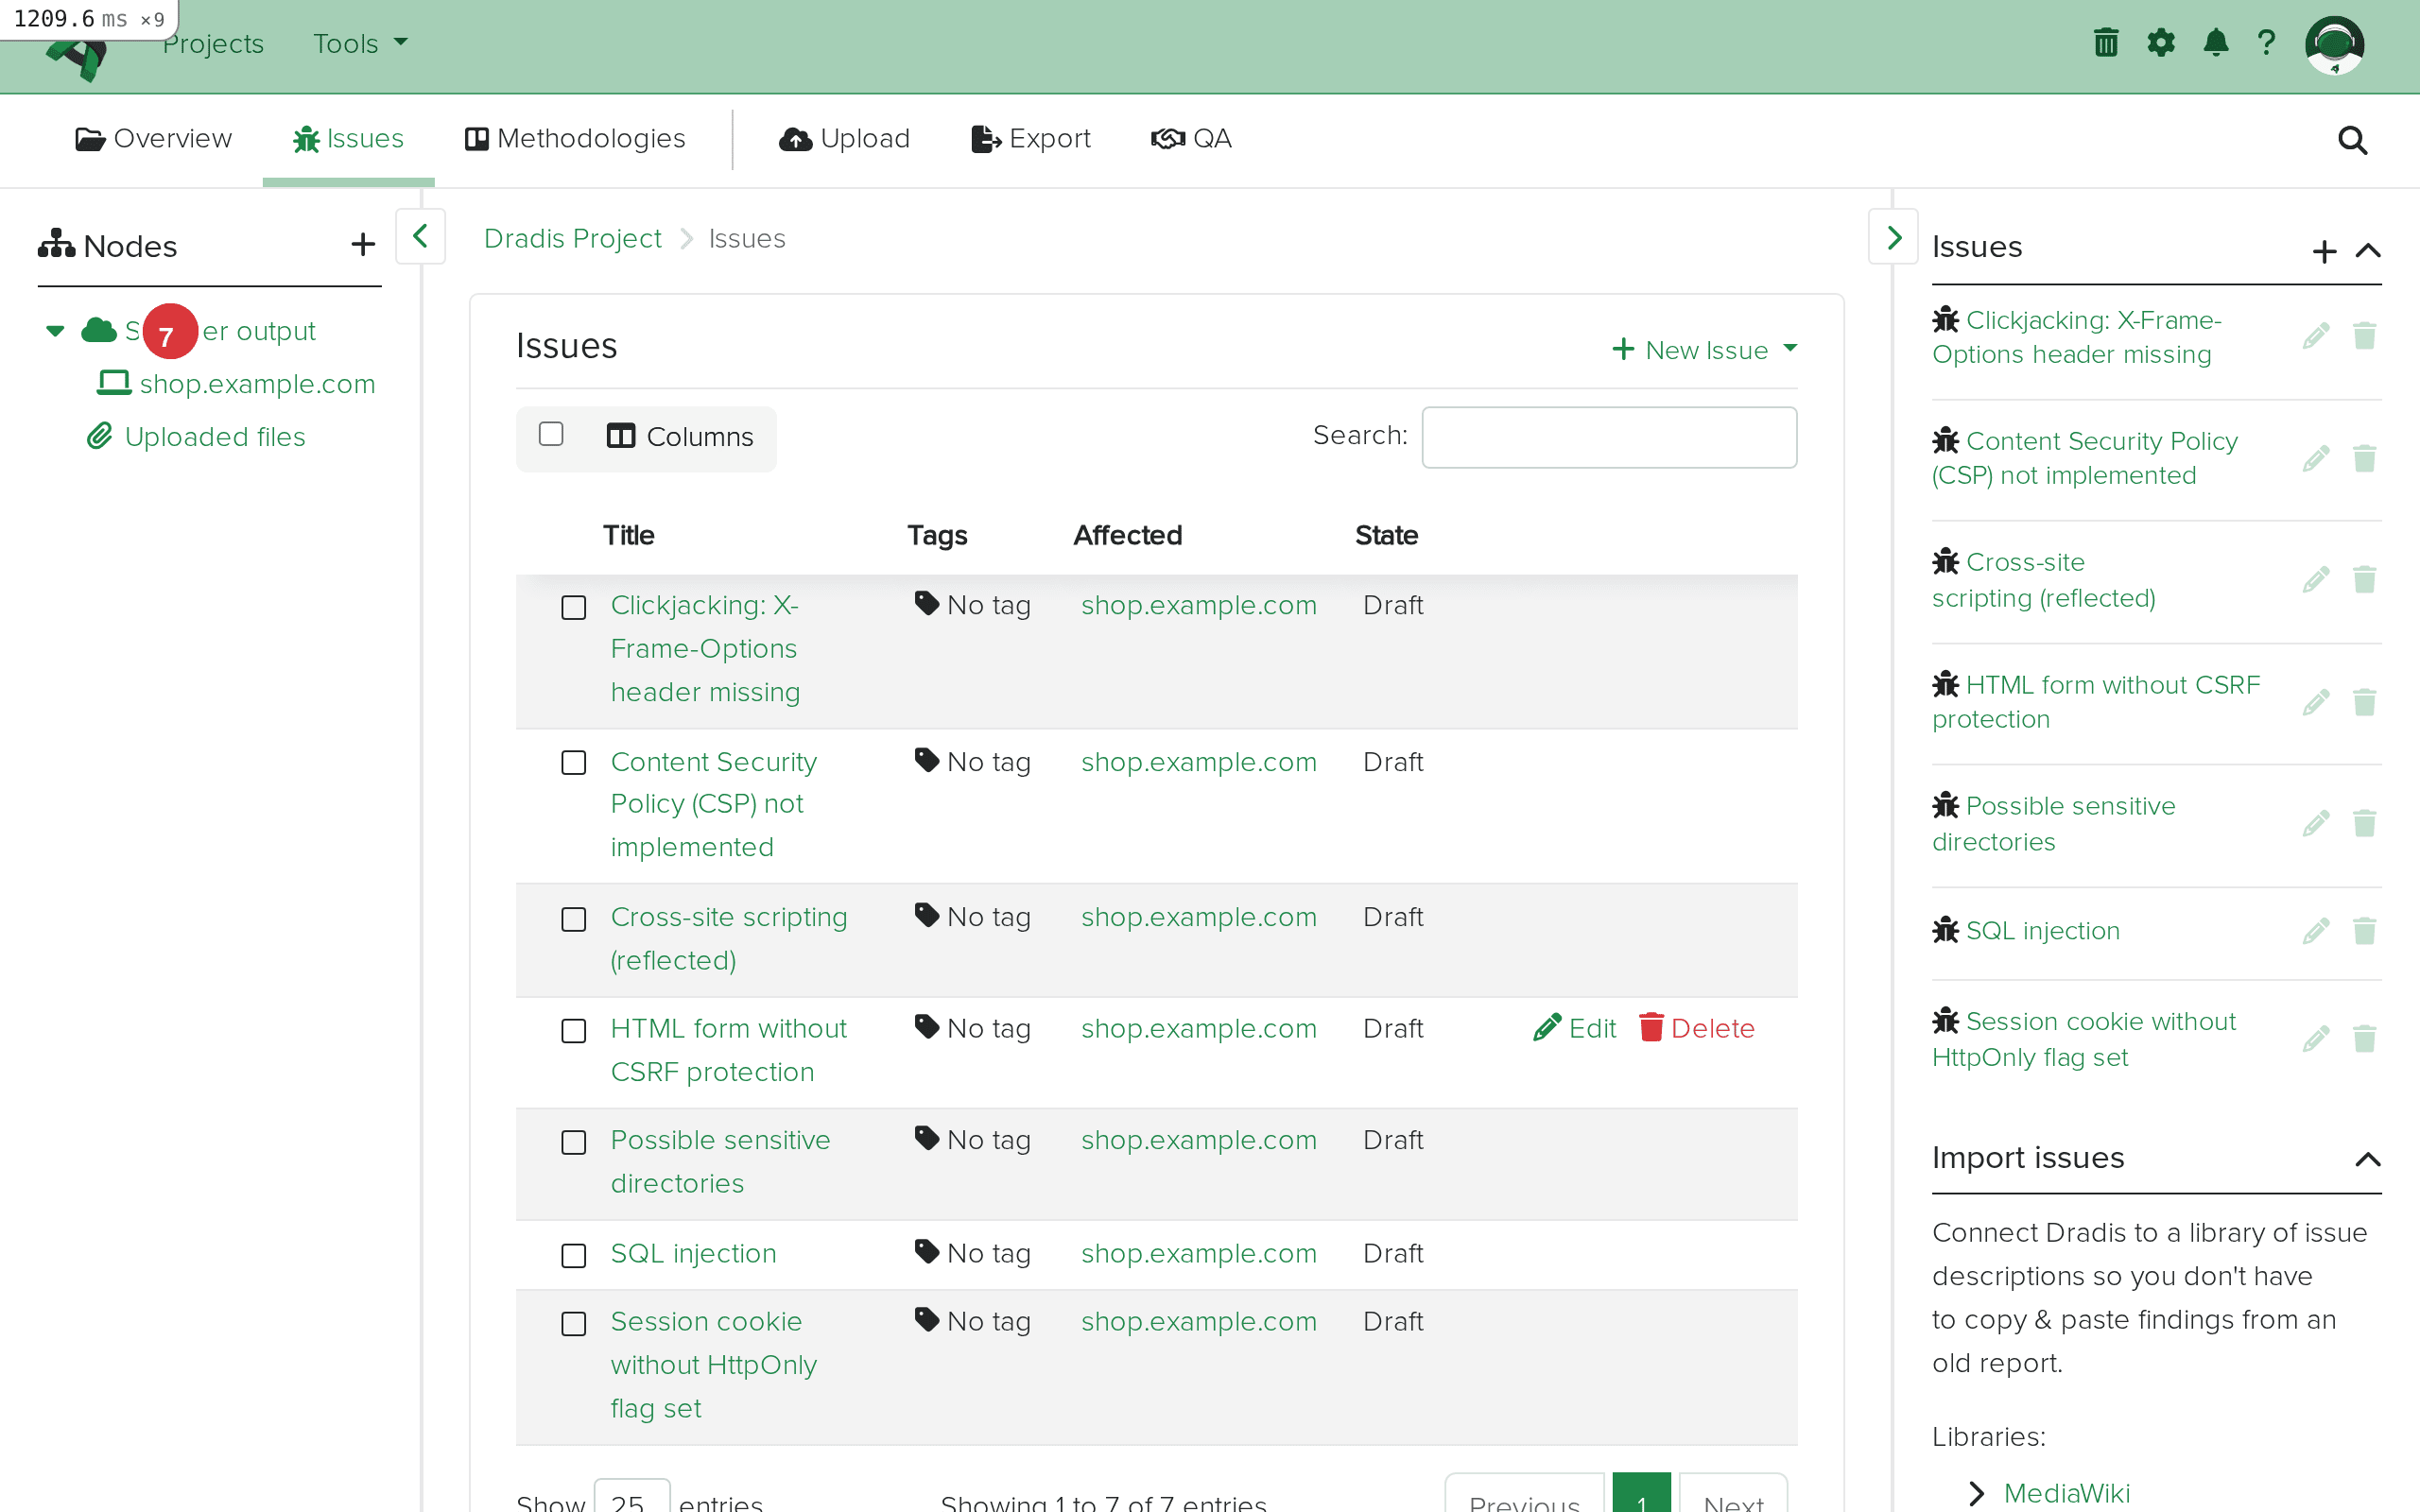
The import log shows each vulnerability being processed. You will see messages indicating when new Issues are created and when Evidence entries are added linking those Issues to the host Node. At the end, the log confirms a successful import. In our sample scan of shop.example.com, seven ReportItems spanning high, medium, low, and informational severities produced seven Issues and seven Evidence entries, all linked to the shop.example.com Node. The findings include SQL Injection, Cross-site scripting (reflected), HTML form without CSRF protection, Session cookie without HttpOnly flag, Clickjacking via missing X-Frame-Options, Content Security Policy not implemented, and Possible sensitive directories.
Navigate to the Issues tab to see all imported Acunetix findings. Each unique vulnerability type (identified by the ModuleName/Name combination) appears as a single row with its title and linked hosts.
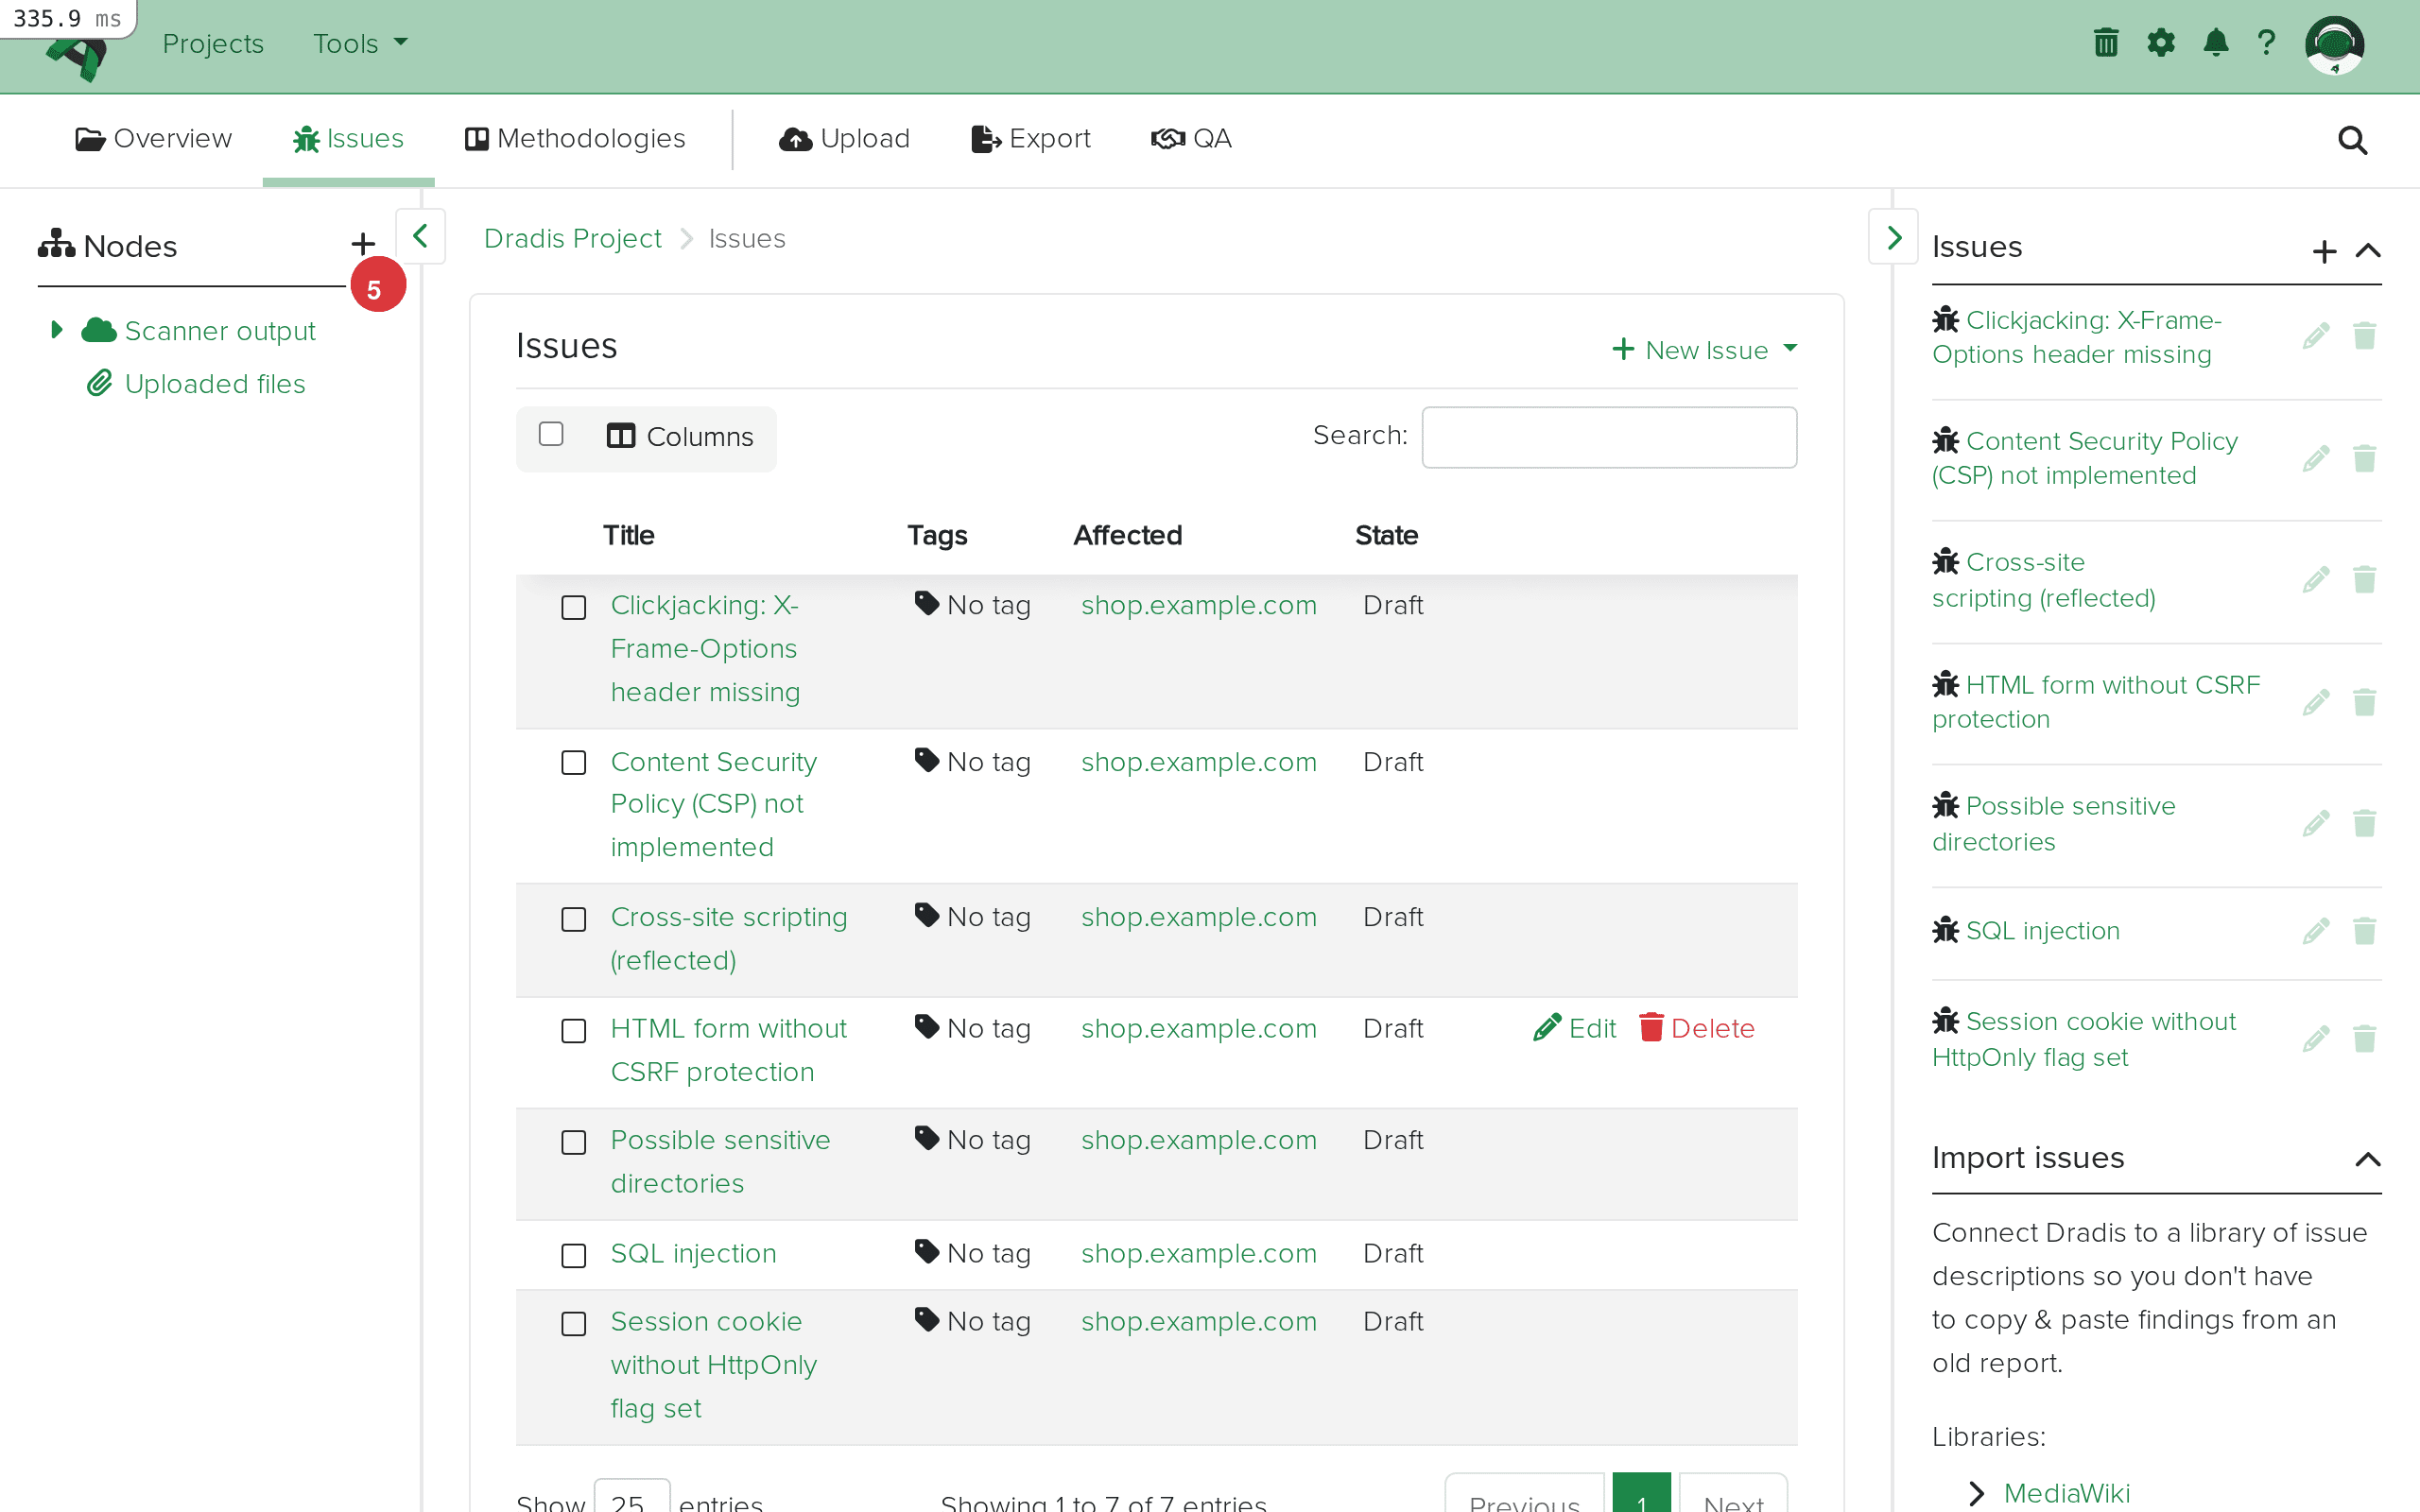
The issues list provides an immediate overview of your scan results. Acunetix findings span the full severity spectrum – in a typical web application scan, you will see high-severity injection vulnerabilities like SQL Injection and Cross-site Scripting at the top, medium-severity configuration issues like missing CSRF protection and insecure cookie flags in the middle, and low or informational findings like missing security headers and sensitive directory discovery at the bottom. This makes the Dradis Issues tab an effective triage dashboard where you can sort by severity and prioritize your verification and reporting work.
Click any Issue to view its complete contents. The detail view displays all fields imported from the Acunetix XML, formatted according to the plugin's field mapping.
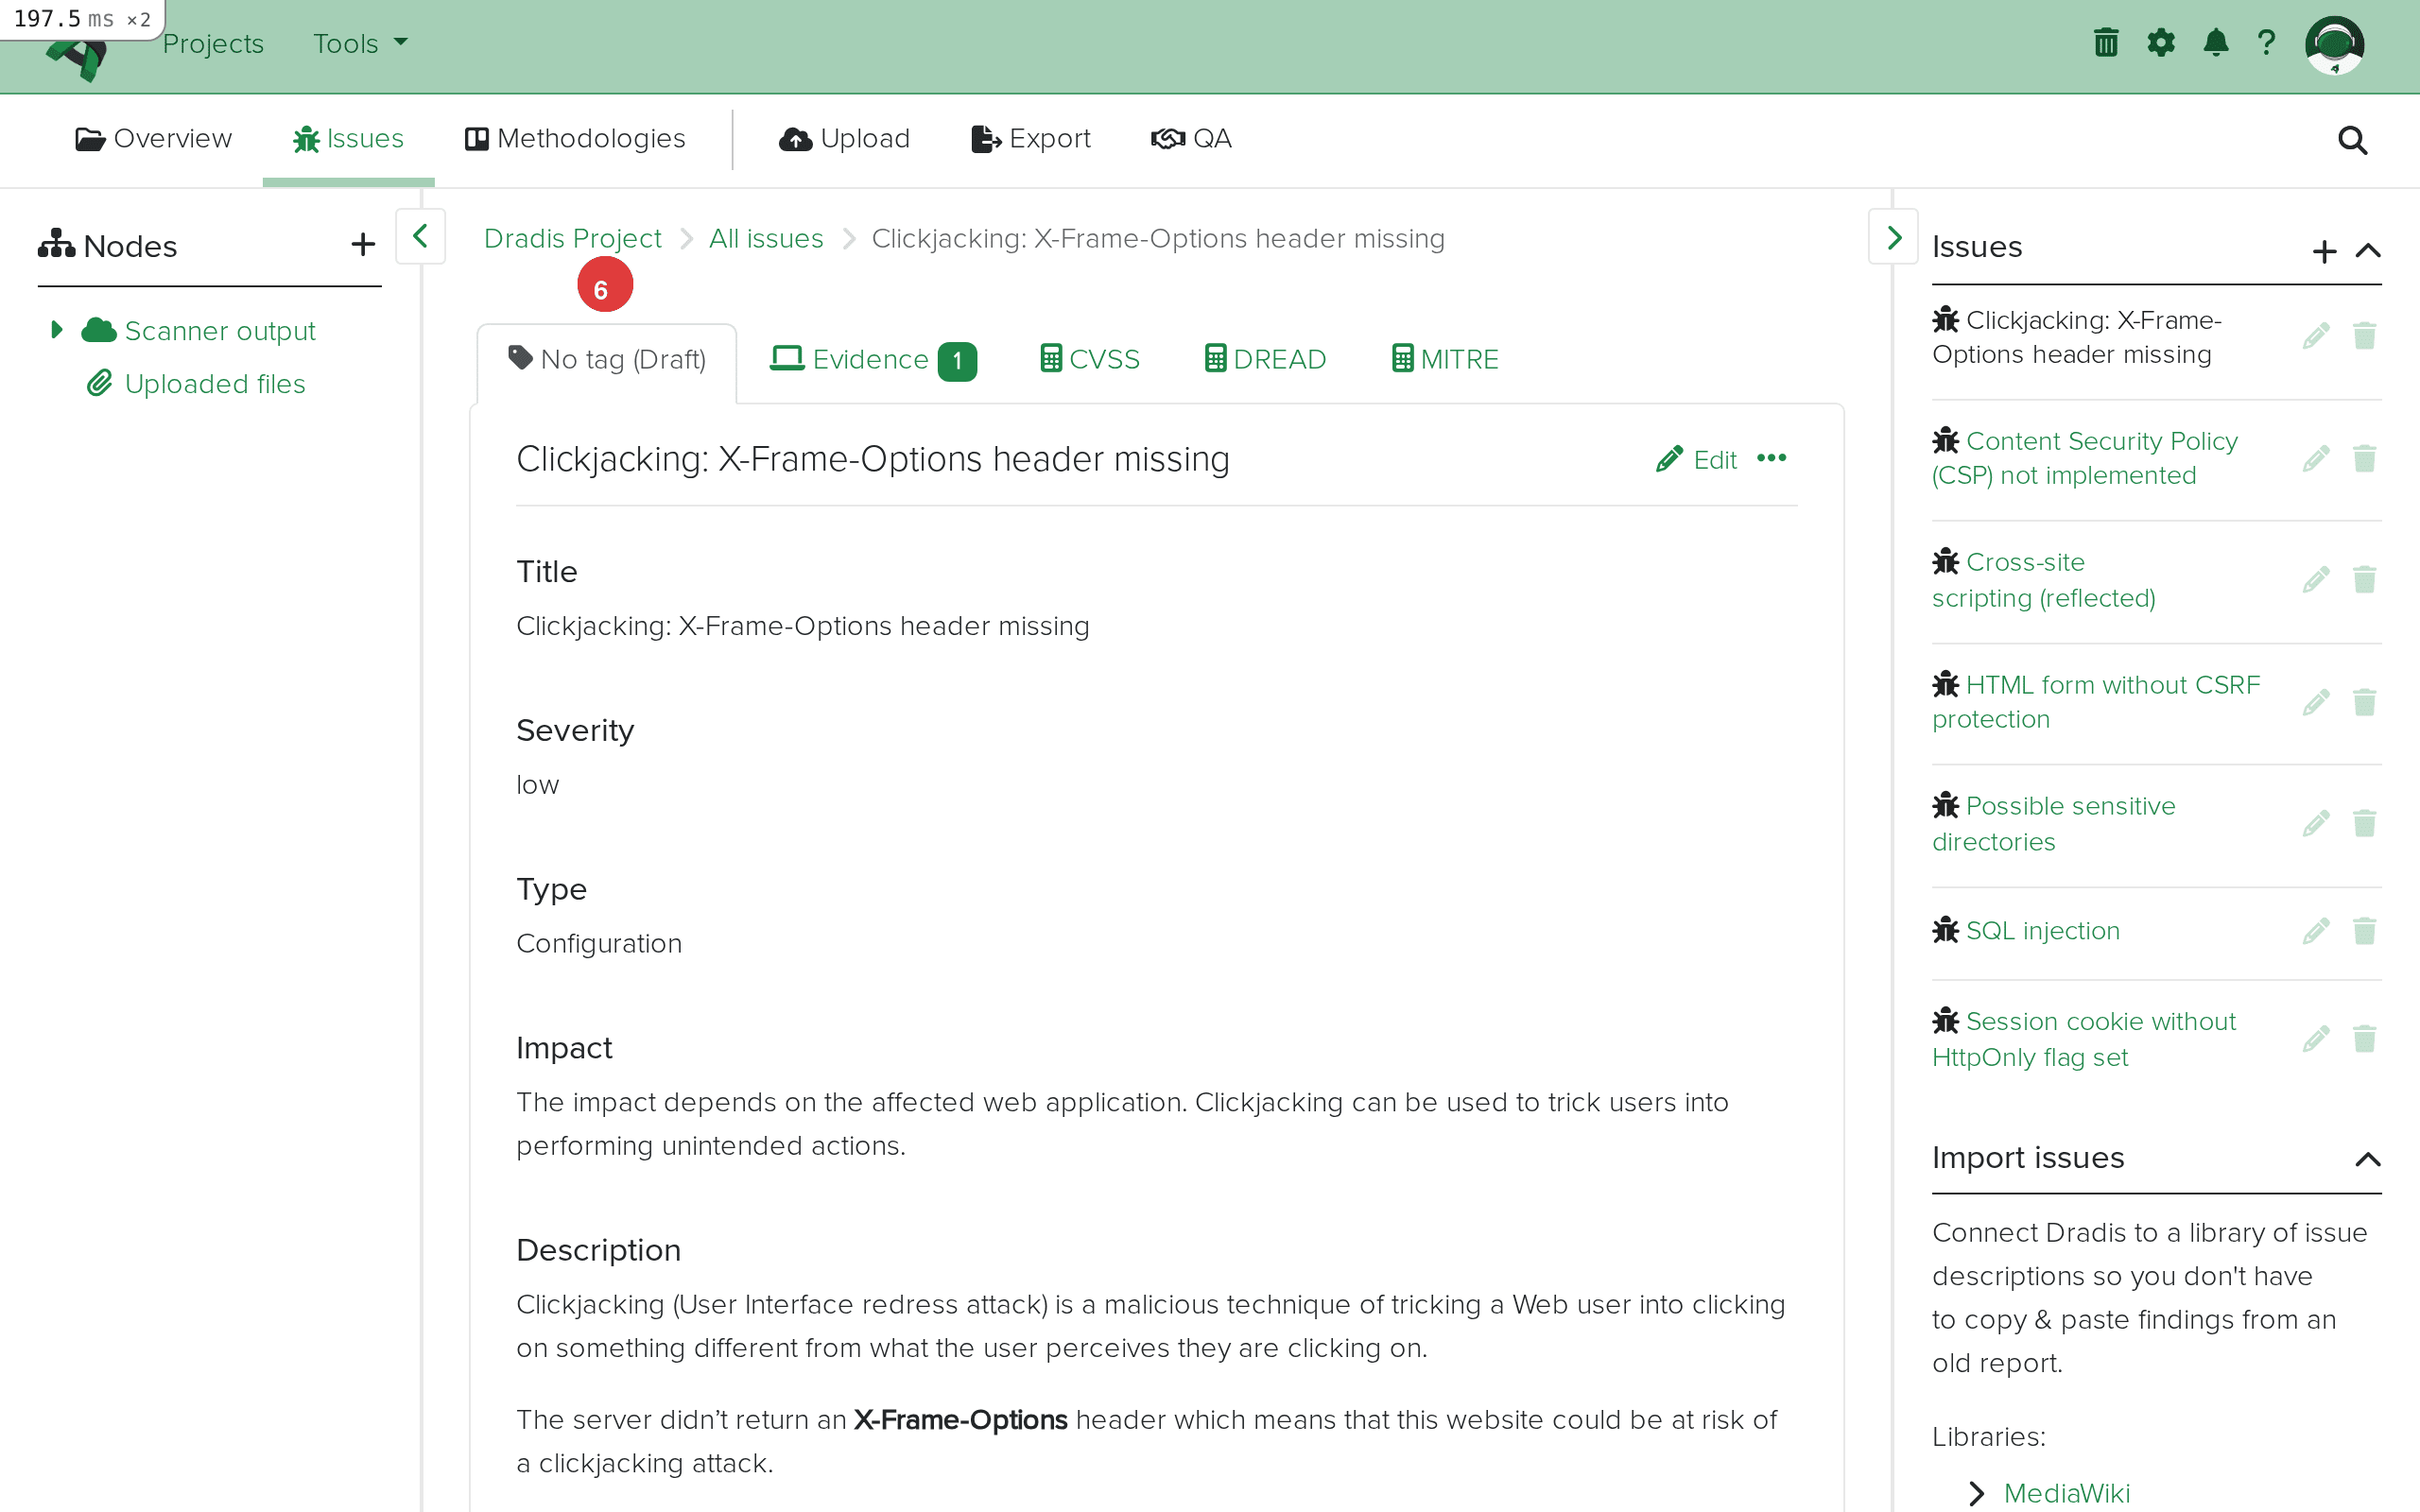
The Issue detail view includes the vulnerability title, severity level, type classification, impact description, a detailed technical description of the vulnerability, step-by-step remediation guidance, and CVSS scoring information. For findings with associated CVEs, the CVEList field provides direct references to the National Vulnerability Database. The References field often includes links to OWASP documentation, CWE entries, and Acunetix's own vulnerability knowledge base. This level of detail means you rarely need to look up additional information when writing your report – the Acunetix plugin preserves the scanner's comprehensive vulnerability documentation, and you can reference it directly using Dradis template placeholders like {{ acunetix[report_item.description] }} and {{ acunetix[report_item.recommendation] }}.
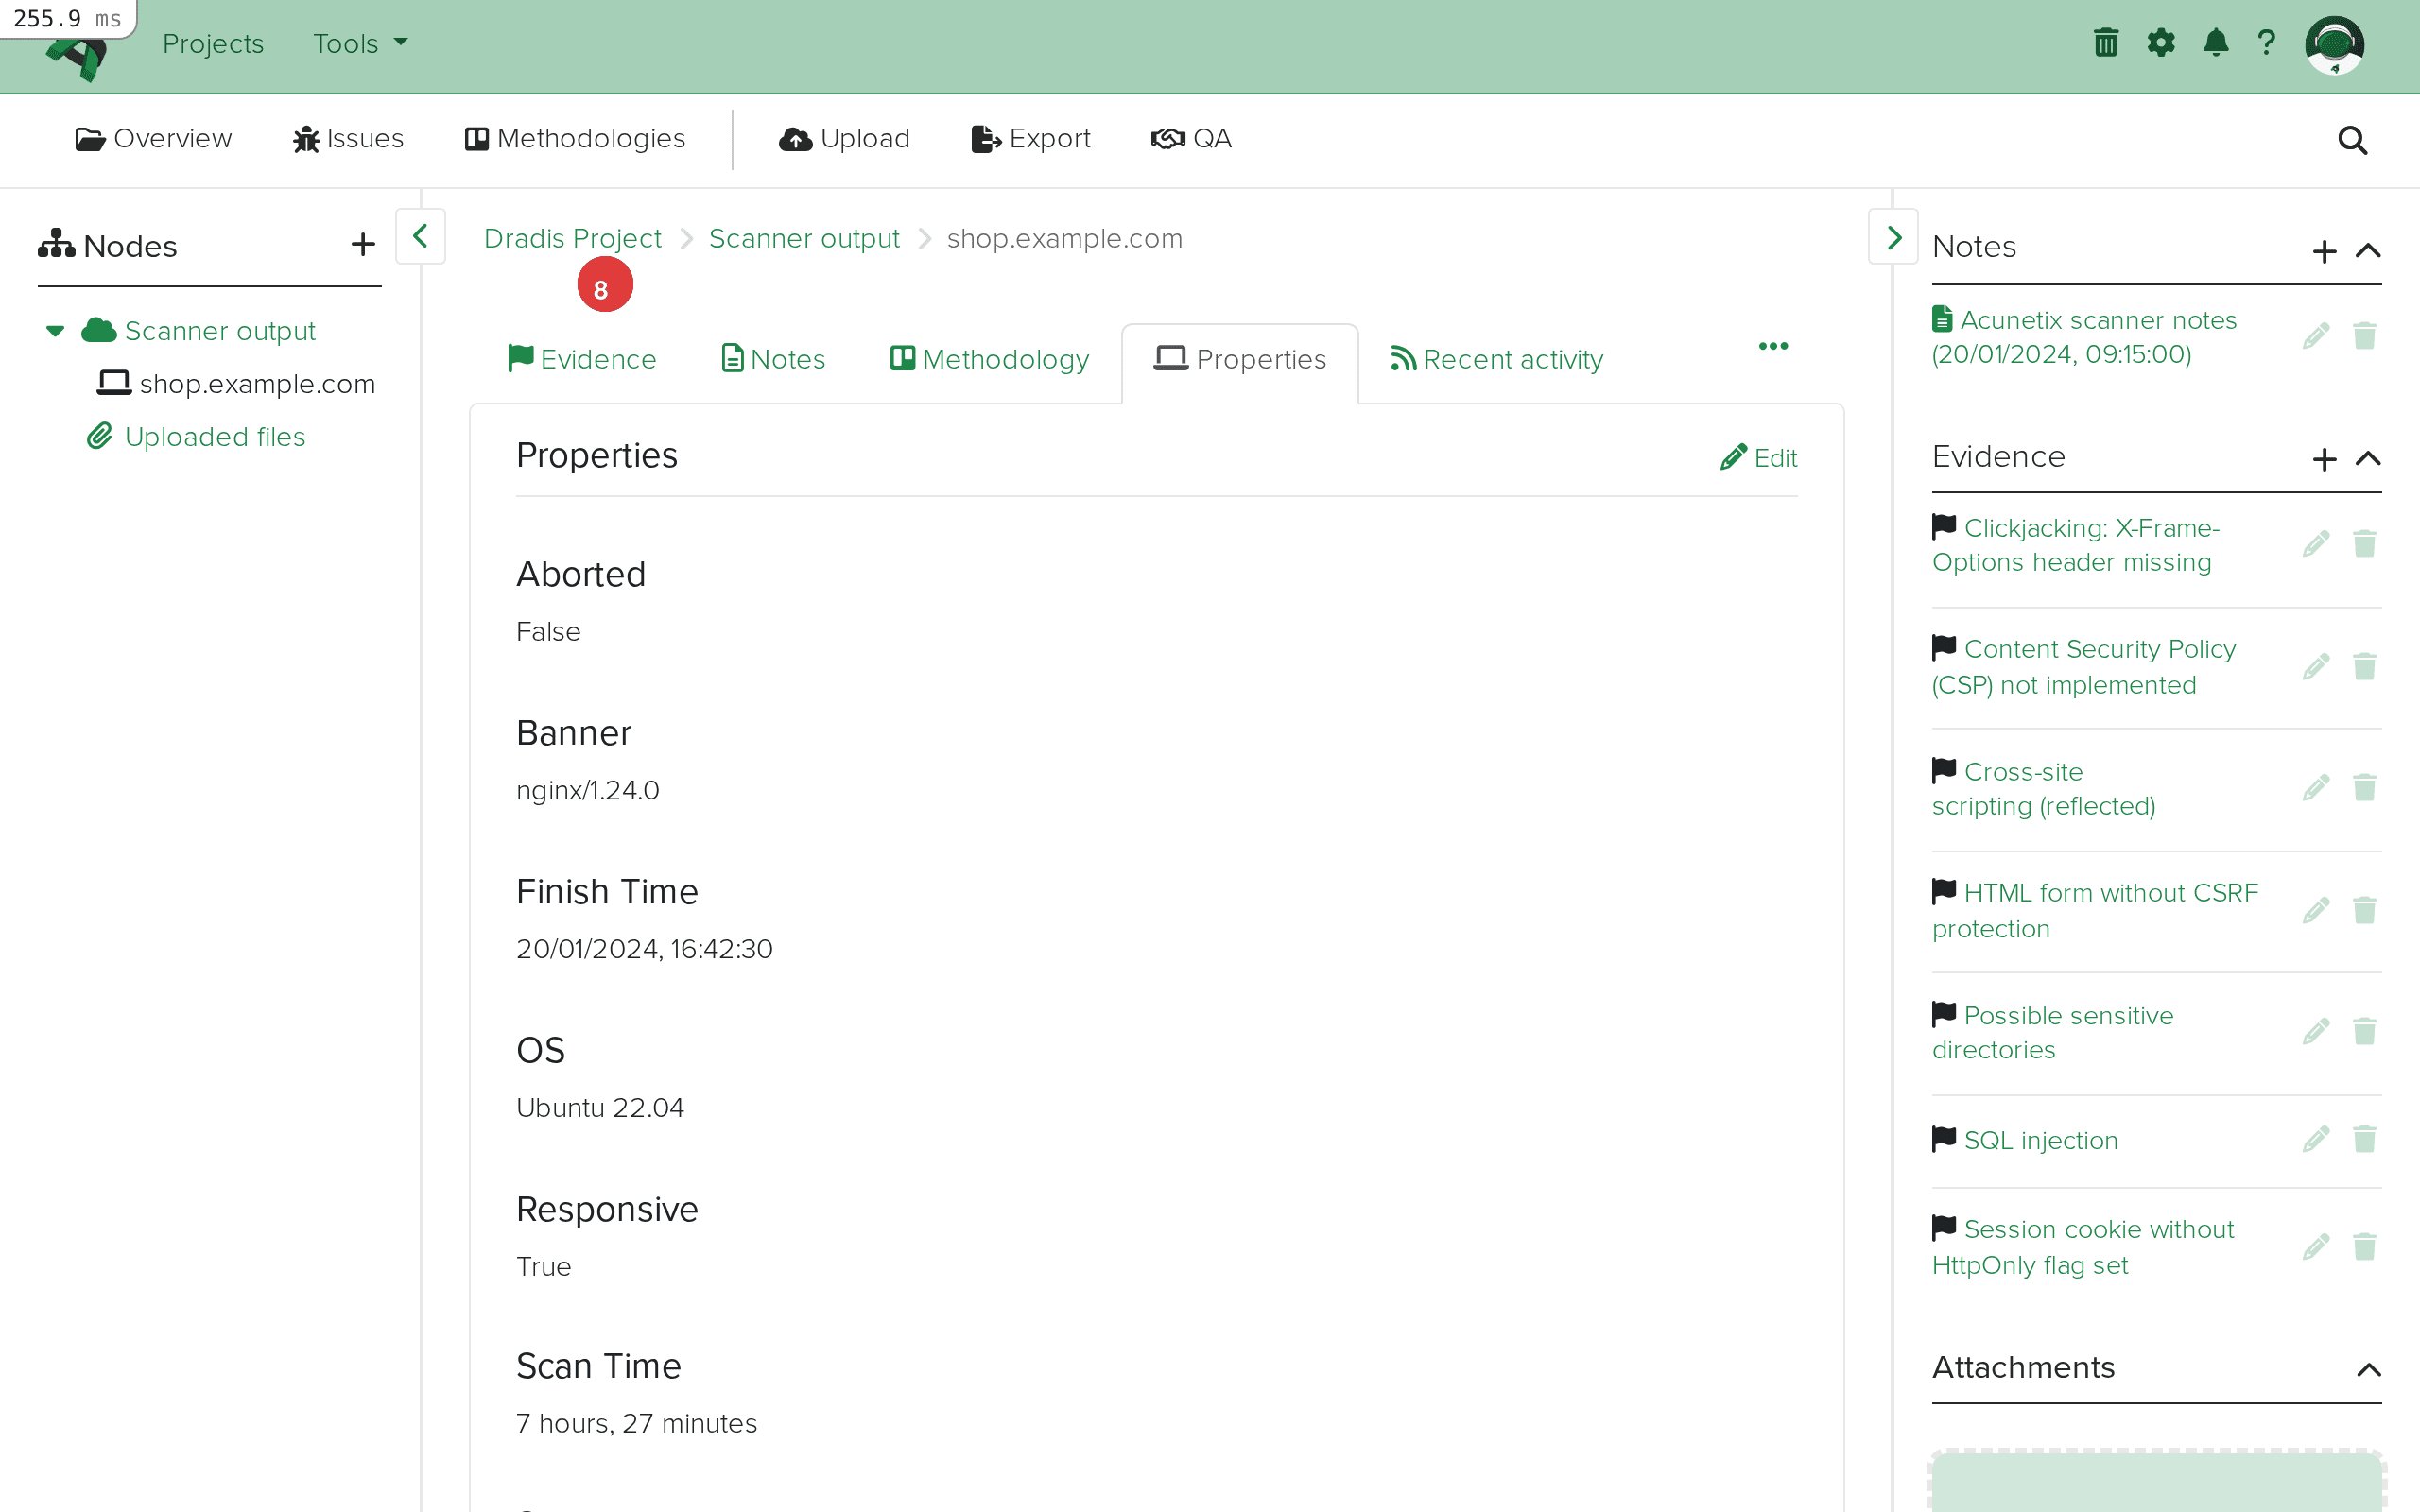
The sidebar tree shows the host Nodes created from your Acunetix scan. Expand the Scanner output node to see each scan target. The plugin creates one Node per unique hostname extracted from the StartURL element.
In our example, the scan targeted shop.example.com, which appears as a single Node under Scanner output. If your Acunetix export covered multiple targets (perhaps imported from separate XML files), each hostname would appear as its own Node. The scan summary Note is attached to the Node, providing context about when the scan ran, what technologies were detected, and whether the scan completed successfully or was aborted.
Click the host Node to see its properties. The scan summary Note displays the scan name, start URL, timing information (start time, finish time, total duration), and a server fingerprint section showing the detected web server software, operating system, and application technologies. This metadata is valuable for report context – you can reference the server fingerprint when discussing configuration findings, and the scan timing information when documenting your assessment timeline.
The Evidence sidebar on the host Node lists every finding linked to this target. Each Evidence entry shows the Issue it relates to, letting you quickly see which vulnerabilities affect this particular host. Click any entry to drill into the instance-specific details.
Click an Evidence entry on the host Node to see the instance-specific finding data. Evidence entries represent the per-URL, per-parameter details that connect an Issue to the location where it was found.
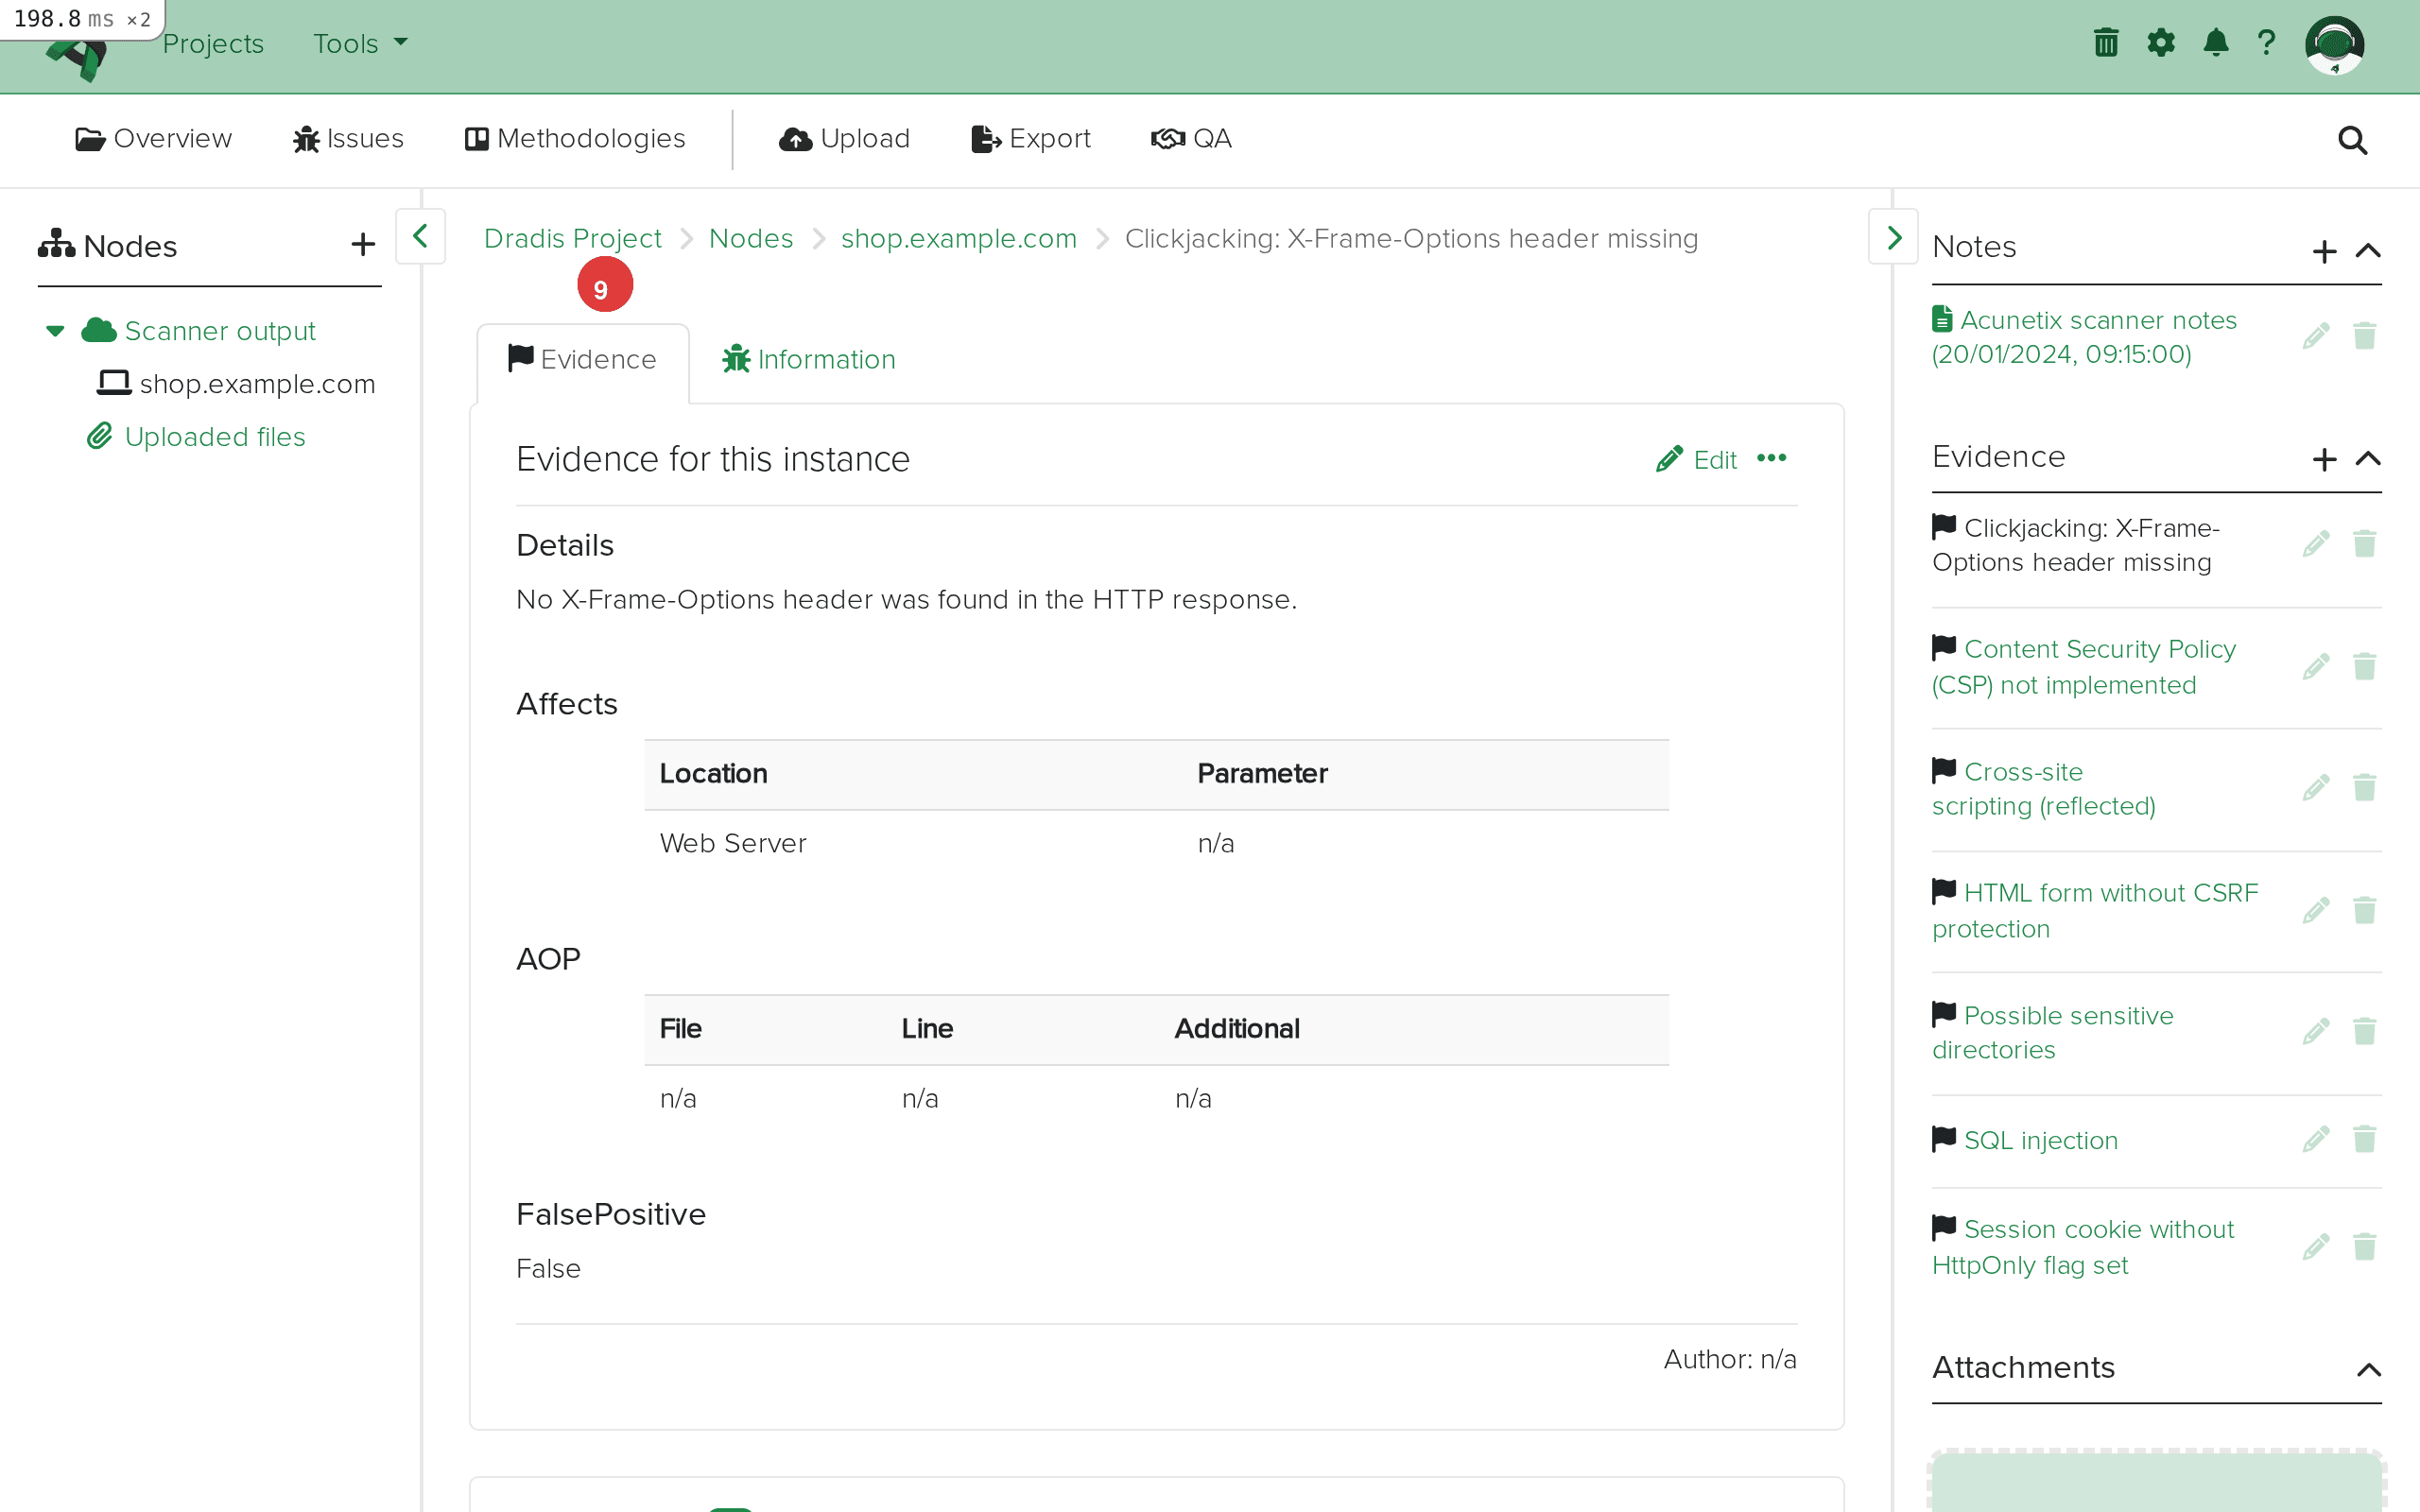
The Evidence detail view shows the affected URL (via the affects field), the vulnerable parameter (when applicable), and instance-specific technical details. For injection vulnerabilities like SQL Injection, the Evidence captures which endpoint and parameter were exploitable – for example, /products.php with parameter category. For server-level findings like missing security headers, the Evidence indicates which page or resource was tested. The false positive flag (is_false_positive) is also preserved, allowing you to track which findings Acunetix itself flagged as potential false positives.
The Acunetix Origin Pinpointing (AOP) fields are particularly noteworthy in the Evidence view. When Acunetix can trace a web vulnerability back to the application's source code, the AOP fields show the source file path (aop_source_file) and line number (aop_source_line). This capability is uncommon for DAST tools and provides a direct bridge between your security testing results and the development team's remediation work. Not every finding will have AOP data – it depends on the application's technology stack and Acunetix's ability to correlate the dynamic finding with source code – but when present, it significantly accelerates fix implementation.
Acunetix uses four severity levels that map directly to Dradis fields:
| Acunetix Severity | Description | Typical Findings |
|---|---|---|
| high | Critical vulnerabilities that allow direct compromise | SQL Injection, XSS (reflected/stored), Remote Code Execution, Authentication Bypass |
| medium | Significant issues requiring prompt attention | Missing CSRF protection, insecure cookie flags (HttpOnly), directory traversal |
| low | Minor issues with limited immediate impact | Missing security headers (X-Frame-Options, CSP), clickjacking risks |
| informational | Non-vulnerability observations and reconnaissance data | Discovered directories, technology fingerprints, TRACE method enabled |
These severity values import directly into the {{ acunetix[report_item.severity] }} field in Dradis. Unlike some scanners that use numeric codes (ZAP uses 0-3, for instance), Acunetix provides human-readable severity strings, which means you can use them directly in report templates without additional mapping or translation.
Acunetix also provides CVSS v2 and CVSS v3 scores alongside the four-tier severity level. The CVSS scores offer a more granular risk measurement – a "high" severity finding might have a CVSS v3 base score of 8.6 or 9.8 depending on the specific vulnerability characteristics. In your report templates, you can choose to display either the Acunetix severity, the CVSS score, or both, depending on your client's risk framework preference. Many penetration testers use the Acunetix severity for high-level triage in the executive summary and the CVSS v3 score for detailed risk quantification in the technical findings section.
Acunetix includes a false positive flag in its XML output for findings that its heuristics identified as potentially inaccurate. The Dradis plugin preserves this flag in the Evidence field {{ acunetix[evidence.is_false_positive] }}. When reviewing imported findings, check this field before including a finding in your report. Acunetix's false positive detection is not always definitive – both false positives and missed detections are possible – so treat the flag as a starting point for manual verification rather than an authoritative classification.
In Dradis Pro, you can use the Rules Engine to automatically tag findings where is_false_positive is set to True, making it easy to filter them out during triage or flag them for a separate manual verification pass. This saves considerable time on large scan results where dozens of findings may carry the false positive flag.
Acunetix Origin Pinpointing (AOP) sets Acunetix apart from most other DAST tools. When AOP data is available, the Evidence fields aop_source_file, aop_source_line, and aop_additional provide developers with the exact code location to fix. This transforms your pentest report from a generic "there is an XSS vulnerability on the search page" to a precise "there is an XSS vulnerability on the search page, originating from line 47 of search.php."
Include AOP data in your Evidence templates when preparing remediation-focused reports for development teams. The source file and line information dramatically reduces the time developers spend locating and fixing vulnerabilities. In your Dradis Pro report template, you can add a section that includes AOP data when present:
#[AOPSourceFile]#
{{ acunetix[evidence.aop_source_file] }}

#[AOPSourceLine]#
{{ acunetix[evidence.aop_source_line] }}

#[AOPAdditional]#
{{ acunetix[evidence.aop_additional] }}
Not all findings will have AOP data populated. Server configuration issues (missing headers, cookie flags) typically lack source code correlation because they are not tied to application code. Injection and scripting vulnerabilities are more likely to have AOP data, especially when the target application runs on a technology stack that Acunetix can instrument.
Acunetix provides excellent coverage for common web vulnerabilities, but no single DAST tool catches everything. A thorough web application assessment typically combines multiple scanners to maximize coverage:
When you import results from multiple web scanners into the same Dradis project, each scanner creates its own Issues and Evidence. If Acunetix finds SQL Injection on /products.php?category=1 and Burp finds the same vulnerability on the same endpoint, you will have two separate Issues (one from each scanner) but they will share the same host Node if the hostname or IP matches. This cross-validation strengthens your findings – you can note in your report that the vulnerability was independently confirmed by multiple scanners, which increases client confidence in the finding.
The scan summary Note that the Acunetix plugin creates on each host Node is often overlooked but contains valuable intelligence for your report. The fingerprint section shows:
Apache/2.4.41 (Ubuntu))This fingerprint data is useful when writing the "Methodology" or "Scope" section of your report, and it provides supporting context for server-level findings. For example, if Acunetix detects that the server is running an outdated version of Apache, the fingerprint data in the scan Note corroborates that finding. Include {{ acunetix[scan.technologies] }} in your report to show what frameworks and languages were detected, helping clients understand which vulnerability classes were relevant to their technology stack.
The timing fields (scan.start_time, scan.finish_time, scan.scan_time) are also useful for documenting your assessment timeline. The scan.aborted field indicates whether the scan completed normally or was stopped prematurely, which is important context if the scan results are incomplete.
Acunetix is fundamentally a DAST (Dynamic Application Security Testing) tool – it tests running web applications by sending requests and analyzing responses, similar to how an attacker would interact with the application from the outside. This is in contrast to SAST (Static Application Security Testing) tools like Brakeman that analyze source code without running the application.
The distinction matters for your Dradis reports because DAST findings represent externally observable vulnerabilities. Every Acunetix finding means the scanner was able to detect the issue from an external perspective, which typically means a real attacker could do the same. SAST findings, by contrast, may identify code-level issues that are not externally exploitable due to other compensating controls. When combining Acunetix (DAST) and Brakeman (SAST) results in the same Dradis project, make this distinction clear in your report methodology to help clients prioritize remediation appropriately.
The AOP feature in Acunetix partially bridges this gap by correlating dynamic findings with source code locations, giving you some of the benefits of SAST-style reporting from a DAST tool. This makes Acunetix findings with AOP data particularly actionable because they combine the "externally exploitable" confirmation of DAST with the "here is the vulnerable code" precision of SAST.
Acunetix scans of large web applications can produce XML files with hundreds of ReportItems. When importing large results:
If the import completes but no Issues or Nodes appear, verify the following:
Dradis::Plugins::Acunetix::Standard, not Acunetix::Acunetix360. The two formats have different XML schemas and are not interchangeable. Open your file in a text editor: Standard Acunetix XML typically contains <Scan> elements with <ReportItems> inside, while Acunetix 360 uses a different structure entirely.<ReportItem> within a <Scan> block. If Acunetix completed the scan but found no vulnerabilities, the XML will have an empty <ReportItems> container, and Dradis will correctly import nothing.If Issues appear in the Issues tab but no Evidence entries link to the host Node, the XML file may lack the per-instance detail fields. This can happen when:
<Affects> or <Parameter> elements were removedRe-export from Acunetix with full detail enabled to include per-finding instance data.
The scan summary Note is created from the <Scan> element's metadata fields (name, start URL, timing information, fingerprint data). If your XML file lacks these parent-level elements – for example, if it was generated by a script that only included ReportItems – the plugin may skip the Note creation while still importing Issues and Evidence successfully. This is harmless but means you lose the scan context metadata.
Not all Acunetix findings include CVSS scores. Informational and some low-severity findings may have empty CVSS fields in the XML, which results in empty placeholders in Dradis. This is expected behavior – Acunetix only assigns CVSS scores to findings where the scoring framework is applicable. When building report templates in Dradis Pro, consider using conditional logic to hide CVSS sections when the score is blank, or display "N/A" as a fallback for findings without scores.
Acunetix XML may contain HTML-formatted content within description and recommendation fields, using CDATA sections or encoded HTML entities. The Dradis plugin preserves this content as-is. If you see raw HTML tags in your Issue descriptions when viewing them in the Dradis interface, they will typically render correctly because Dradis processes content through its Textile markup engine. In Dradis Pro report templates, the HTML content is converted appropriately for Word or PDF output.
If you import the same Acunetix XML file twice into the same project, the plugin will create duplicate Evidence entries because it cannot determine that the same Evidence already exists from a previous import. Issues are deduplicated by the ModuleName/Name key, so you will not get duplicate Issues, but the Evidence count will double. To avoid this, delete the existing Scanner output Node and its children before re-importing, or create a fresh project for the new import.
| Feature | Community Edition | Professional |
|---|---|---|
| Acunetix Standard import | Yes | Yes |
| Default field mapping | Fixed template | Customizable via Mappings Manager |
| Custom Issue/Evidence templates | No | Yes – remap any Acunetix field to any Dradis field |
| AOP data in reports | Manual formatting | Automated with template variables and conditional sections |
| Rules Engine | No | Yes – auto-tag by severity, CVSS score, or false positive flag |
| Report generation | Manual (HTML export) | Automated Word/Excel reports with Acunetix field placeholders |
| Integration with ticketing | No | Yes – push findings to Jira/ServiceNow as remediation tickets |
The Mappings Manager in Pro is especially valuable for Acunetix imports because of the extensive field set the plugin provides. You can build Issue templates that display CVSS v3 scores alongside the four-tier severity rating, Evidence templates that highlight AOP source file and line data for developer-facing remediation reports, and conditional sections that suppress empty fields when a particular finding lacks CVSS or AOP data. The Rules Engine can automatically tag high-severity findings for immediate attention, mark false-positive-flagged items for review, and categorize findings by type for structured reporting workflows.
After importing your Acunetix results into Dradis:
is_false_positive Evidence field for flagged items. Investigate each flagged finding and remove confirmed false positives from your report scope, but document your verification process.Yes. Dradis ships with two separate plugins: Dradis::Plugins::Acunetix::Standard for classic Acunetix WVS XML exports, and Dradis::Plugins::Acunetix::Acunetix360 for the Acunetix 360 / Invicti platform format. The two XML schemas are different and not interchangeable, so you must select the correct plugin for your file format. This guide covers the Standard plugin for classic Acunetix WVS exports.
Yes. Each import adds new Issues, Evidence, Nodes, and Notes to the existing project. Issues are deduplicated by the ModuleName/Name combination, so if the same vulnerability type appears in a second scan, the plugin creates new Evidence entries linking to the existing Issue rather than creating a duplicate. Host Nodes are reused when the hostname matches, so findings from multiple scans of the same target are consolidated under a single Node.
Acunetix severity levels (high, medium, low, informational) are imported as-is into the {{ acunetix[report_item.severity] }} field. They are not converted to a numeric scale or mapped to a different rating system. In Dradis Pro, you can use the Mappings Manager to remap these values to your organization's preferred severity scale or combine them with the CVSS scores for a more nuanced risk presentation.
Yes. The Acunetix plugin imports CVSS v3 base score, temporal score, environmental score, and the full CVSS v3 vector string. These are stored in separate fields (cvss3_score, cvss3_tempscore, cvss3_envscore, cvss3_descriptor) and can be referenced individually in report templates. If Acunetix did not calculate a particular score for a finding, the corresponding field will be empty in Dradis.
If you run both authenticated and unauthenticated Acunetix scans against the same target, import both XML files into the same Dradis project. The host Node is shared because the hostname matches, and issues are deduplicated by ModuleName/Name. Findings from the authenticated scan that were not present in the unauthenticated scan will appear as new Evidence entries, giving you a clear picture of what is exposed to anonymous users versus authenticated users. You can distinguish the scan context using the scan summary Notes, which include the scan name and timing for each import.
AOP is a feature in Acunetix that attempts to correlate dynamically discovered web vulnerabilities with the specific source code file and line number responsible. When available, this data imports into the Evidence fields aop_source_file, aop_source_line, and aop_additional. AOP is not available for all findings or all technology stacks, but when present, it provides developers with precise remediation targets. This is a distinctive capability that most other DAST tools do not offer.
Loading form...
Your email is kept private. We don't do the spam thing.